Deploy Immuta on OpenShift
Audience: System Administrators
Content Summary: This page outlines how to deploy Immuta on OpenShift.
Immuta OpenShift Support
Immuta officially supports OpenShift 4 (versions supported by Red Hat) and does not support OpenShift 3.
1 - Create a Project
Run the following command in your terminal:
oc create-project immuta
2 - Determine Values for runAsUser and fsGroup
The Immuta Helm Chart must be configured to set two values within the approved ranges for the
OpenShift project Immuta is being deployed into: runAsUser and fsGroup.
runAsUser: On a Pod SecurityContext, this field defines the user ID that will run the processes within the pod. In the next step, this can be set to any value within the range defined insa.scc.uid-range. See details below.fsGroup: This field defines a group ID that will be added as a supplemental group to the Pod. Files inPersistentVolumeswill be writable by this group ID. In the next step, this must be set to the minimum value in the range defined insa.scc.supplemental-groups. See details below.
View the approved ranges in OpenShift using one of the two methods below:
OpenShift Console
-
Navigate to the Project Details page and click the link under Annotations.
-
Take note of the values for
openshift.io/sa.scc.uid-rangeandopenshift.io/sa.scc.supplemental-groups.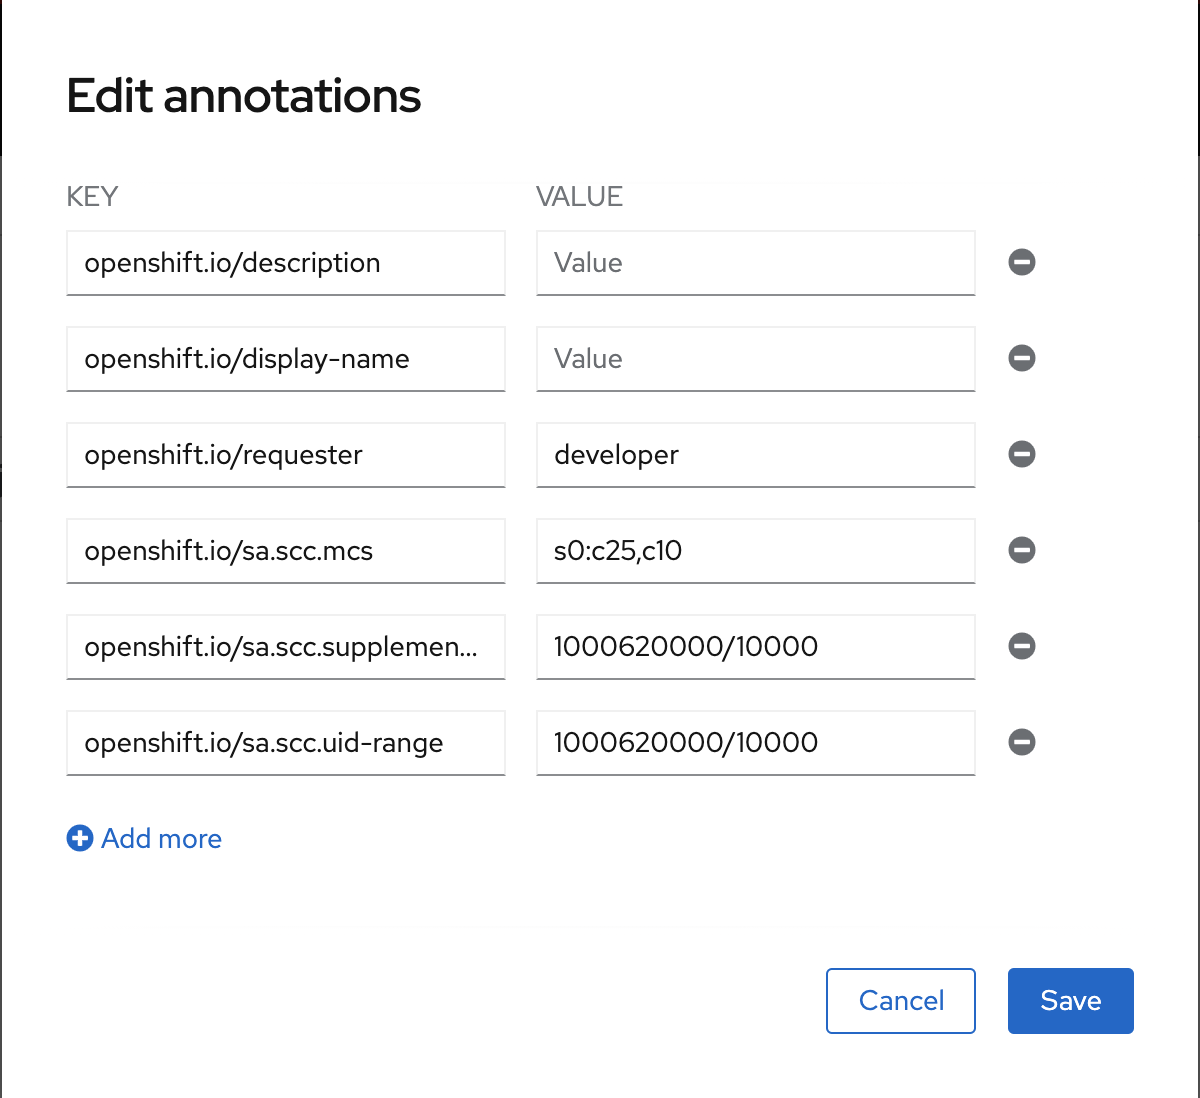
OpenShift CLI
Alternatively, use the OpenShift CLI to inspect the relevant values directly. For example,
$ oc get project immuta --output template='{{index .metadata.annotations "openshift.io/sa.scc.uid-range"}}{{"\n"}}'
1000620000/10000

$ oc get project immuta --output template='{{index .metadata.annotations "openshift.io/sa.scc.supplemental-groups"}}{{"\n"}}'
1000620000/10000
In both illustrations above, the first part of the value (leading up to the /) is the assigned user ID/group ID
range, and the second part (trailing the /) is the extent of the range.
For example, the minimum UID for sa.scc.uid-range=1000620000/10000 is 1000620000 and the maximum is 1000629999
(1000620000 + 10000).
For the examples throughout the rest of this tutorial, 1000620000 will be set as the value for
both runAsUser and fsGroup.
For more details on security context restraints and how the user and group ID ranges are allocated, see the OpenShift documentation.
3 - Create a Values File for Immuta
Set these OpenShift-specific Helm values in a YAML file that will be passed to helm install in the next step:
-
externalHostname: Set to a subdomain of the domain configured for the OpenShift Ingress controller. Contact your OpenShift administrator to get the configured domain if it is unknown. -
securityContext.runAsUser: Set this to a user ID in the range specified by the annotationopenshift.io/sa.scc.uid-rangein the OpenShift project for the following components:backup.securityContext.runAsUsercache.securityContext.runAsUserdatabase.securityContext.runAsUserfingerprint.securityContext.runAsUserqueryEngine.securityContext.runAsUserweb.securityContext.runAsUser
-
securityContext.fsGroup: Set this to the minimum value in the range defined insa.scc.supplemental-groupsin the OpenShift project for the following components:backup.securityContext.fsGroupdatabase.securityContext.fsGroupqueryEngine.securityContext.fsGroupweb.securityContext.fsGroup
-
patroniKubernetes.use_endpoints: Set tofalsefor the components below. This change is required for Patroni to be able to successfully elect a leader.database.patroniKubernetes.use_endpointsqueryEngine.patroniKubernetes.use_endpoints
-
queryEngine.clientService.type: Set toLoadBalancerso that a LoadBalancer will be created to handle the TCP traffic for the Query Engine. The LoadBalancer that OpenShift creates will have its own hostname/IP address, and you must update the Public Query Engine Hostname in Application Settings (instructions below). This step can be omitted if the Query Engine is not being used. -
web.ingress.enabled: Set tofalseto disable creation of Ingress resources for the Immuta Web Service. OpenShift provides its own Ingress controller for handling HTTP ingress, and this is configured by creating Routes.
Example Values File
externalHostname: immuta.apps.openshift-example-cluster.example.com
backup:
  securityContext:
    runAsUser: 1000620000
    fsGroup: 1000620000
cache:
  securityContext:
    runAsUser: 1000620000
database:
  patroniKubernetes:
    use_endpoints: false
  securityContext:
    runAsUser: 1000620000
    fsGroup : 1000620000
fingerprint:
  securityContext:
    runAsUser: 1000620000
queryEngine:
  clientService:
    type: LoadBalancer
  patroniKubernetes:
    use_endpoints: false
  securityContext:
    runAsUser: 1000620000
    fsGroup: 1000620000
web:
  ingress:
    enabled: false
  securityContext:
    runAsUser: 1000620000
    fsGroup: 1000620000
nginxIngress:
  enabled: false
4 - Install Immuta
Follow the standard Immuta deployment with Helm, but supply the additional
values file
using the --values flag in the helm install step.
helm install --values immuta-values.yaml --values openshift-values.yaml immuta immuta/immuta
5 - Configure Ingress
-
To set up ingress for Immuta using the OpenShift Ingress controller, get the CA certificate used by Immuta for internal TLS. This will be used by the OpenShift Ingress controller to validate the upstream TLS connection to Immuta.
kubectl get secret \ --selector=app.kubernetes.io/name=immuta,app.kubernetes.io/component=tls \ --output=go-template='{{index .items 0 "data" "ca.crt"|base64decode}}' > ca.crt -
Create a Route using the OpenShift CLI. The hostname flag should be set to match the value configured for
externalHostnamein the Helm values file, and it should be a subdomain of the domain that the OpenShift Ingress controller is configured for.oc create route reencrypt immuta-web \ --dest-ca-cert=ca.crt \ --hostname=immuta.apps.openshift-example-cluster.example.com \ --service=immuta-webThis will create a route to be served by the OpenShift Ingress controller. At this point, Immuta is installed and should be accessible at the configured hostname.
-
Run
kubectl get svc immuta-query-engine-clientsto inspect the Query Engine client's service in Kubernetes to get the assigned External IP address. For example,$ kubectl get svc immuta-query-engine-clients NAME TYPE CLUSTER-IP EXTERNAL-IP PORT(S) AGE immuta-query-engine-clients LoadBalancer 172.30.161.225 example.com 5432:31737/TCP,8008:31285/TCP 65m -
Copy the External-IP address. You will paste this value in the Immuta App Settings page to update the Public Query Engine Hostname.
- In the Immuta UI, click the App Settings icon in the left sidebar and scroll to the Public URLs section.
-
Enter the value you copied from the
EXTERNAL-IPcolumn in the Public Query Engine Hostname field.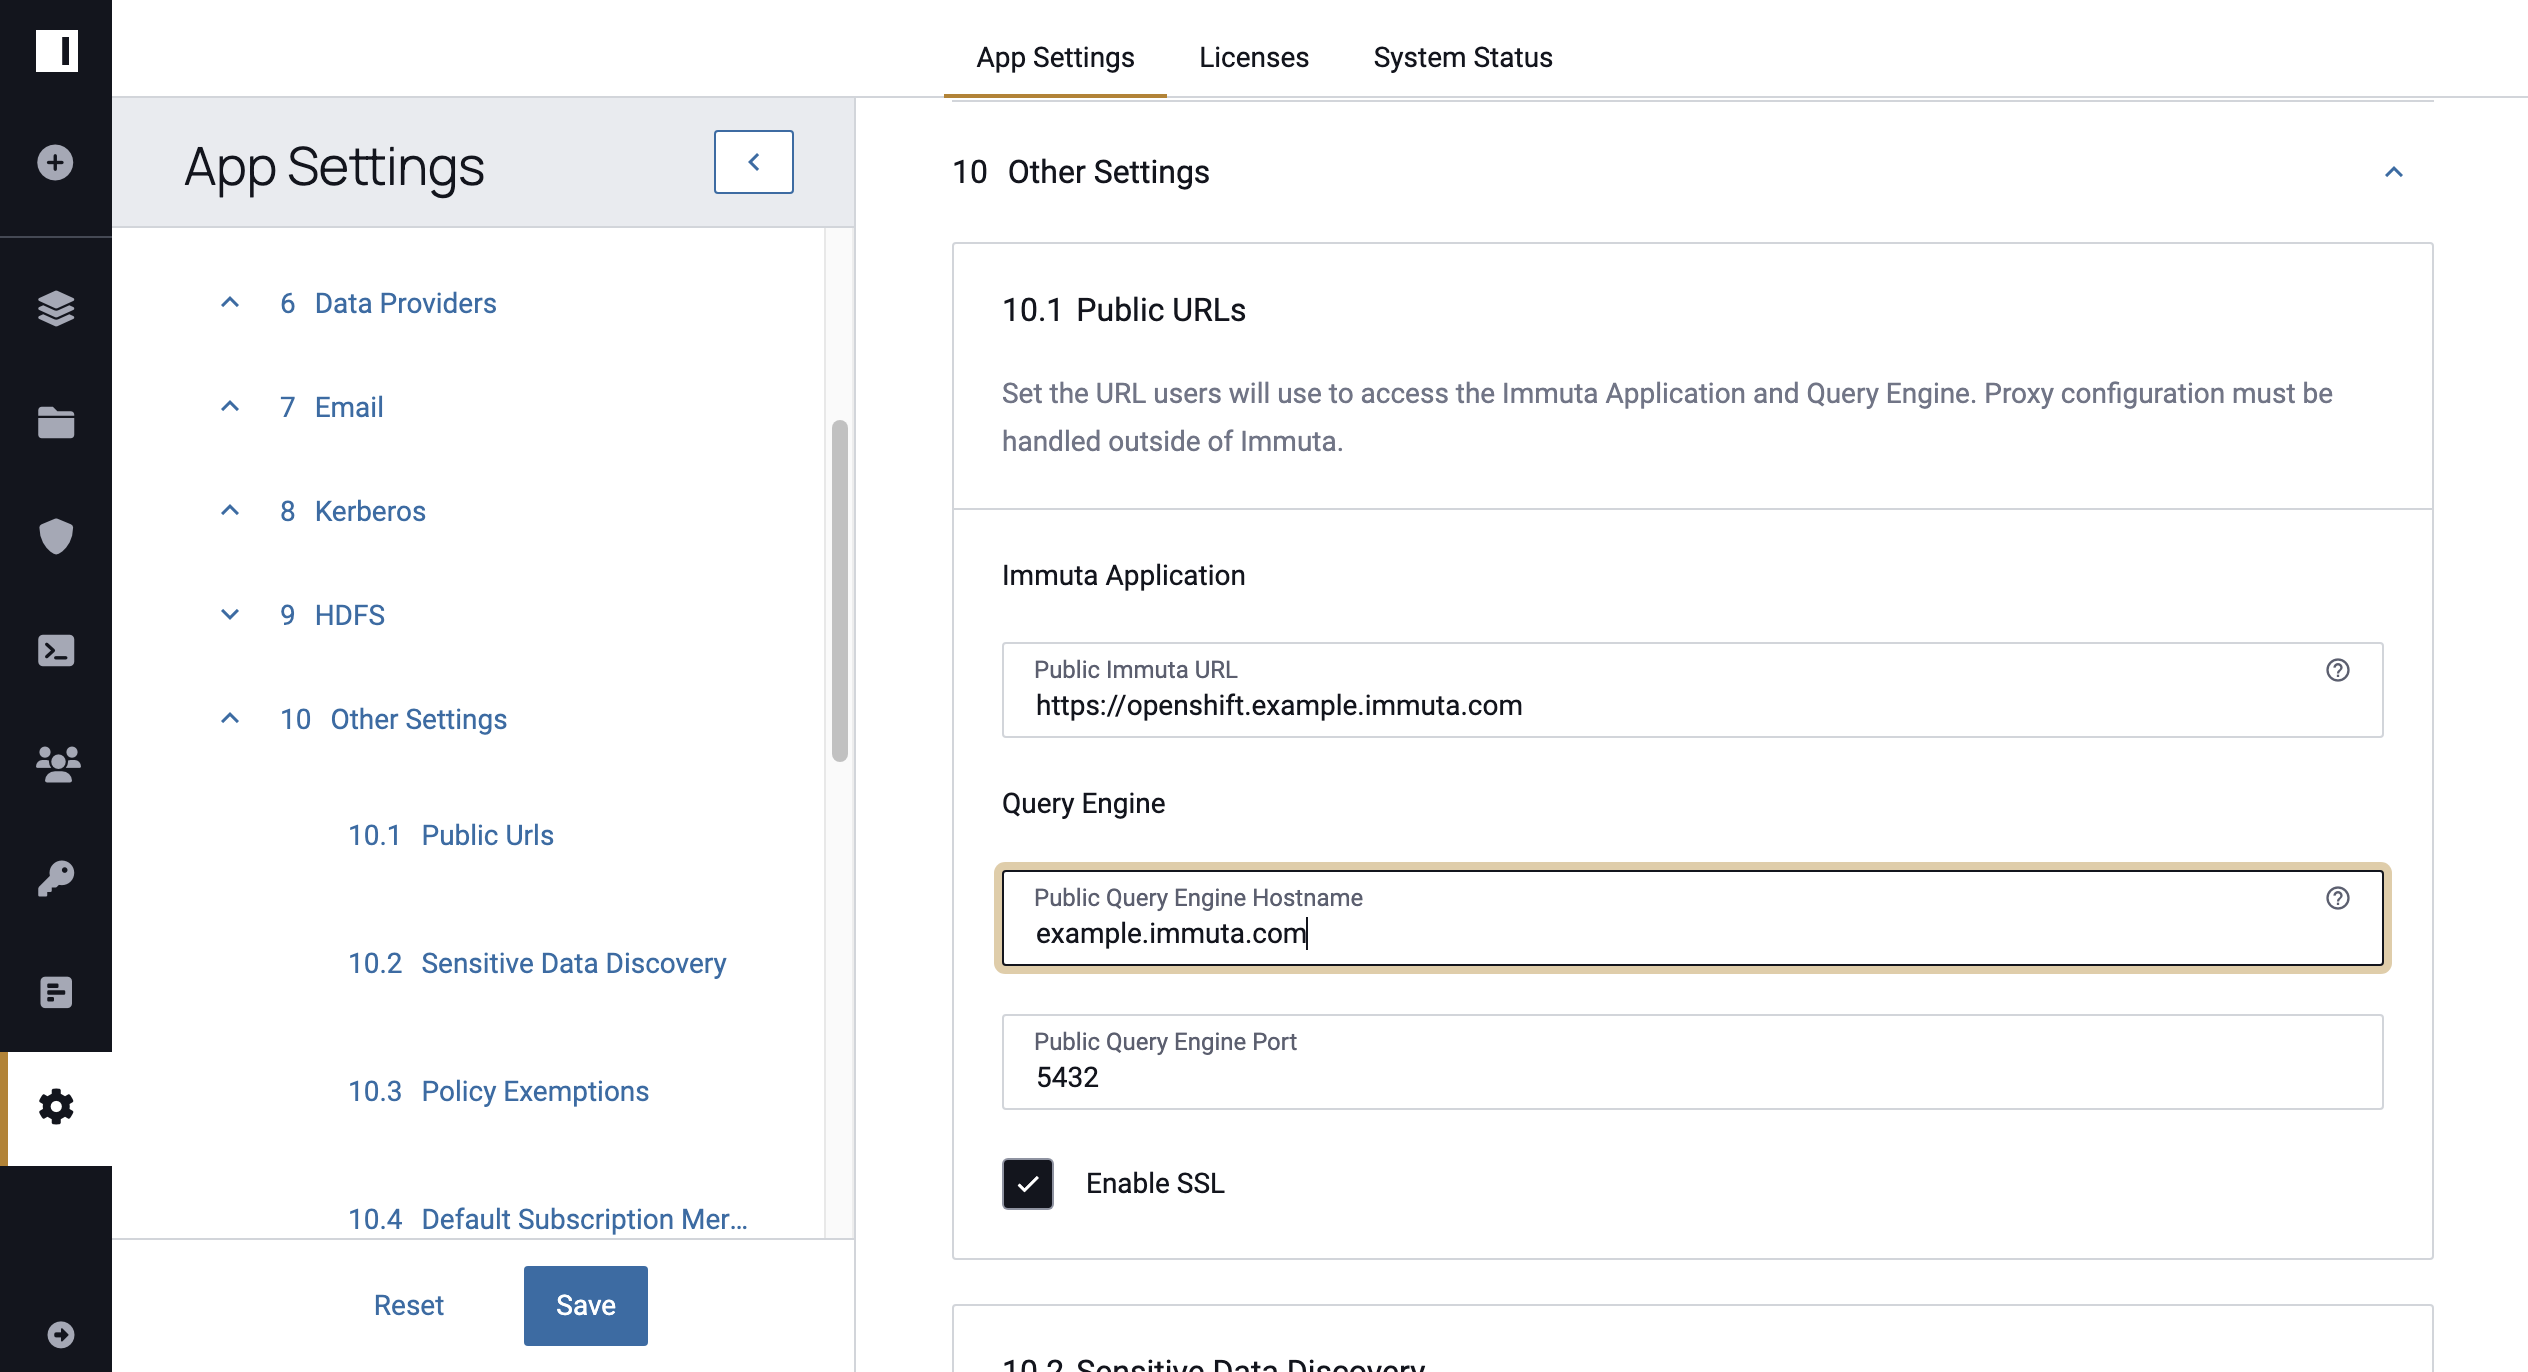
-
Click Save to update the configuration.
Caveat
- Nginx Ingress must be disabled to run with the restricted SCC. Immuta's built-in Nginx Ingress controller will not run with the restricted SCC and must be disabled to run in this configuration. OpenShift has its own Ingress controller that can be used for HTTP traffic for the Immuta Web Service. However, since the OpenShift Ingress controller does not support TCP traffic, a separate LoadBalancer service must be used for the Query Engine, and the Public Query Engine Hostname must be updated accordingly.