Create a Project
Audience: Data Owners
Content Summary: This page outlines step-by-step instructions for creating a project.
Additional Tutorials Contents:
- Disable a Project
- Enable a Project
- Delete a Project
- Enable Masked Joins
- Add Data Sources to a Project
- Add Data Sources by Purpose
- Manage Project Discussions
- Manage Project Documentation
- Modify a Member's Role within a Project
- Remove Members from a Project
- Add Tags to a Project
- Remove Tags from a Project
Use Case
Compliance Requirement: Users can only WRITE to specified locations in Dev.
To meet this requirement, a System Administrator must first configure Immuta to a root location for all data to be written to. Then, when a user creates an Immuta project, it will automatically generate a subfolder in that root path and remote database associated with the project.
Then, a user with the CREATE_PROJECT permission will create a project that users in the Dev group can join and write data to, and this project owner will use the groups created in Chapter 2 to build a Subscription Policy for this project.
The steps below use this scenario to illustrate creating a project, but other options are noted throughout the tutorial. The steps required to create a workspace for users to write data into is covered in the next section.
1 - Create a New Project
Best Practice: Project Naming Convention
Use a naming convention for projects that reflects the naming convention for databases. (e.g., If the project in Dev is called: “my_project” name the project “dev_my_project.") The data will end up in the project database prefix, so you can trace the source and make edits upstream in that project as necessary.
-
Click the Projects page icon in the left sidebar, and click the New Projects button. Then, complete the fields in the project workflow.
For specific instructions for each section, click the tabs below.
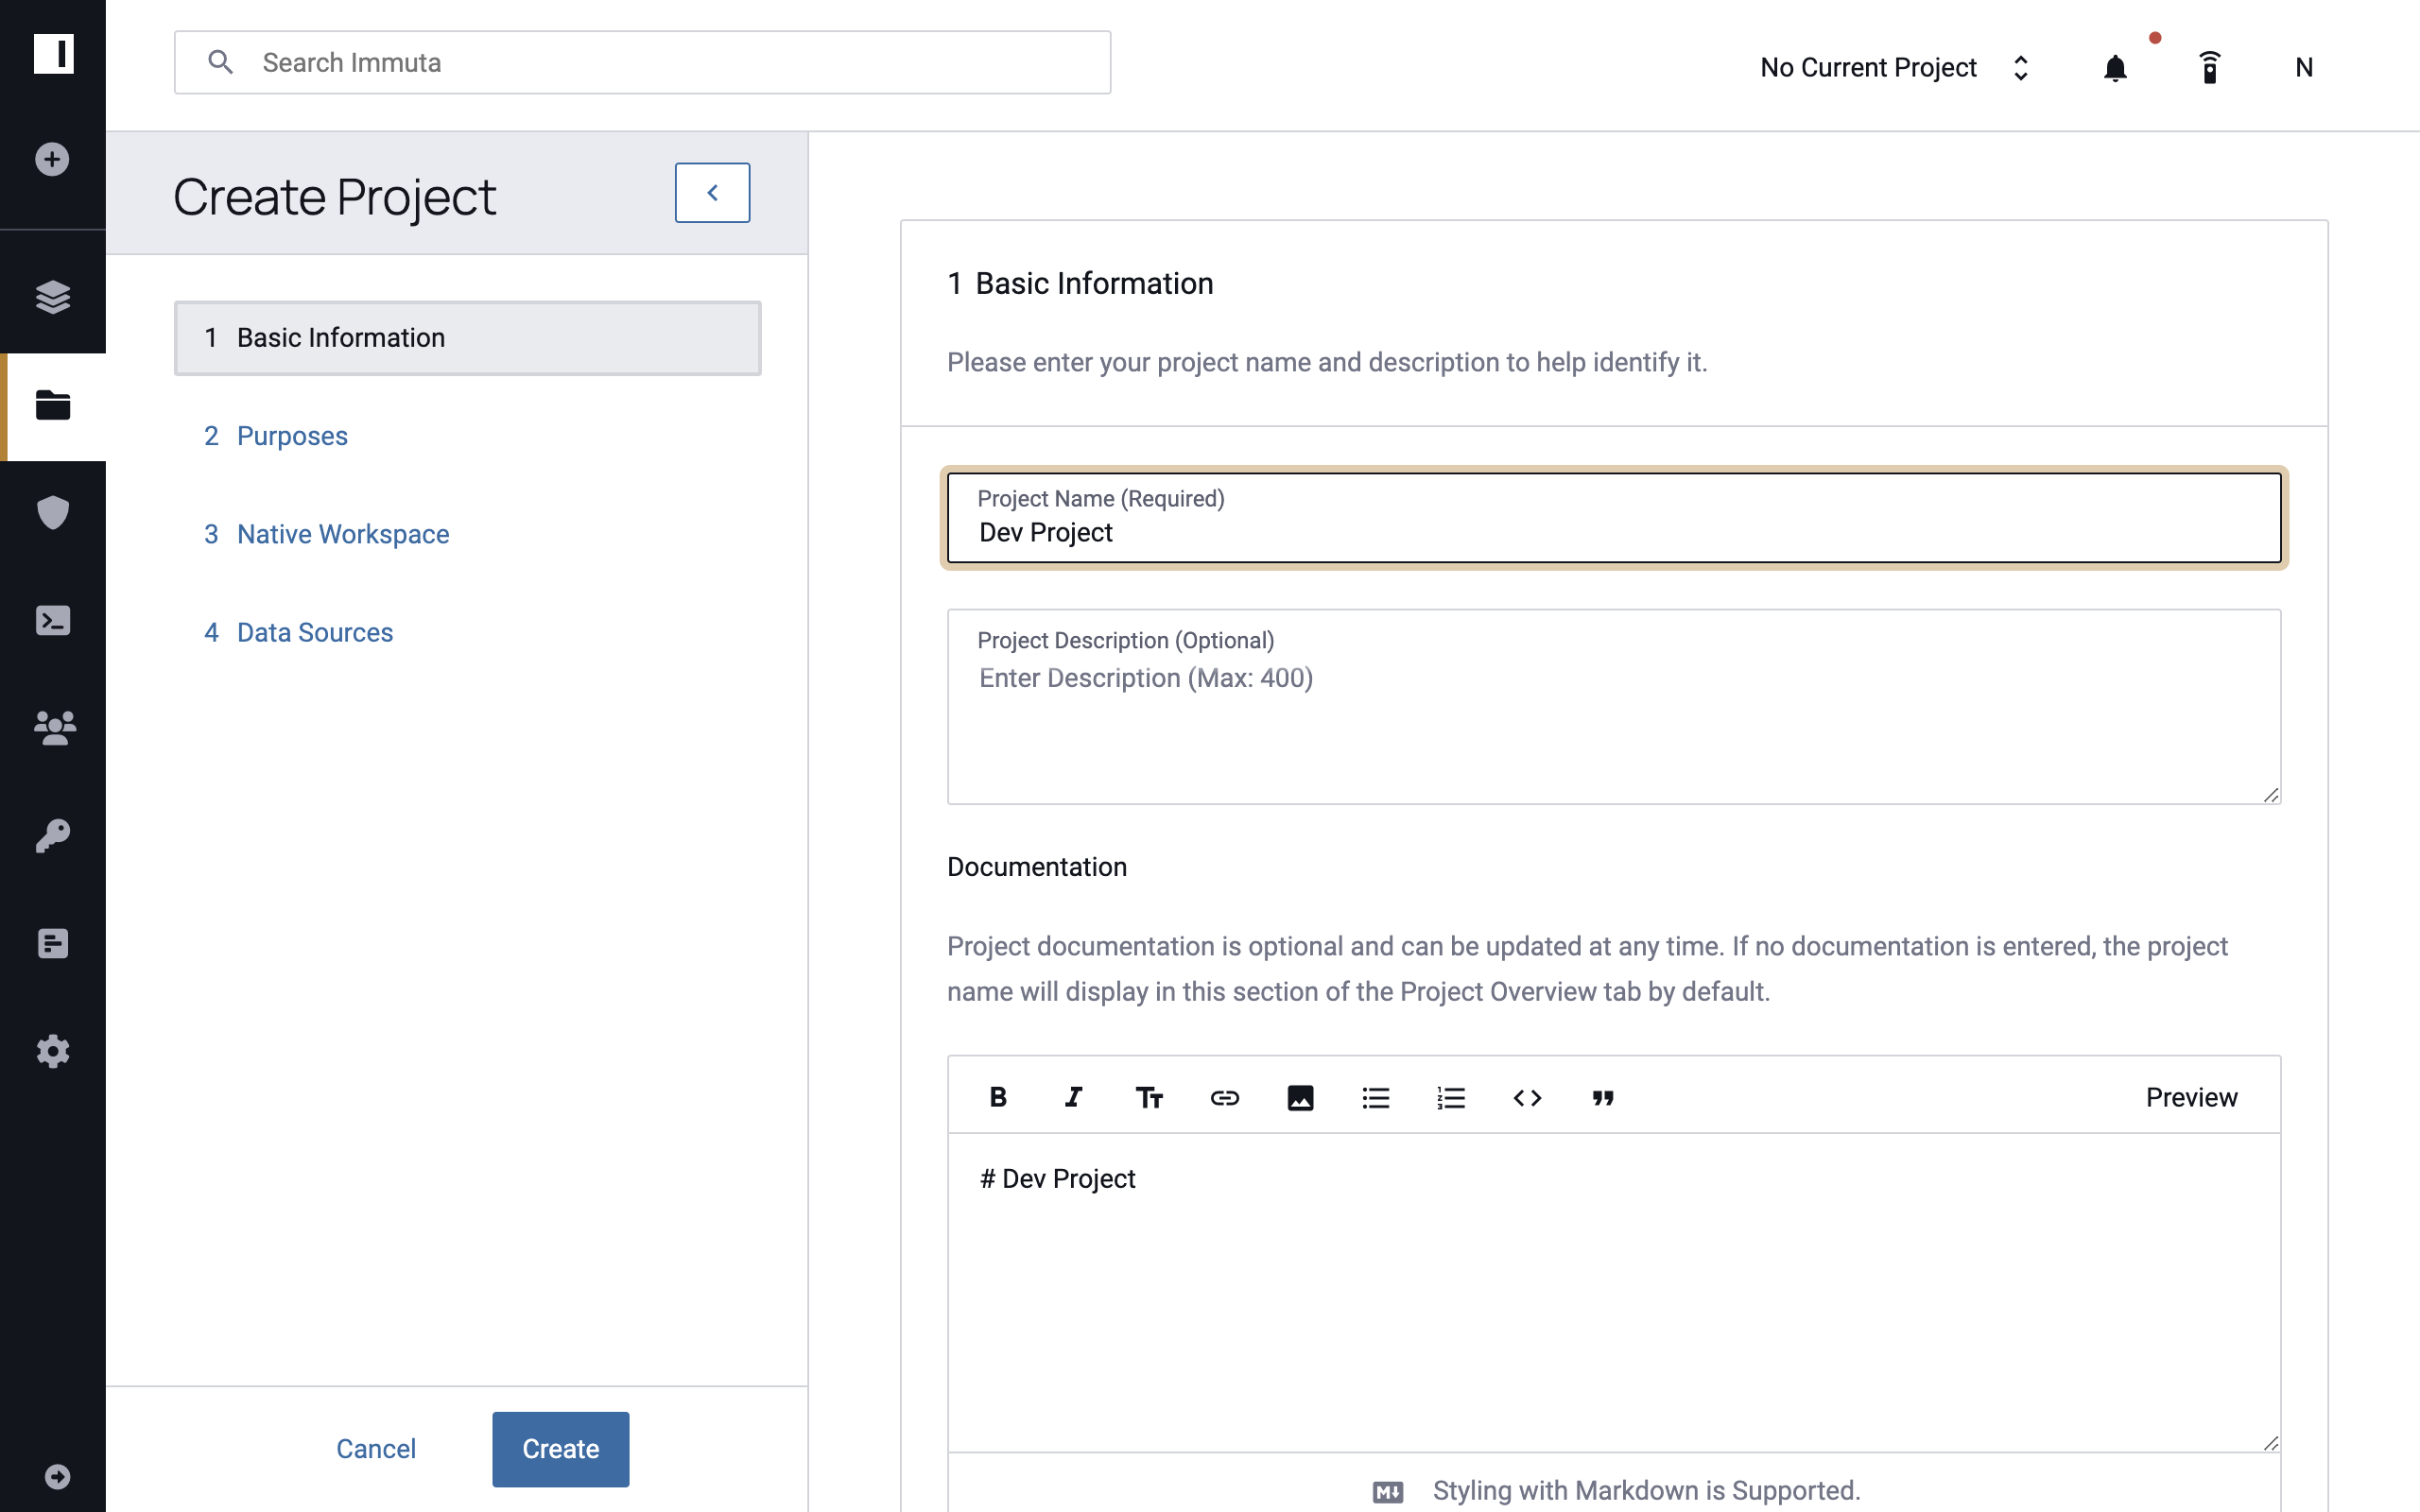
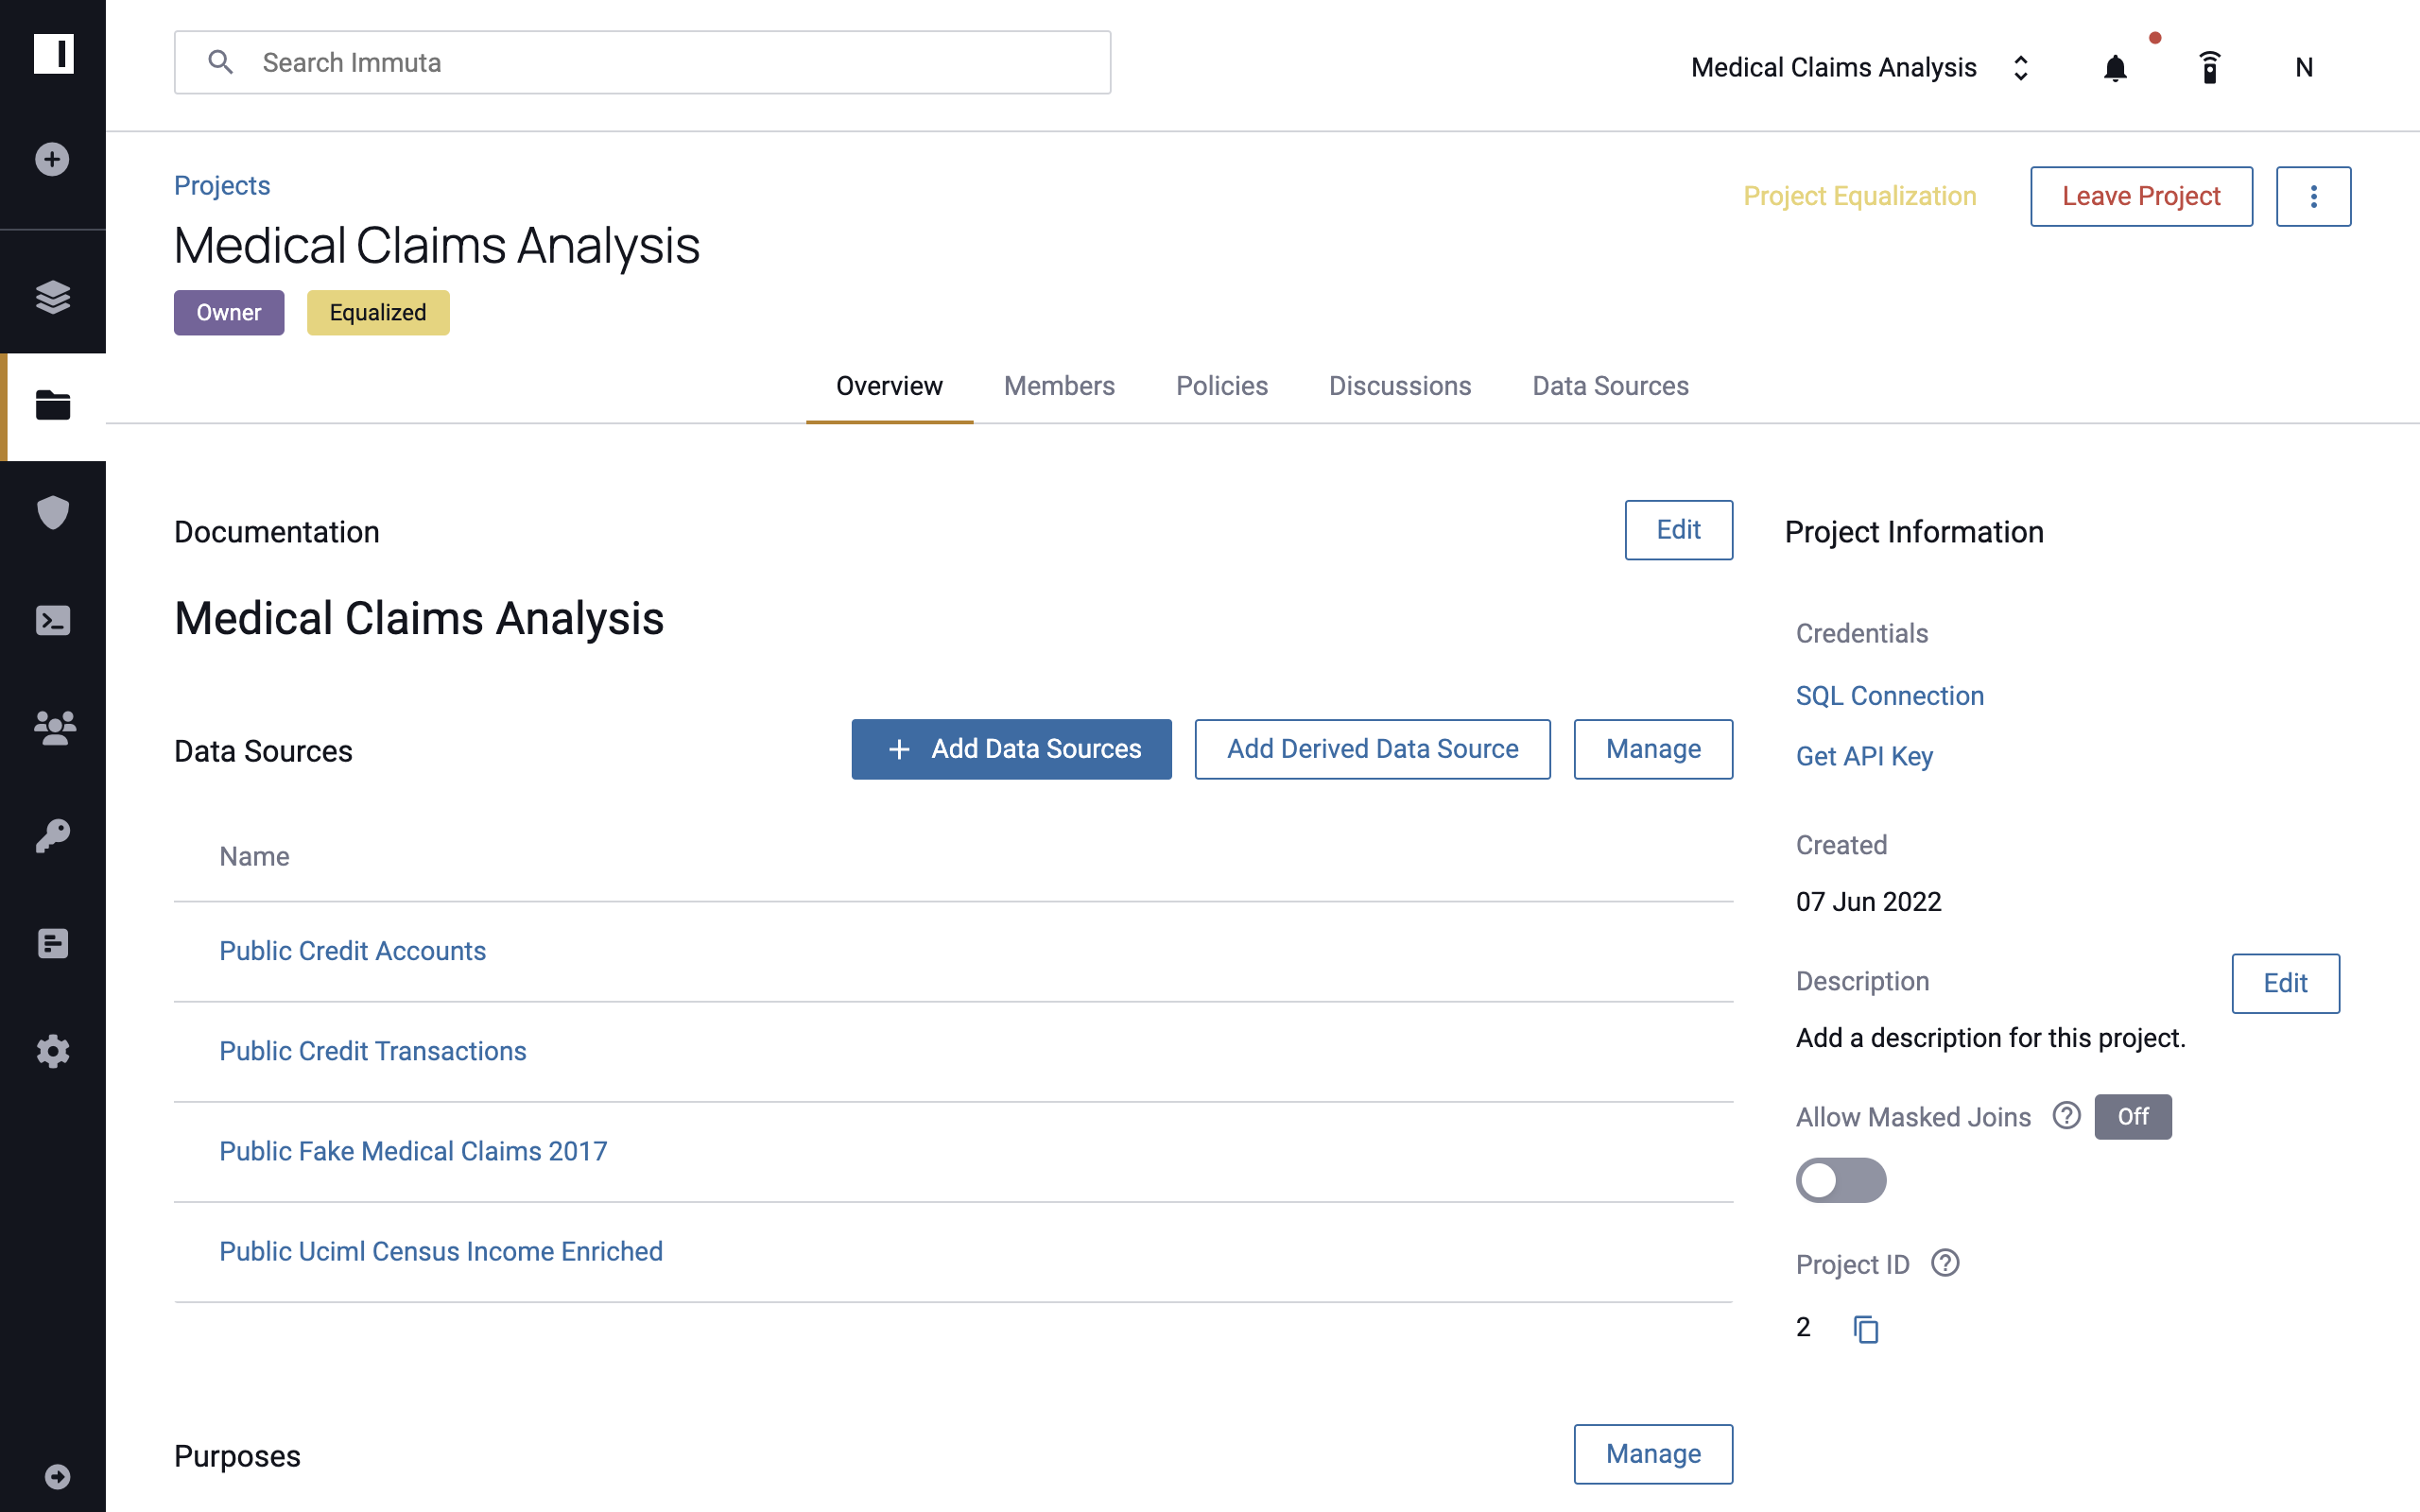
Basic Information
- Enter a name for your project in the Project Name field.
- Opt to complete the Project Description field to help identify your project.
- Opt to enter project Documentation to provide context for members.
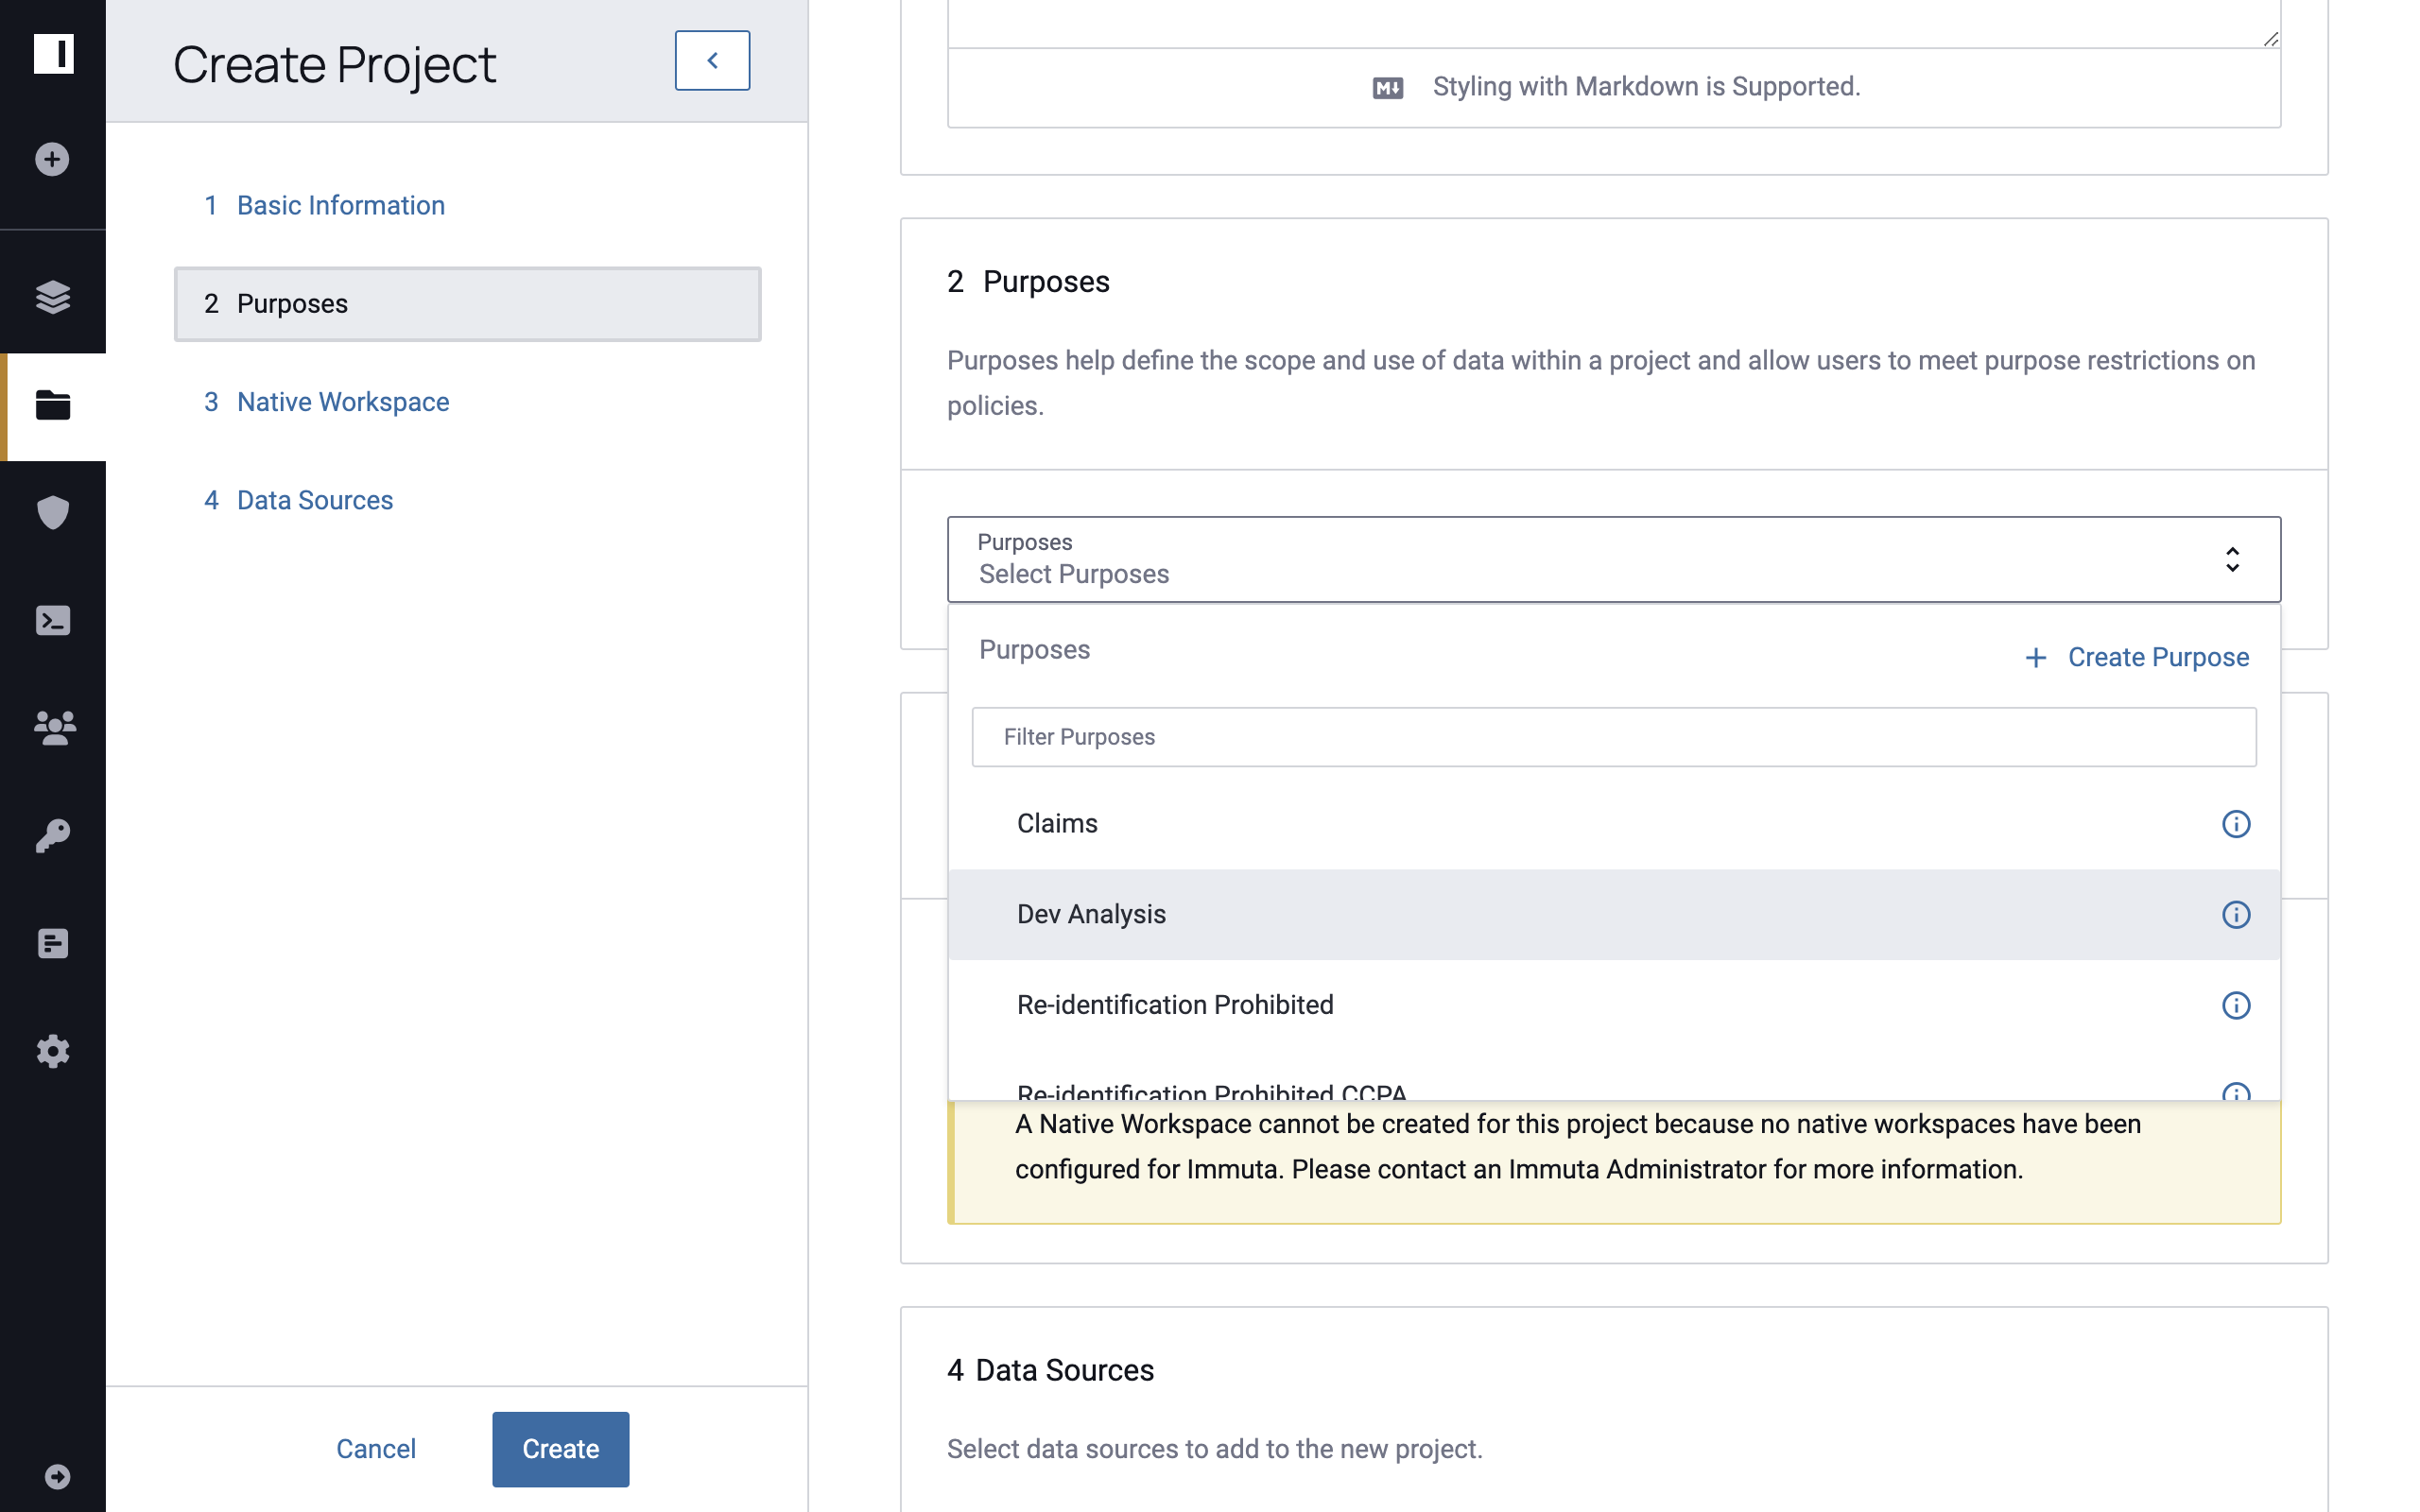
Purposes & Policy Adjustments
Select a purpose from the list of purposes or create a new purpose for the project. Note: All purposes added to a project will need to be created by a Data Governor or user with the PROJECT_MANAGEMENT permission, and once purposes have been applied to a project, only these users can add data sources to the project. Governors are the only users who can manage Subscription Policies for projects with purposes.
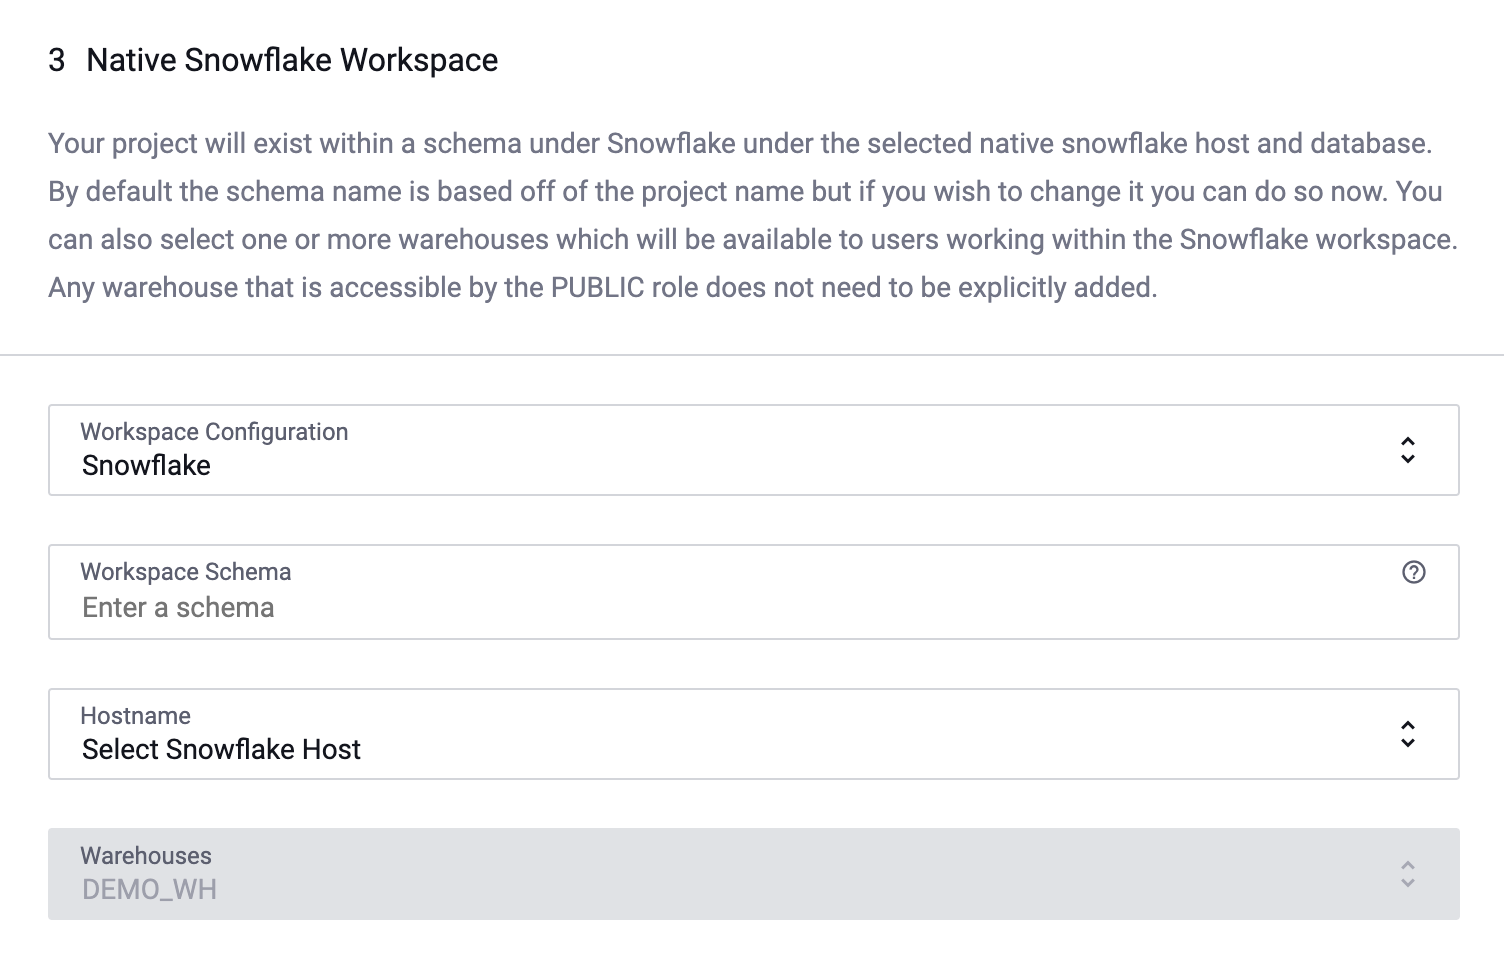
Workspace
Select your workspace configuration from the Workspace Configuration dropdown menu: Cloudera, Databricks, EMR, or Snowflake.
-
Cloudera or EMR: Select the Cluster Name from the subsequent dropdown menu, and then opt to edit the Workspace Directory field or add a Hive Connection (if available).
-
Databricks: Opt to edit the sub-directory in the Workspace Directory field (this sub-directory auto-populates as the project name) and enter the Workspace Database Name.
-
Snowflake: Name the Workspace Schema. By default, the schema name is based off of the project name, but you can change it here. Your project workspace will exist within this schema under Snowflake under the database configured by the Application Admin.
-
Use the dropdown menu to select the Hostname. Projects can only be configured to use one Snowflake host.
-
Select one or more Warehouses to be available to project members when they are working in the native workspace.
-
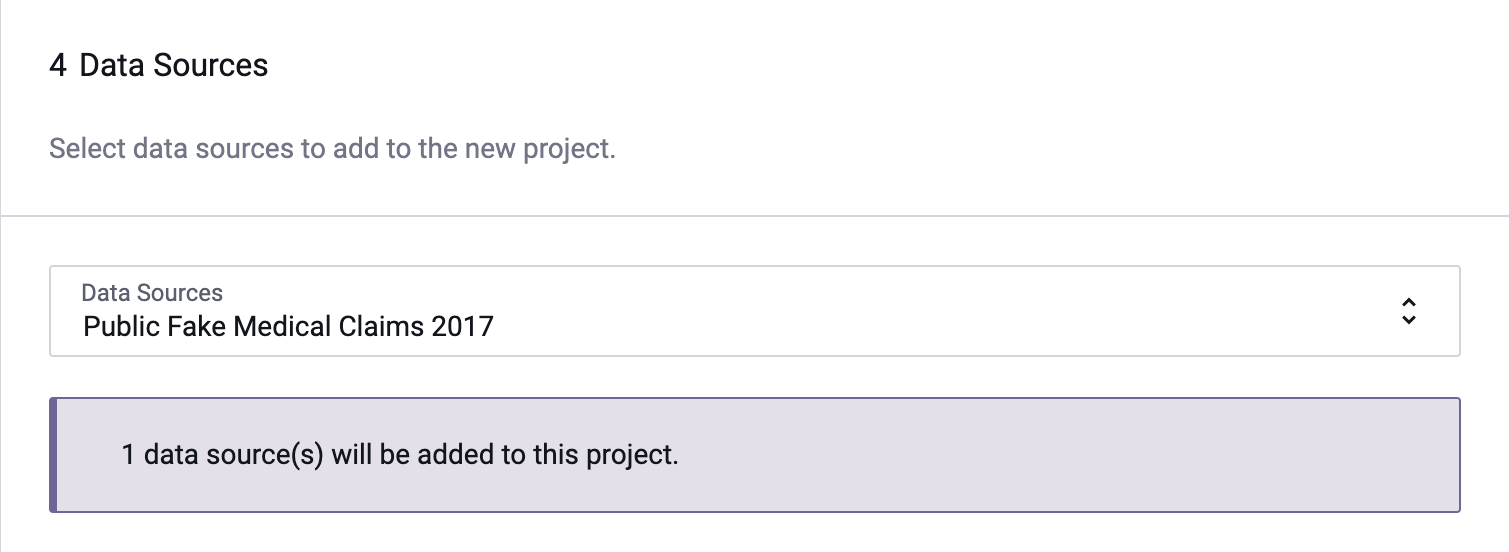
Data Sources
Add data sources to the project using the dropdown menu. This step can also be completed later.
-
Click Affirm and Create.
2 - Set the Project Subscription Policy
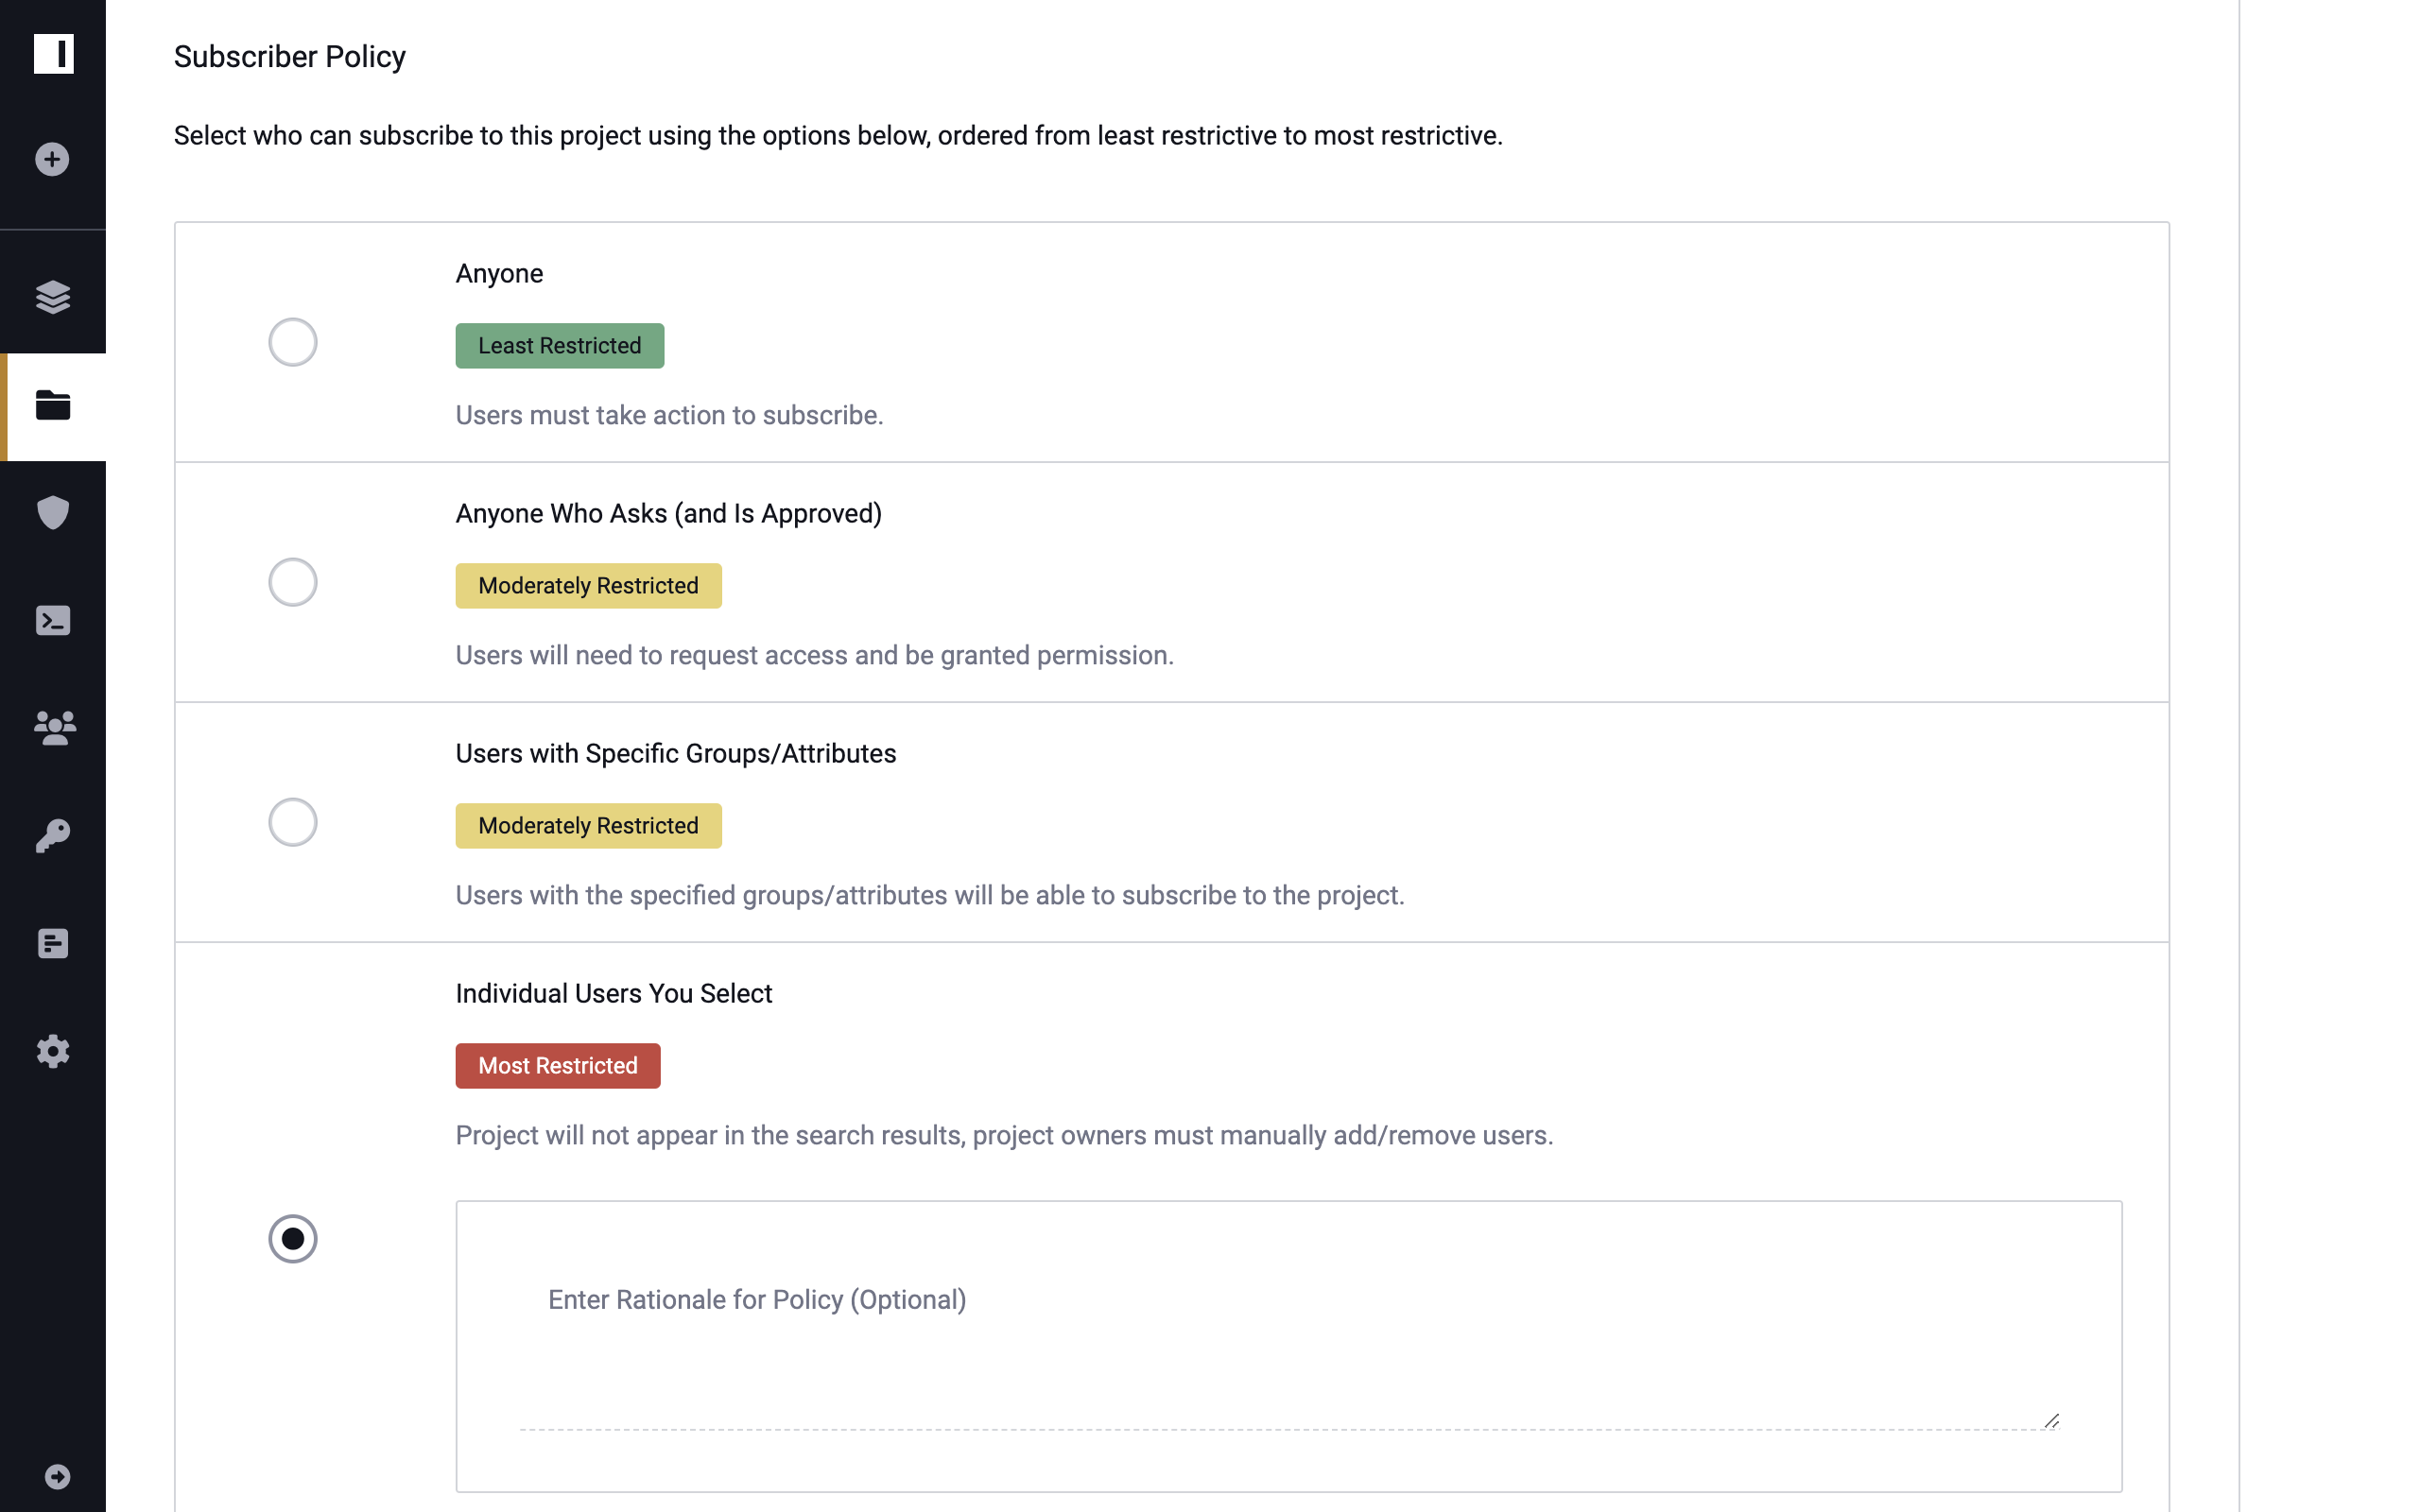
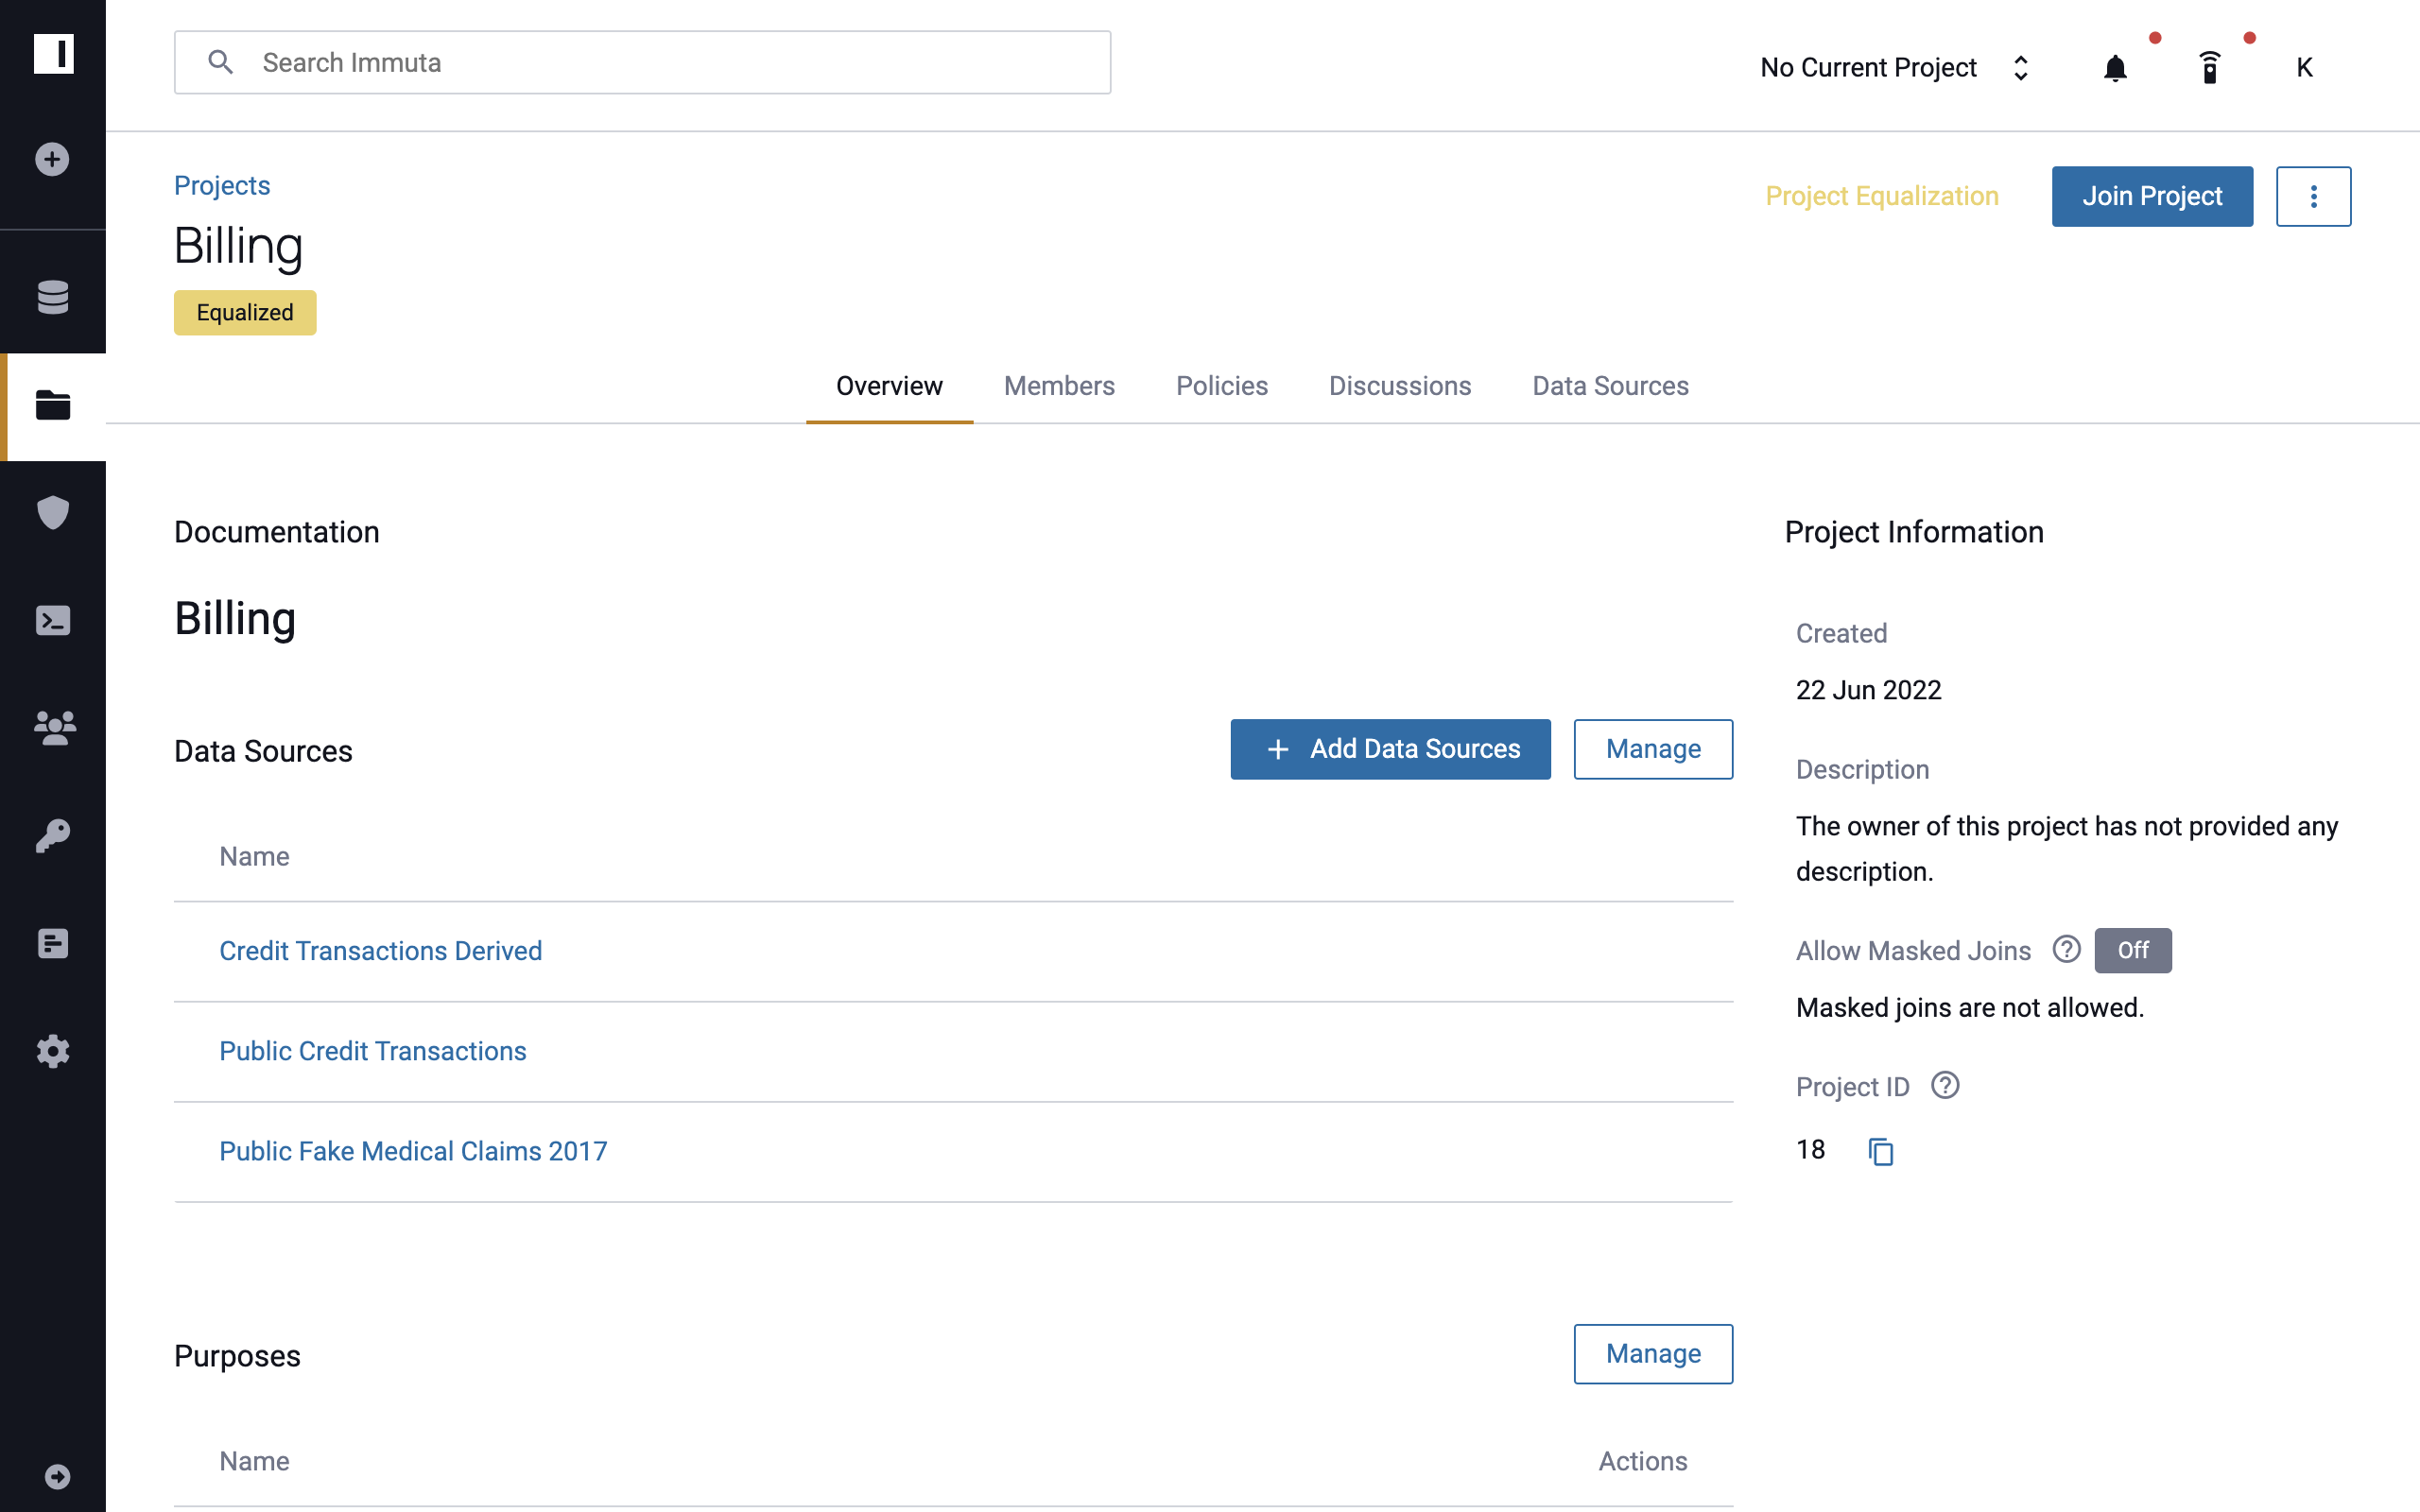
Projects are private by default but can be made public and shared with other users by changing the Subscription Policies setting.
-
Click the Policies tab.
-
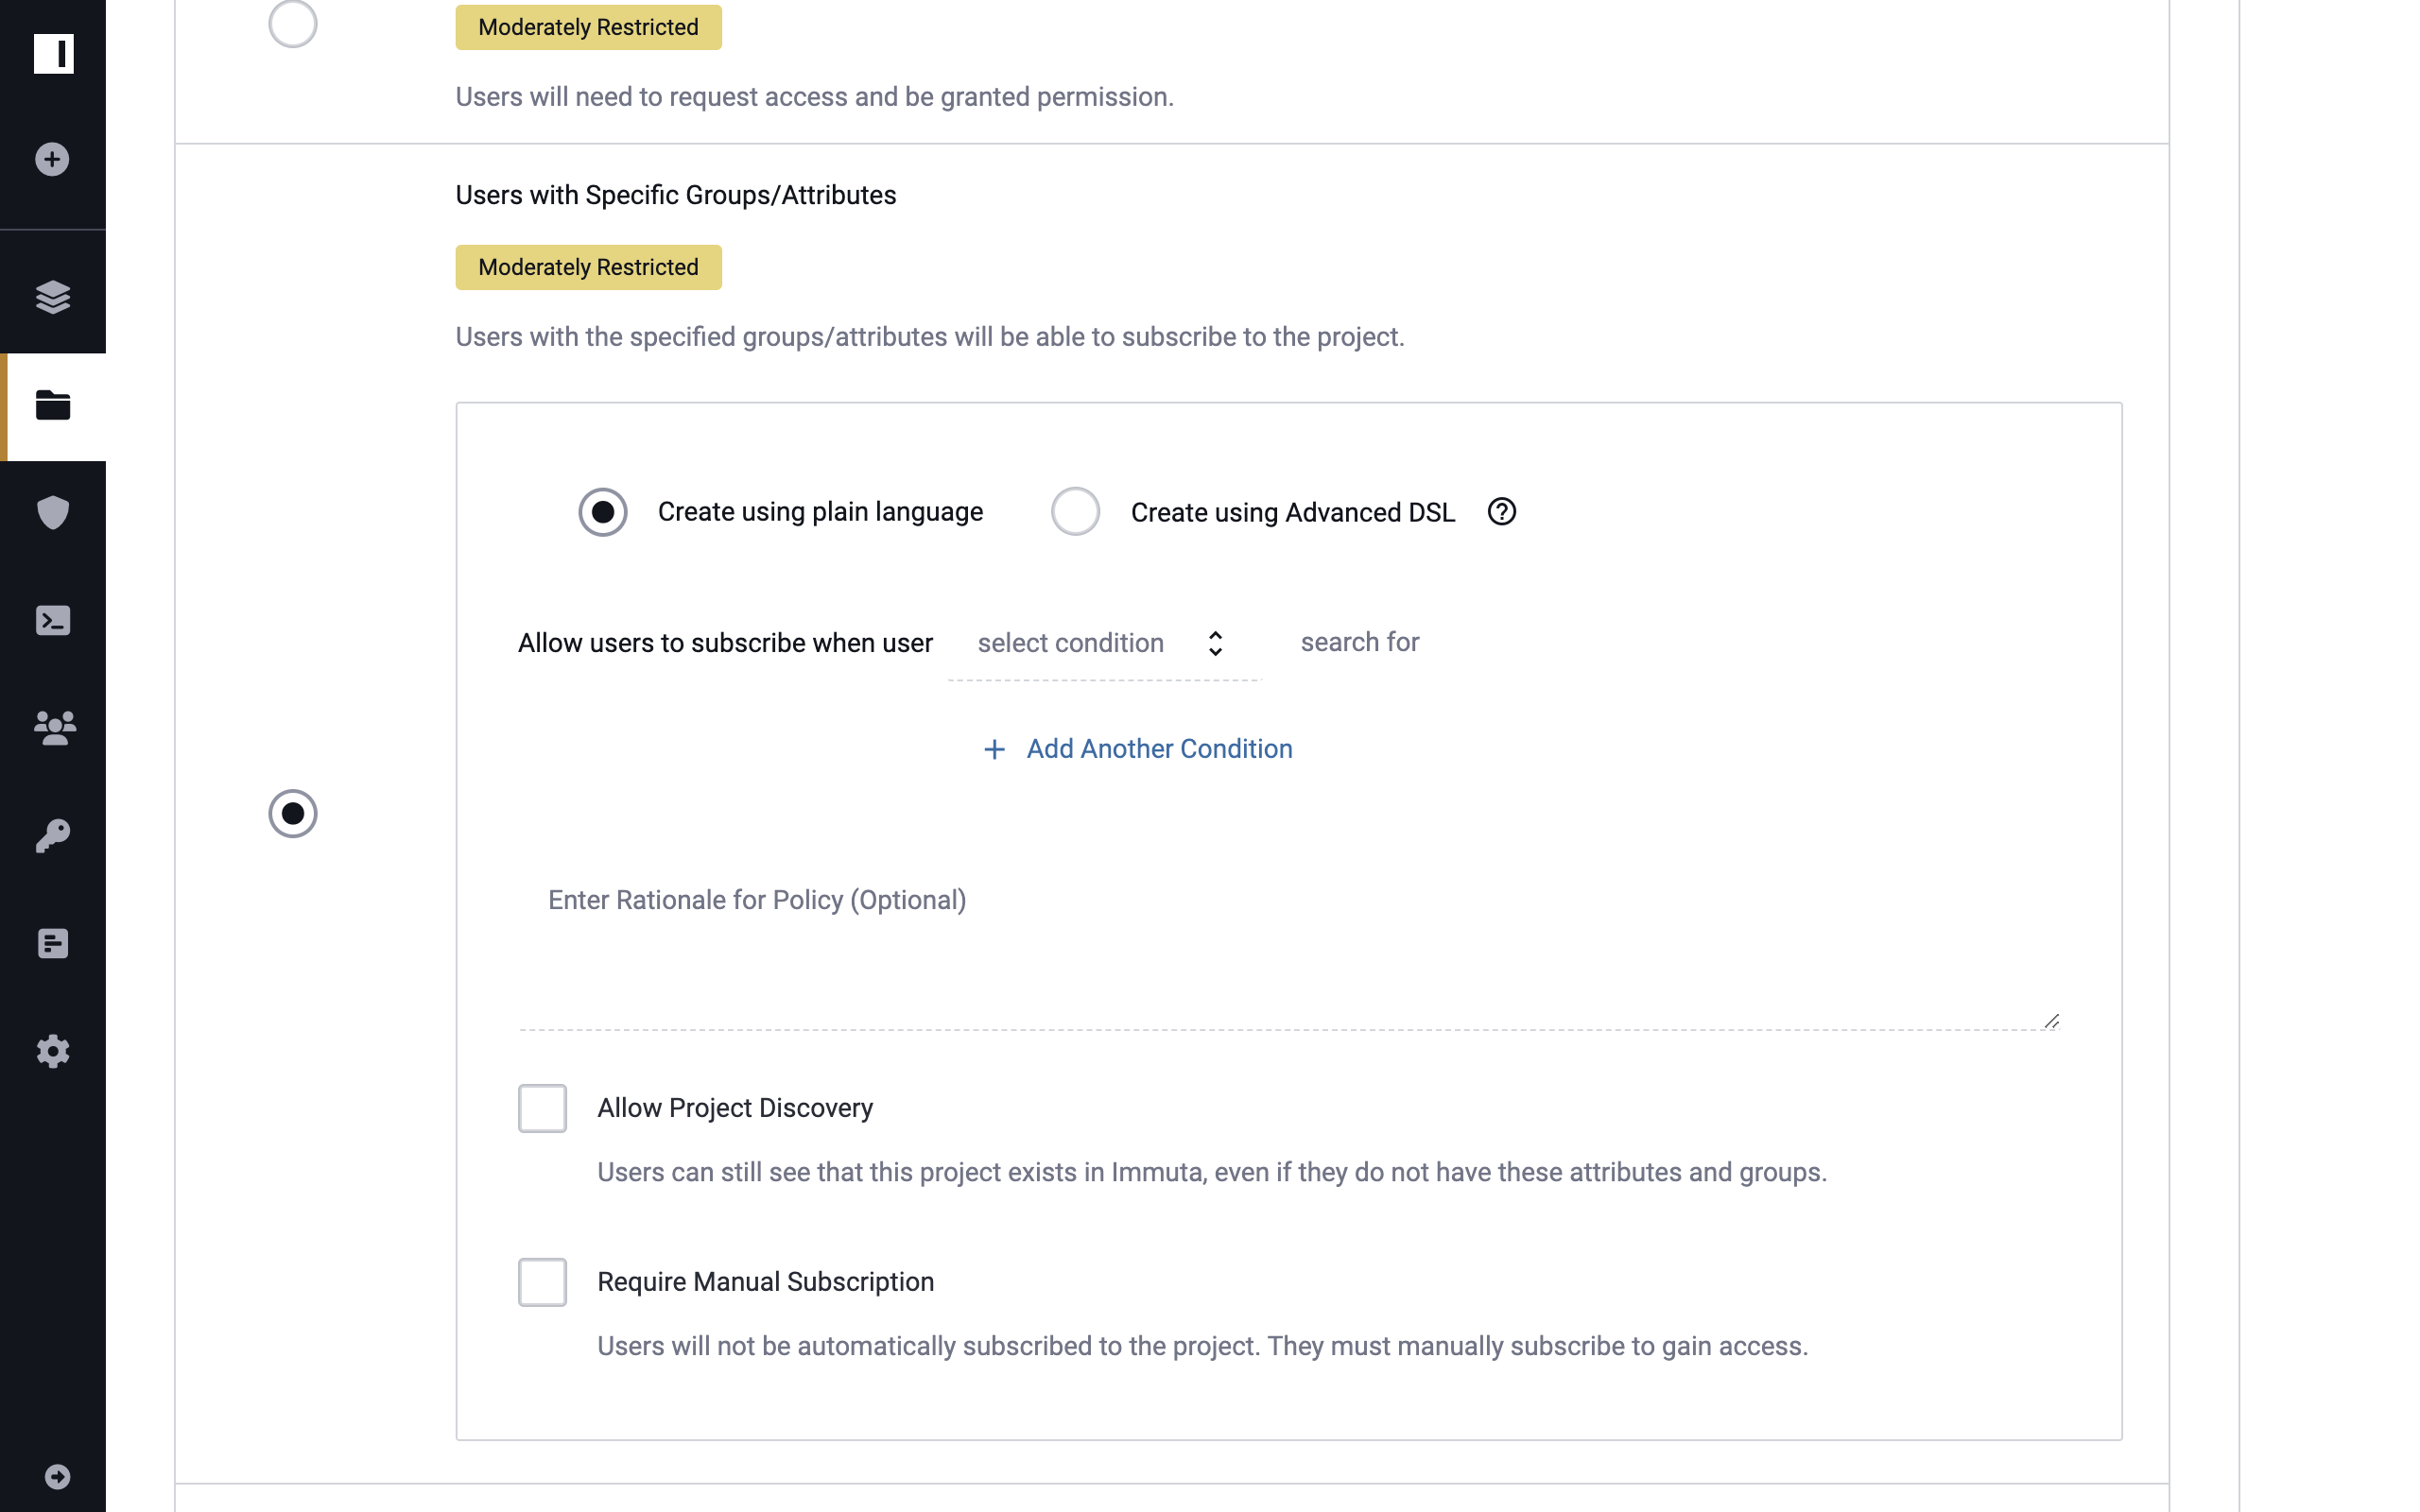
Select Users with Specific Groups/Attributes in the Subscribers section. Additional options include Anyone, Anyone Who Asks (and Is Approved), and Individual Users You Select. Click the tabs below for a definition of and specific instructions for each:
Anyone
Selecting this option makes the project visible to everyone and automatically grant users access when they request to subscribe.
Anyone Who Asks (and Is Approved)
Selecting this option makes the project visible in search results, but users must request access and be granted permission. This restriction supports multiple approving parties, so project owners can allow more than one approver or users with specified permission types to approve other users who request access to the project.
-
Click anyone or an individual selected by user from the first dropdown menu in the Subscription Policy Builder.
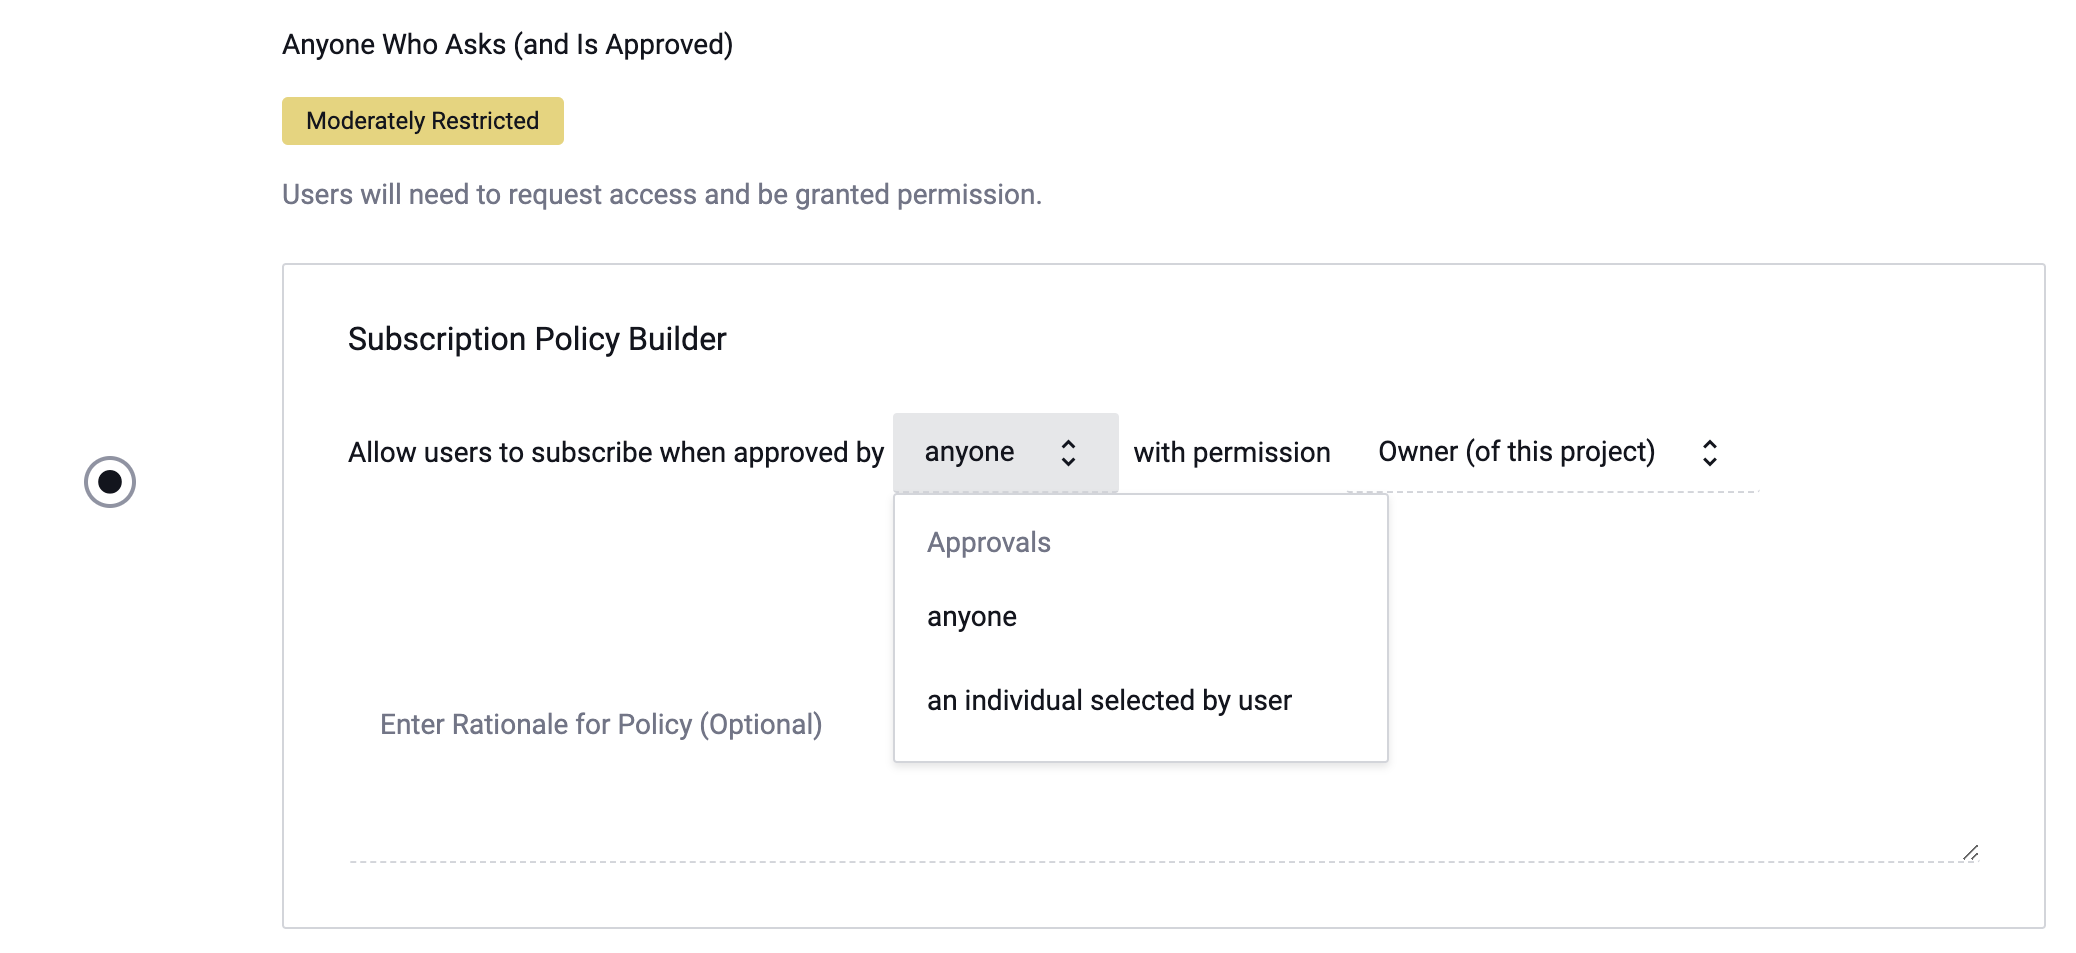
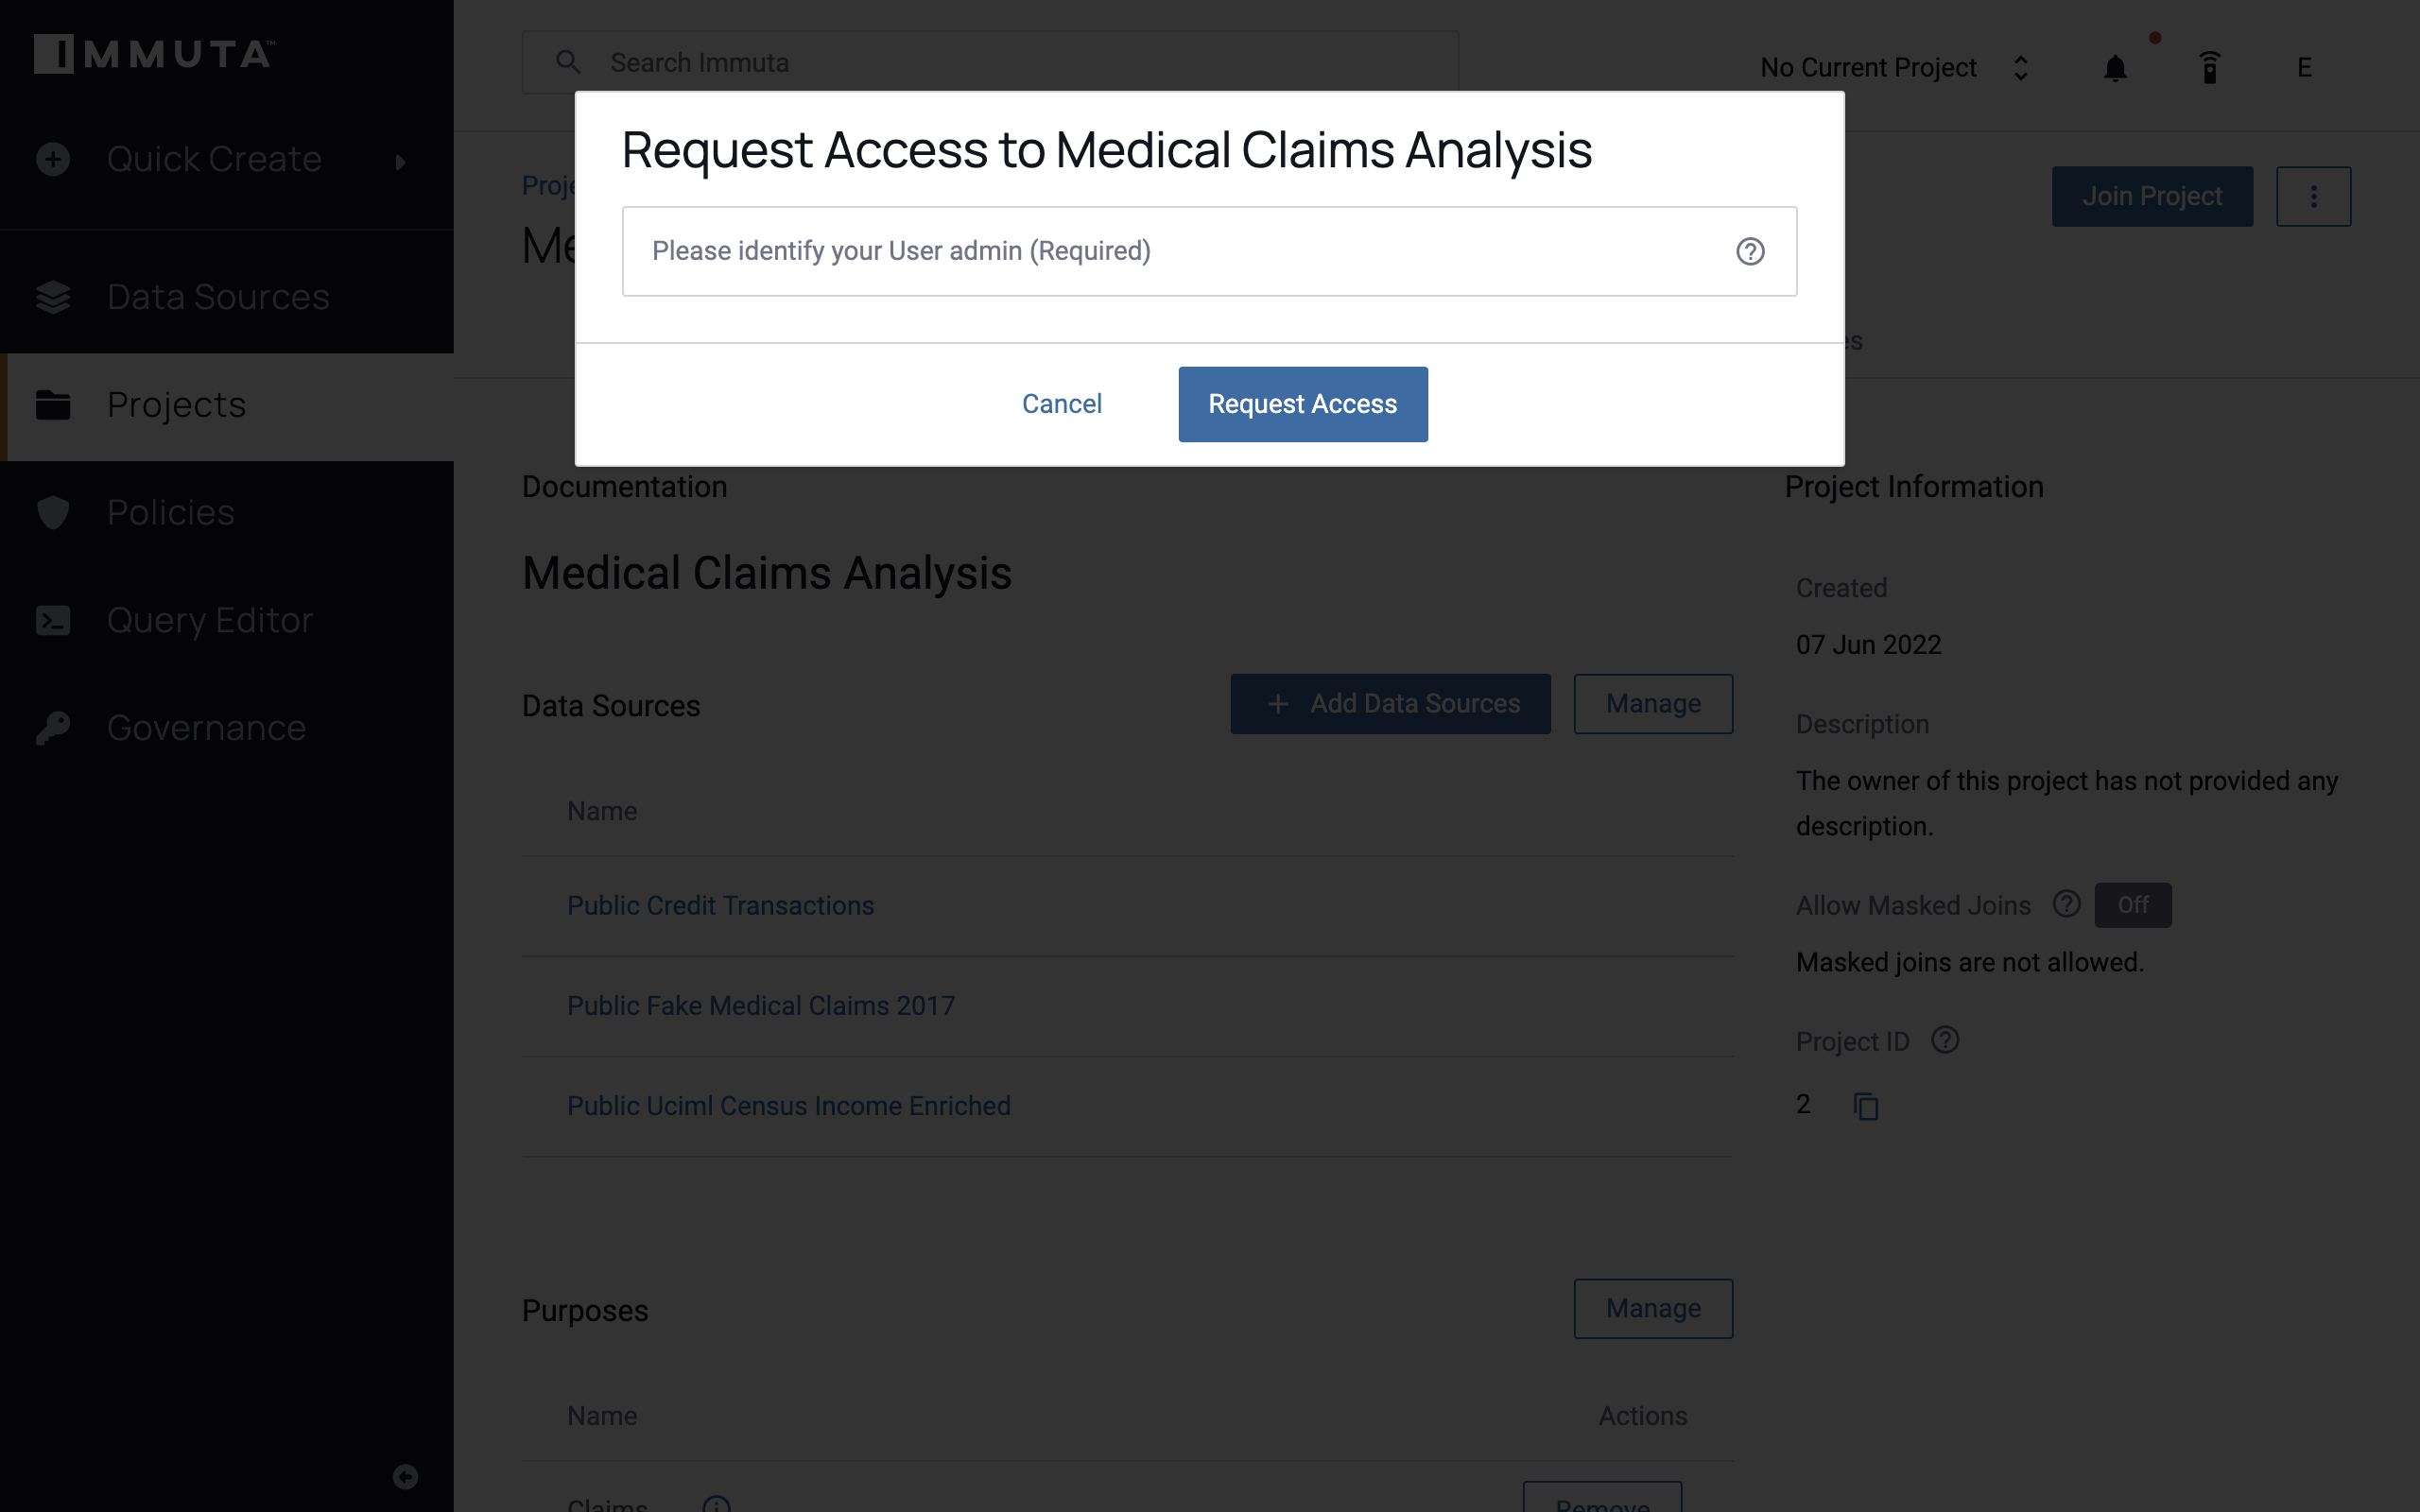
Note: If you choose an individual selected by user, when users request access to a project they will be prompted to identify an approver with the permission specified in the policy, as pictured below.
-
Select the Admin, Governance, or Audit permission from the subsequent dropdown menu. Note: You can add more than one approving party by selecting + Add.
Individual Users You Select
Selecting this option hides the project from the search results. Project owners must manually add and remove users, and the Private label will appear next to the project name.
-
-
Choose when user is a member of group as the condition that will drive the policy. Note: You could also choose when user possesses attribute.
-
Use the subsequent dropdown to choose the group Dev.

Note: You can add more than one condition by selecting + ADD. The dropdown menu in the far right of the Subscription Policy Builder contains coordinating conjunctions for your policy. If you select or, only one of your conditions must apply to a user for them to see the data. If you select and, all of the conditions must apply.
-
Opt to allow users who do not meet the restrictions defined in the policy to still be able to discover the project in the UI by selecting the Allow Project Discovery checkbox.
-
Click Save to finish your policy.
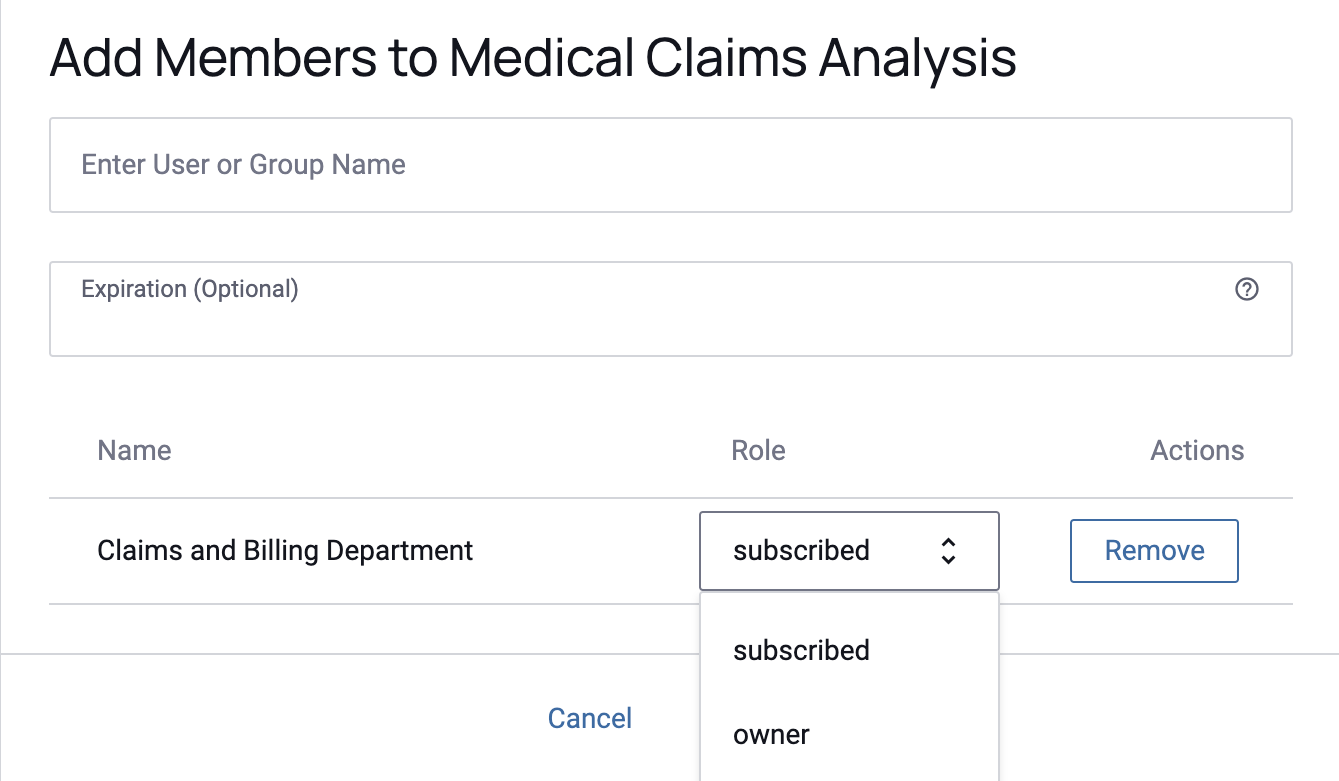
3 - Add Users or Groups to the Project
- Click the Members tab.
-
Click the Add Members link in the center pane.
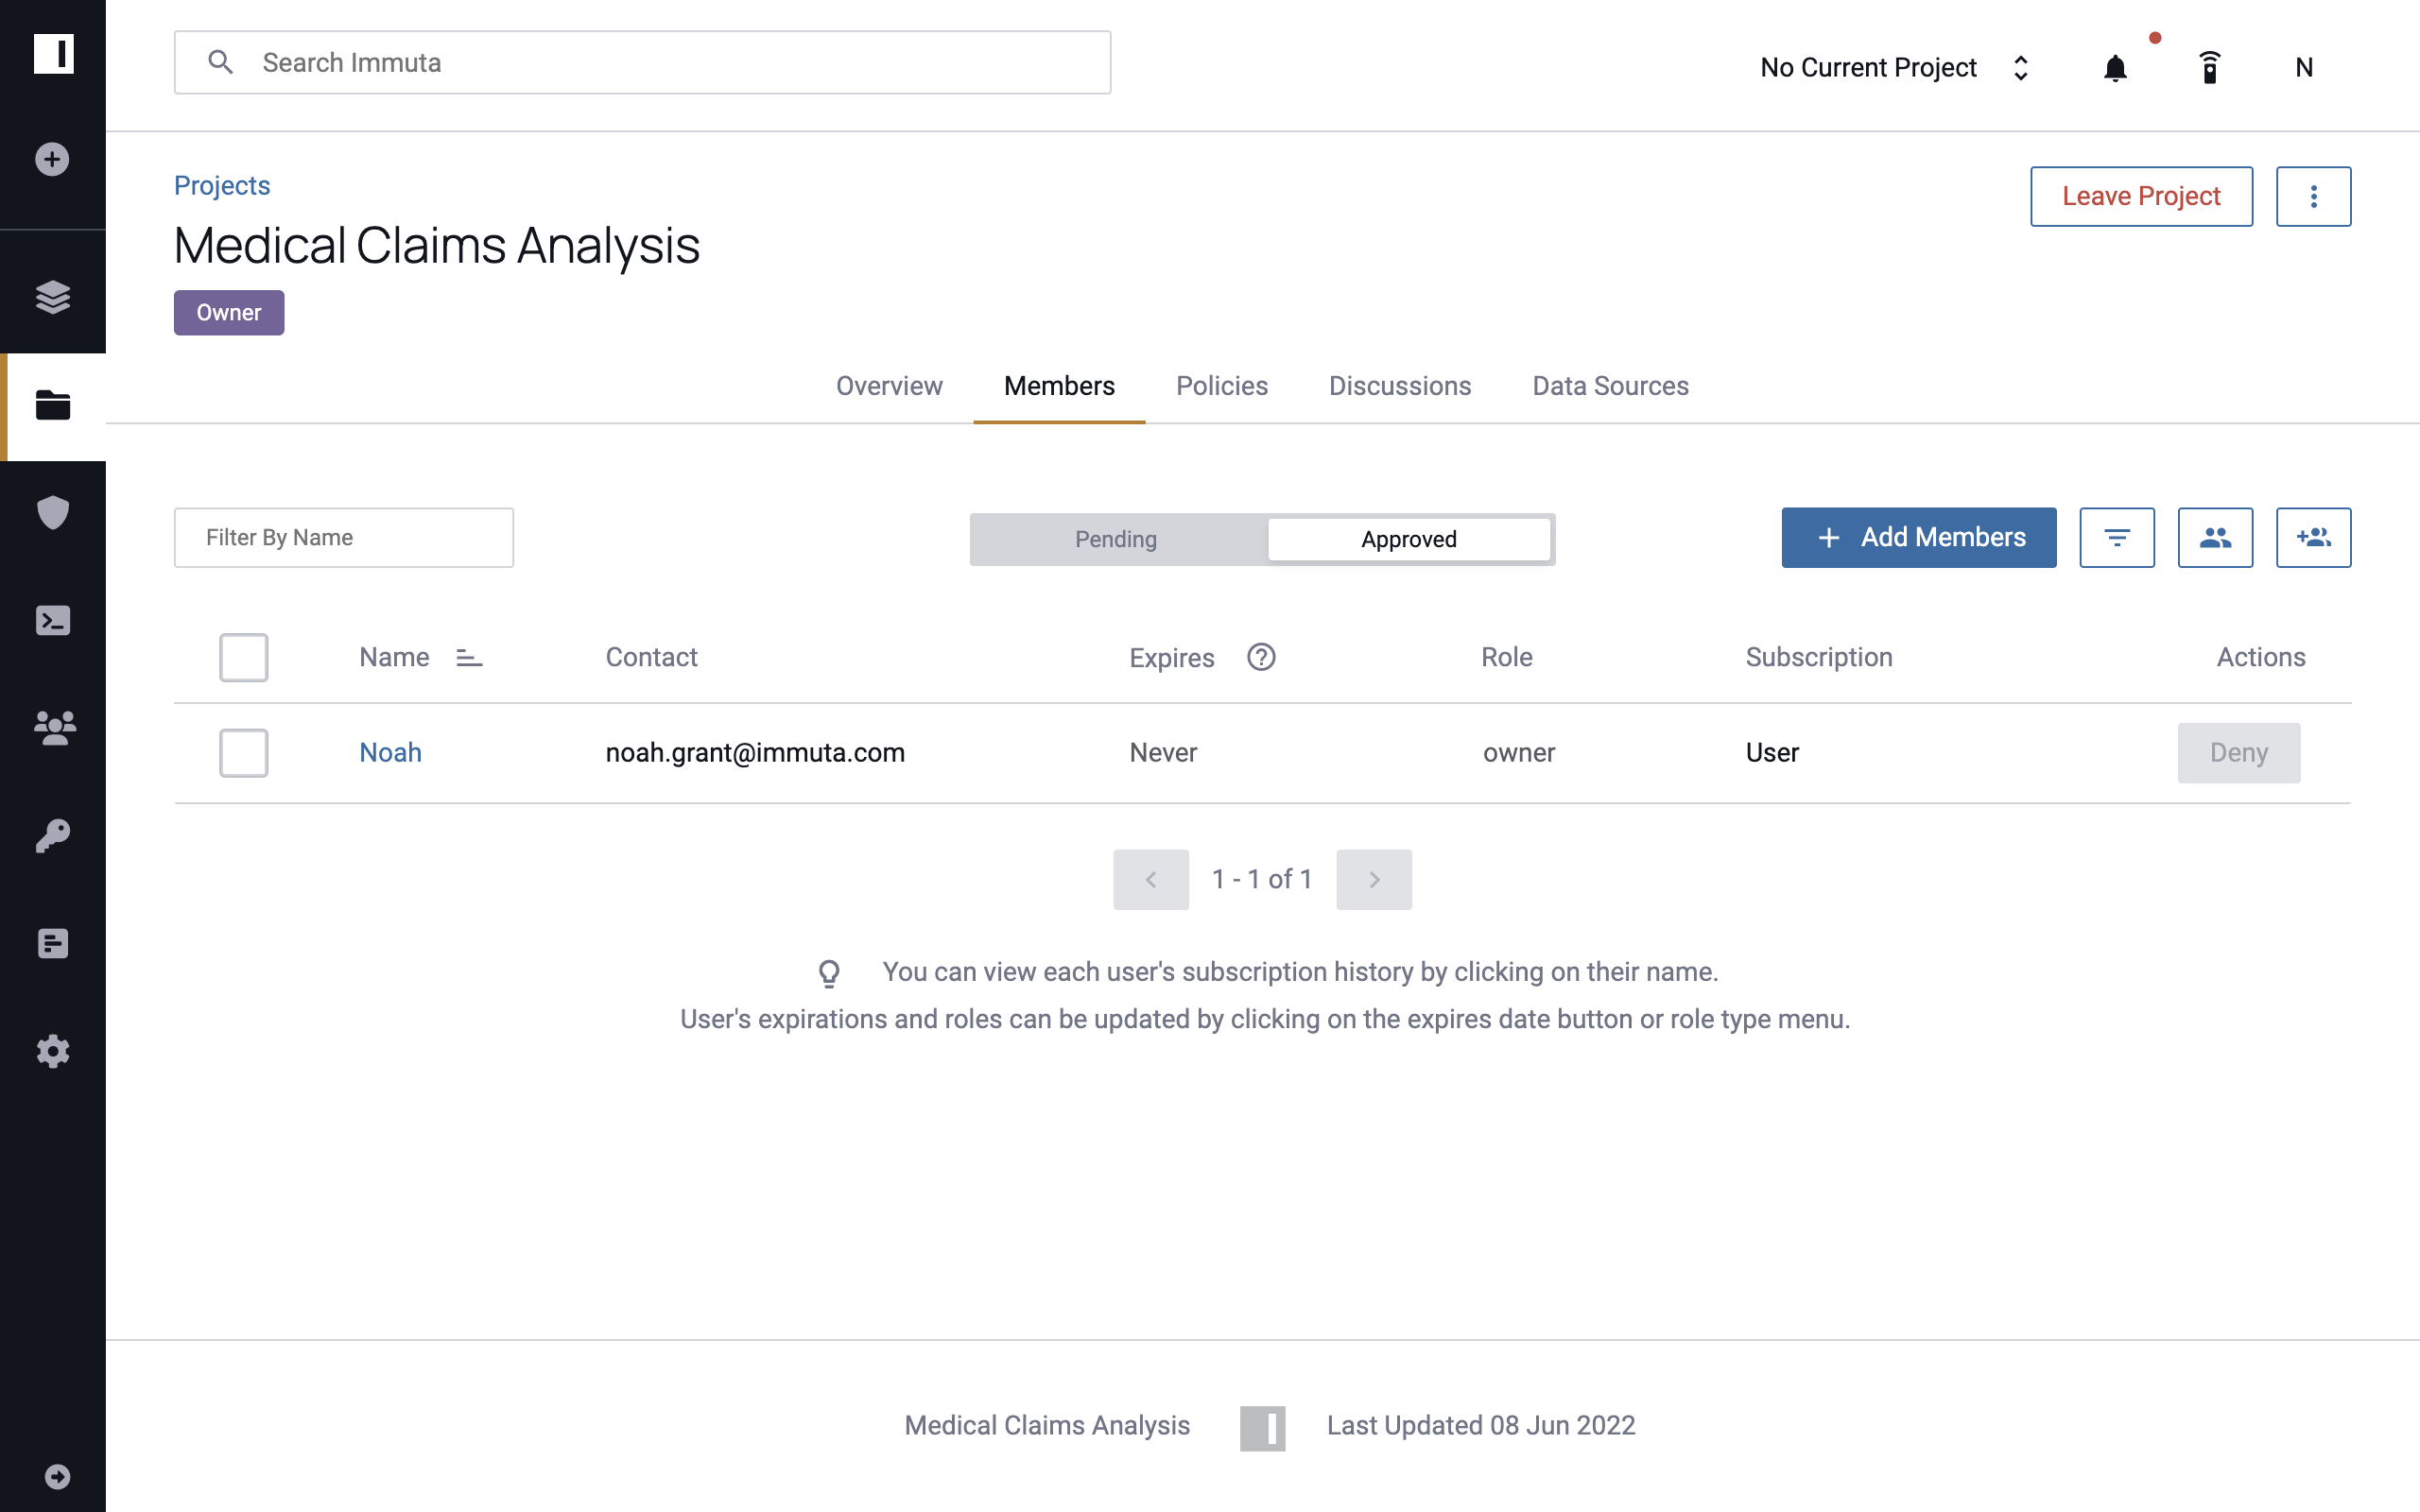
-
Start typing Claims in the Add Members modal and select that group from the dropdown that appears. You could also select individual users by typing in their names and selecting them from the dropdown.
-
Select subscribed as the role for the group. You can opt to make groups or members owners of the project.
-
Click Add.
Users will receive notifications that new users have been added to the project. A similar entry will be posted to the project's activity pane.
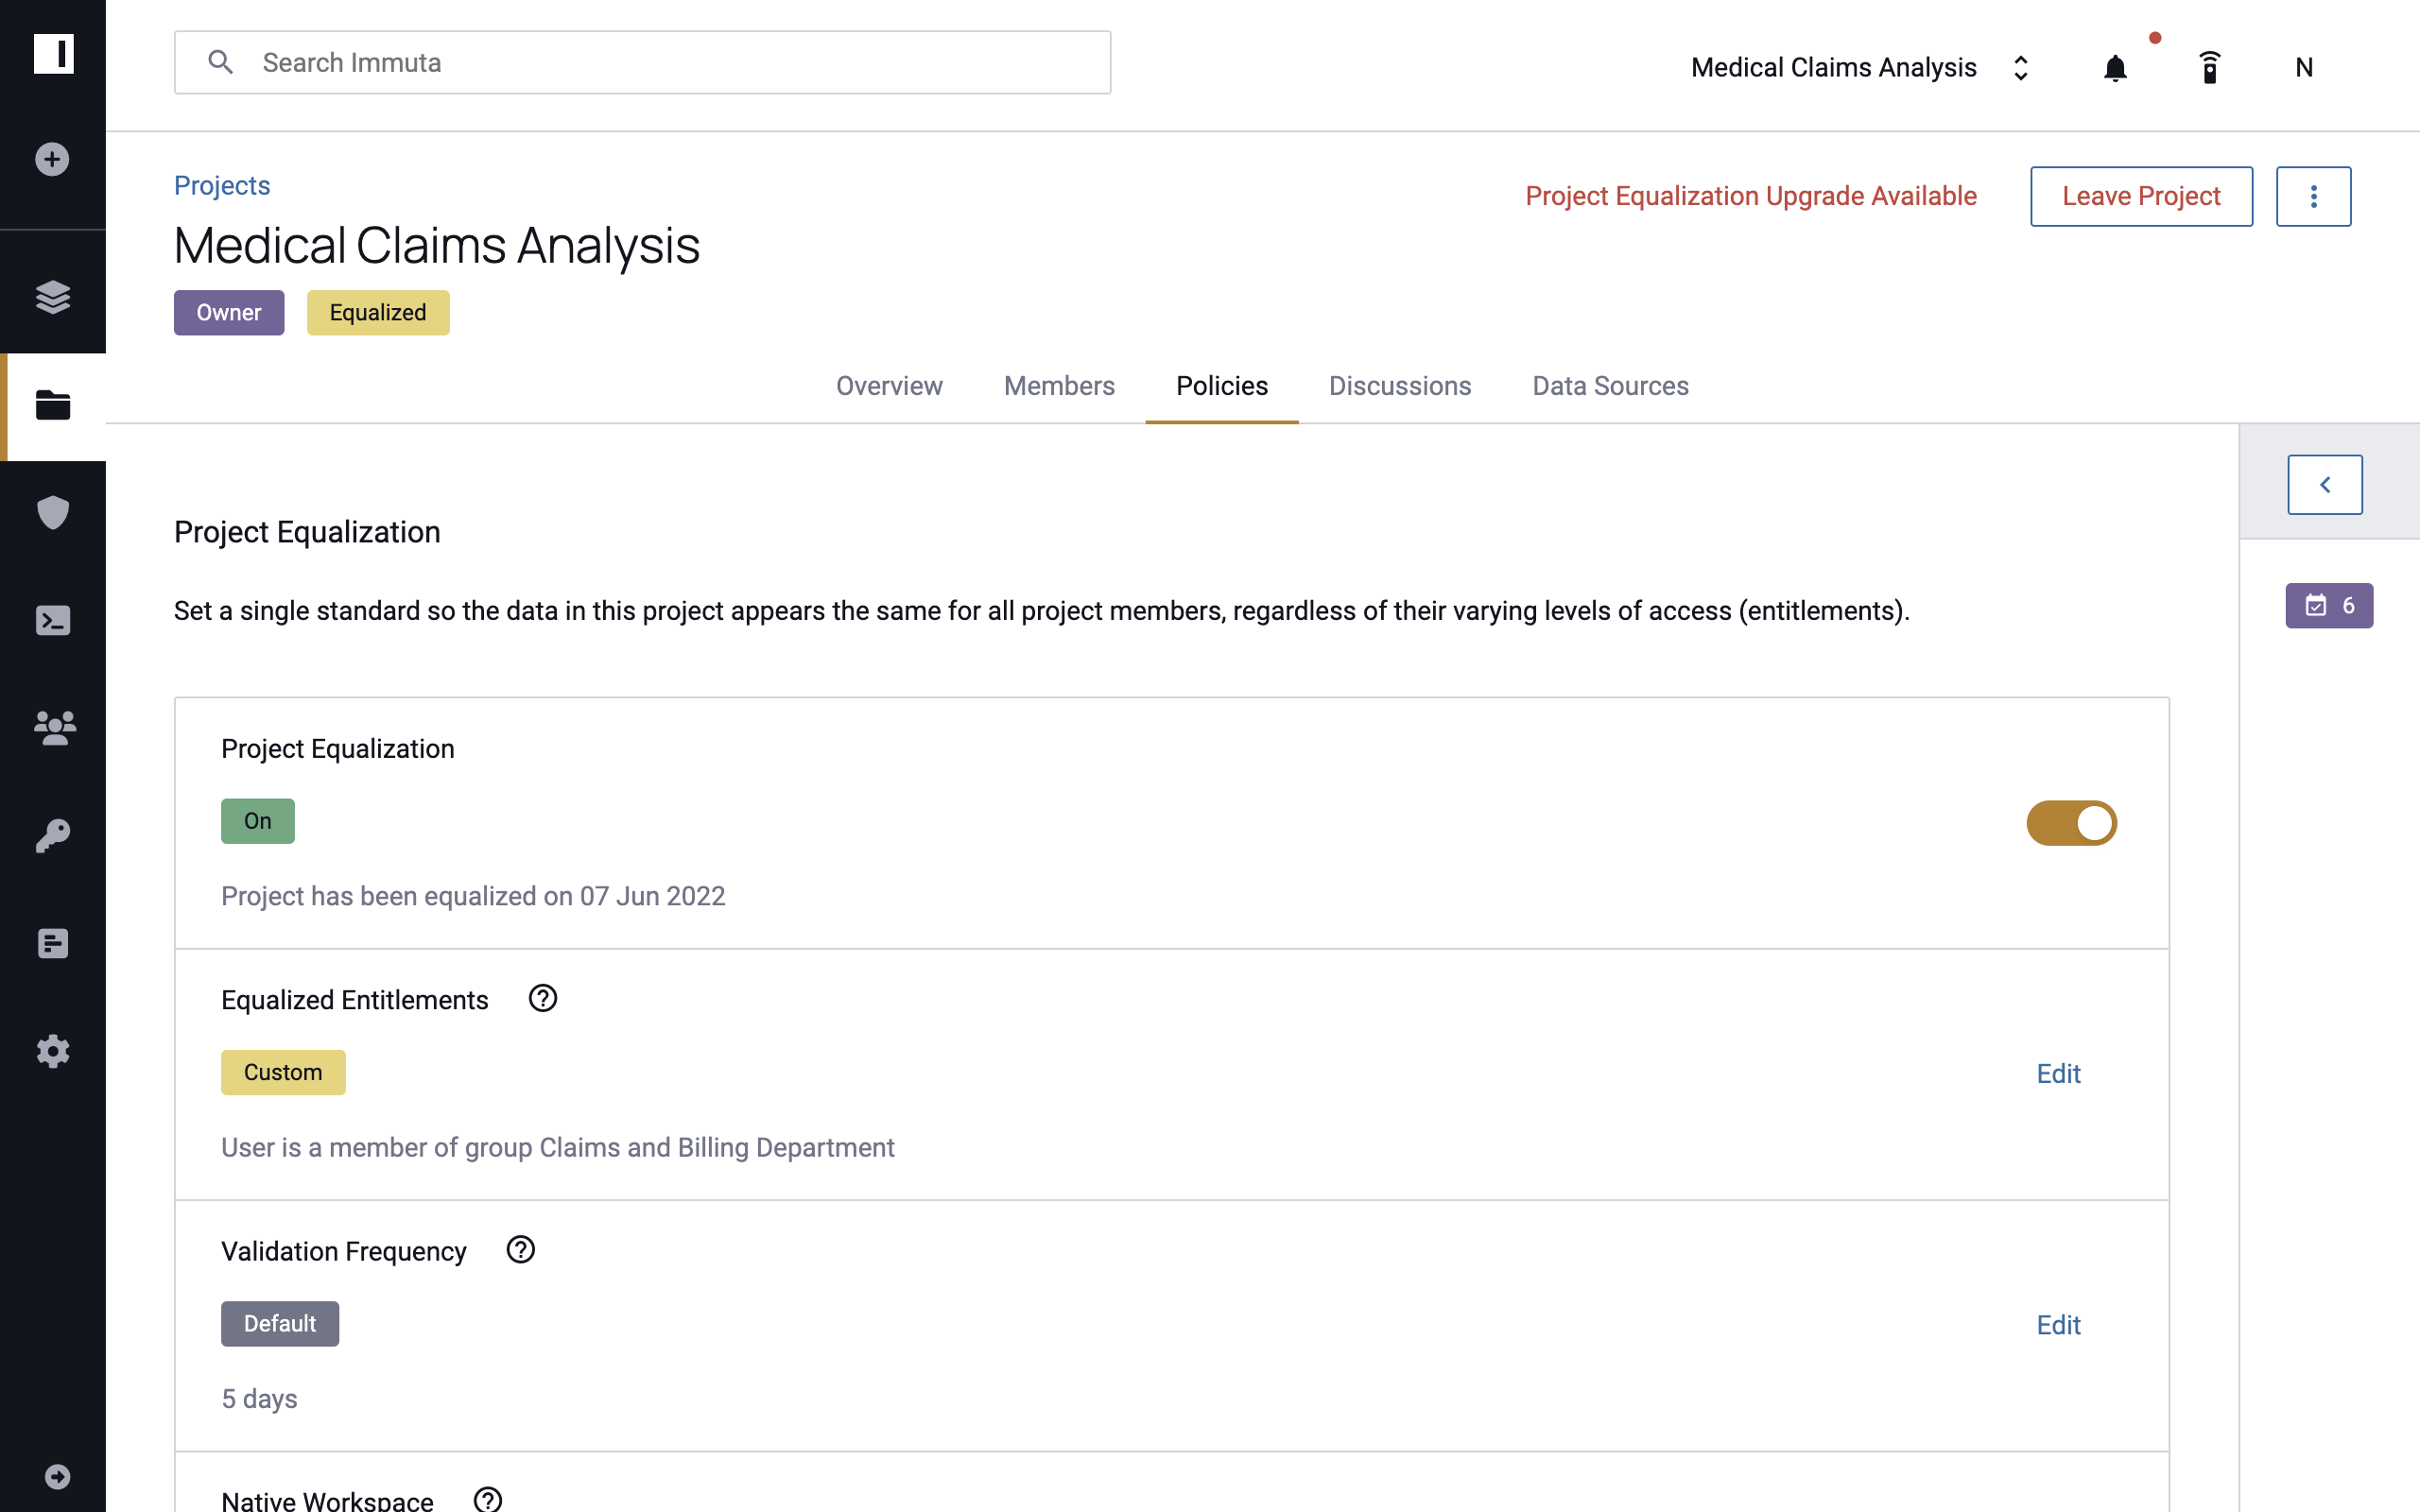
4 - Enable Project Equalization
Best Practice: Equalize Projects
Use Project Equalization so that all project members see the same data, and re-equalize projects if new members or data sources are added to the project.
- Click the Policies tab.
-
In the Project Equalization section, click the toggle button on the far right to On.
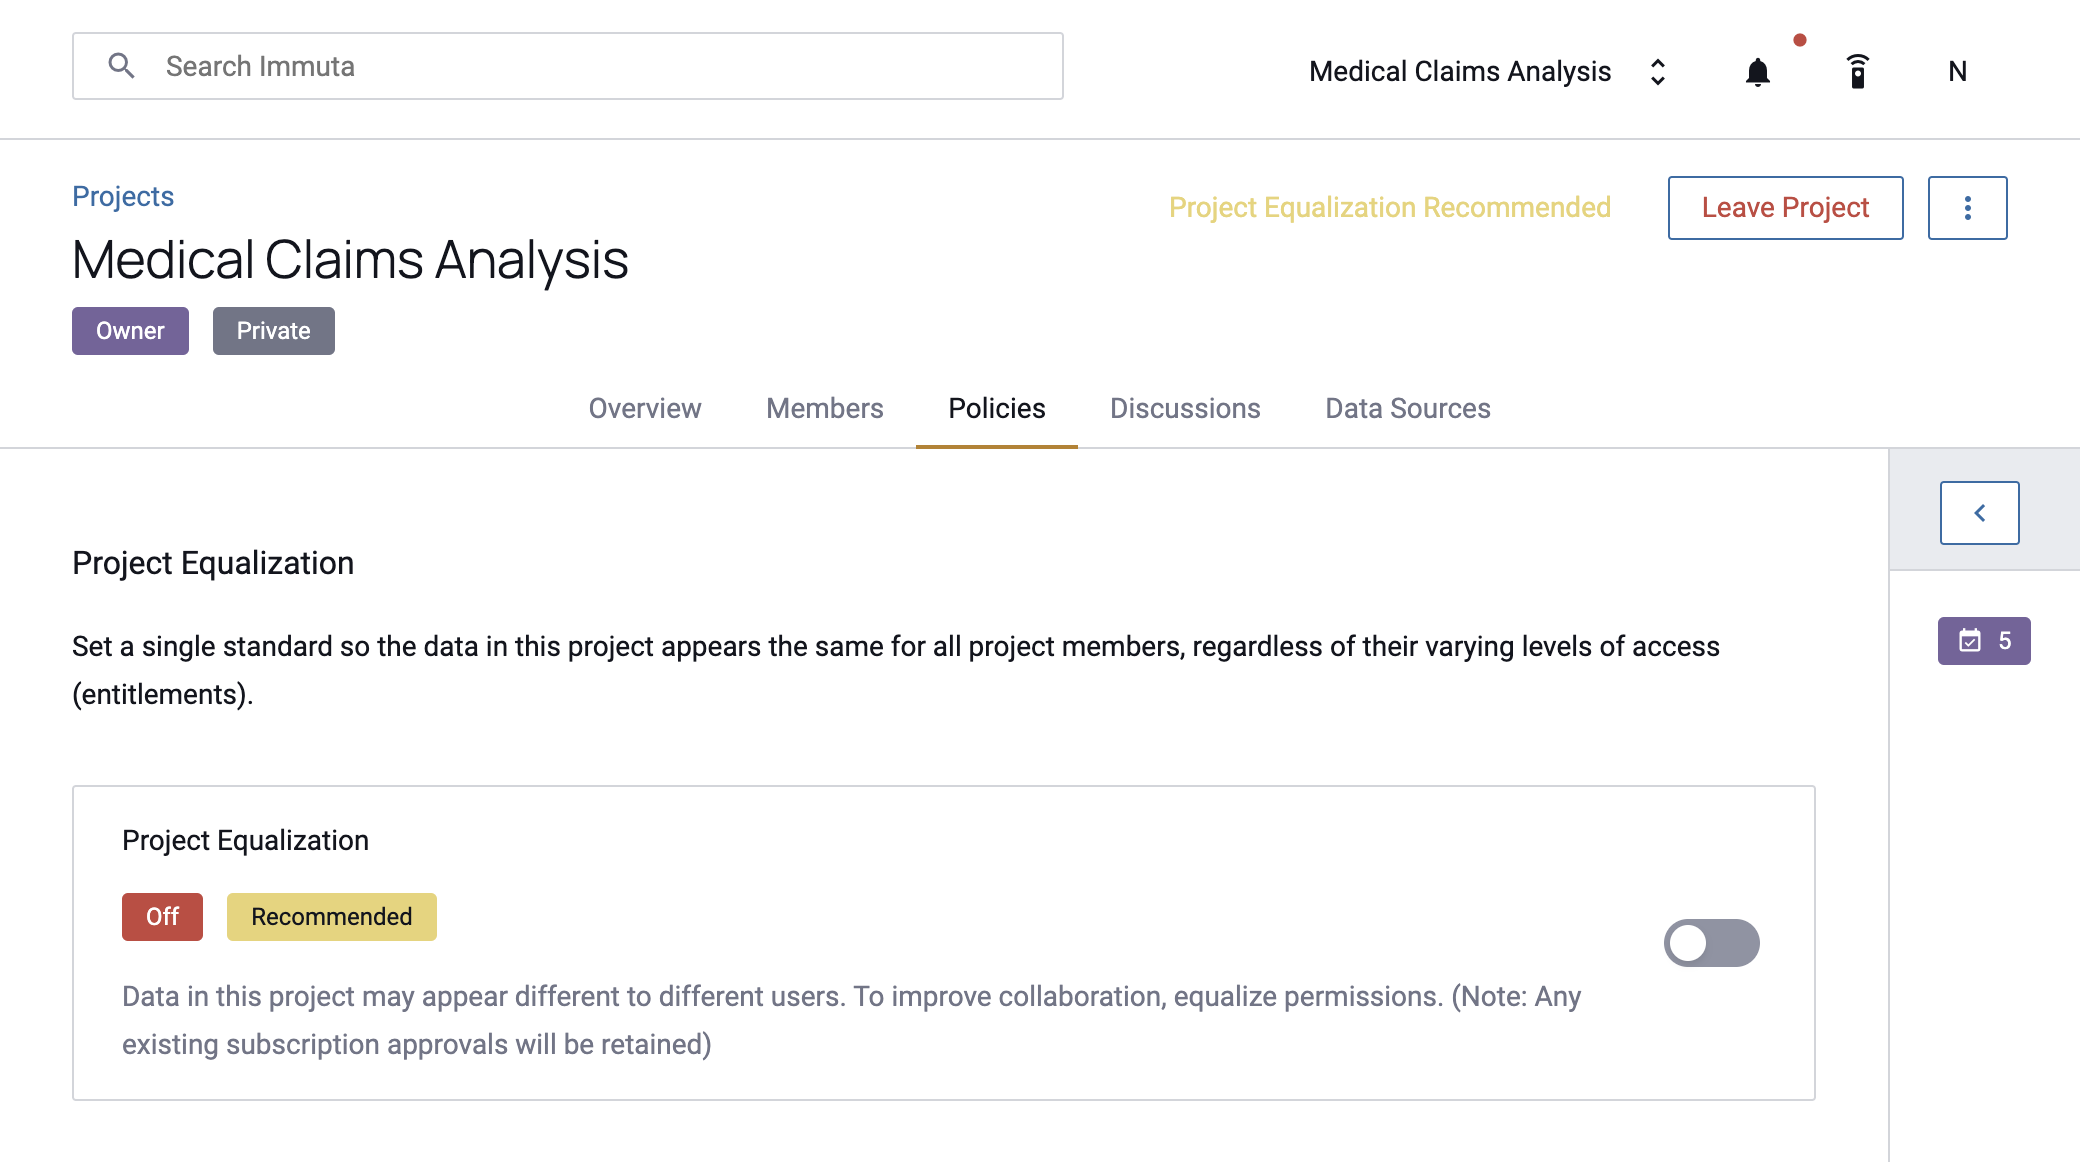
Note: Only project owners can add data sources to the project if this feature is enabled.
After enabling this feature, you can opt to manage Equalized Entitlements and Validation Frequency or to disable Project Equalization:
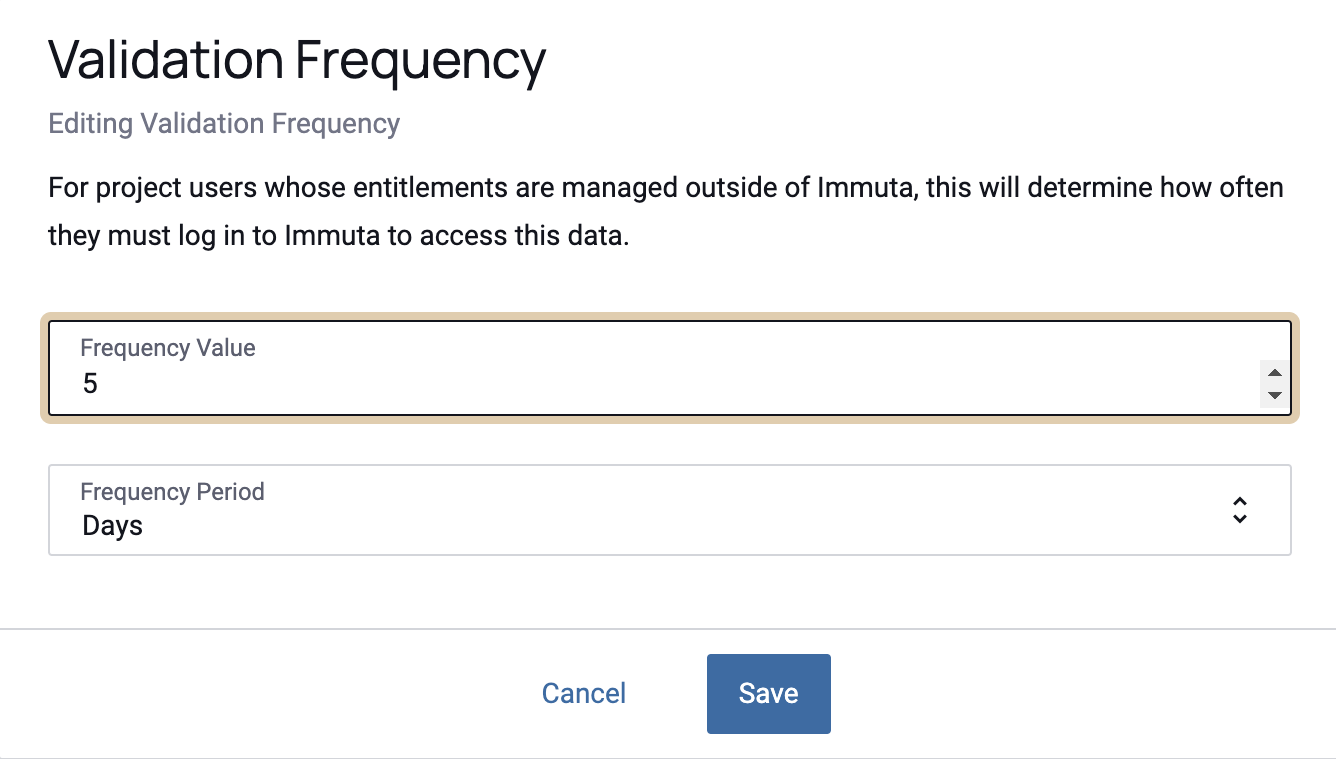
Manage Validation Frequency
- Click Edit Validation Frequency.
- Enter an integer in the first field of the Validation Frequency modal that appears.
- Select Days or Hours in the next dropdown.
-
Click Save.
Disable Project Equalization
- Navigate to the Policies tab.
- In the Project Equalization section, click the toggle button on the far right to Off.
- Click Yes, Turn Off in the confirmation window.
Manage Equalized Entitlements
Best Practice: Use the Recommended Equalized Entitlements
Use Immuta's recommended Equalized Entitlements to protect your data in projects. Changing these entitlements creates two potential disadvantages:
-
If you add entitlements, members might see more data as a whole, but at least some members of the project will be out of compliance.
-
If you remove entitlements, the project will be open to users with fewer privileges, but this change might make less data visible to all project members. Removing entitlements is only recommended if you foresee new users joining with less access to data than the current members.
-
Click Edit next to Equalized Entitlements.
-
In the Equalized Entitlements Builder, select either is a member of a group or possesses attribute from the user condition dropdown menu.
- If you selected is a member of a group, select the appropriate group from the resulting dropdown.
- If you selected possesses attribute, select the appropriate key and value from the subsequent dropdown menus.
-
Click Save.
To view members' compliance status after changing the Equalized Entitlements,
-
Navigate to the Members tab from the Project Overview page.
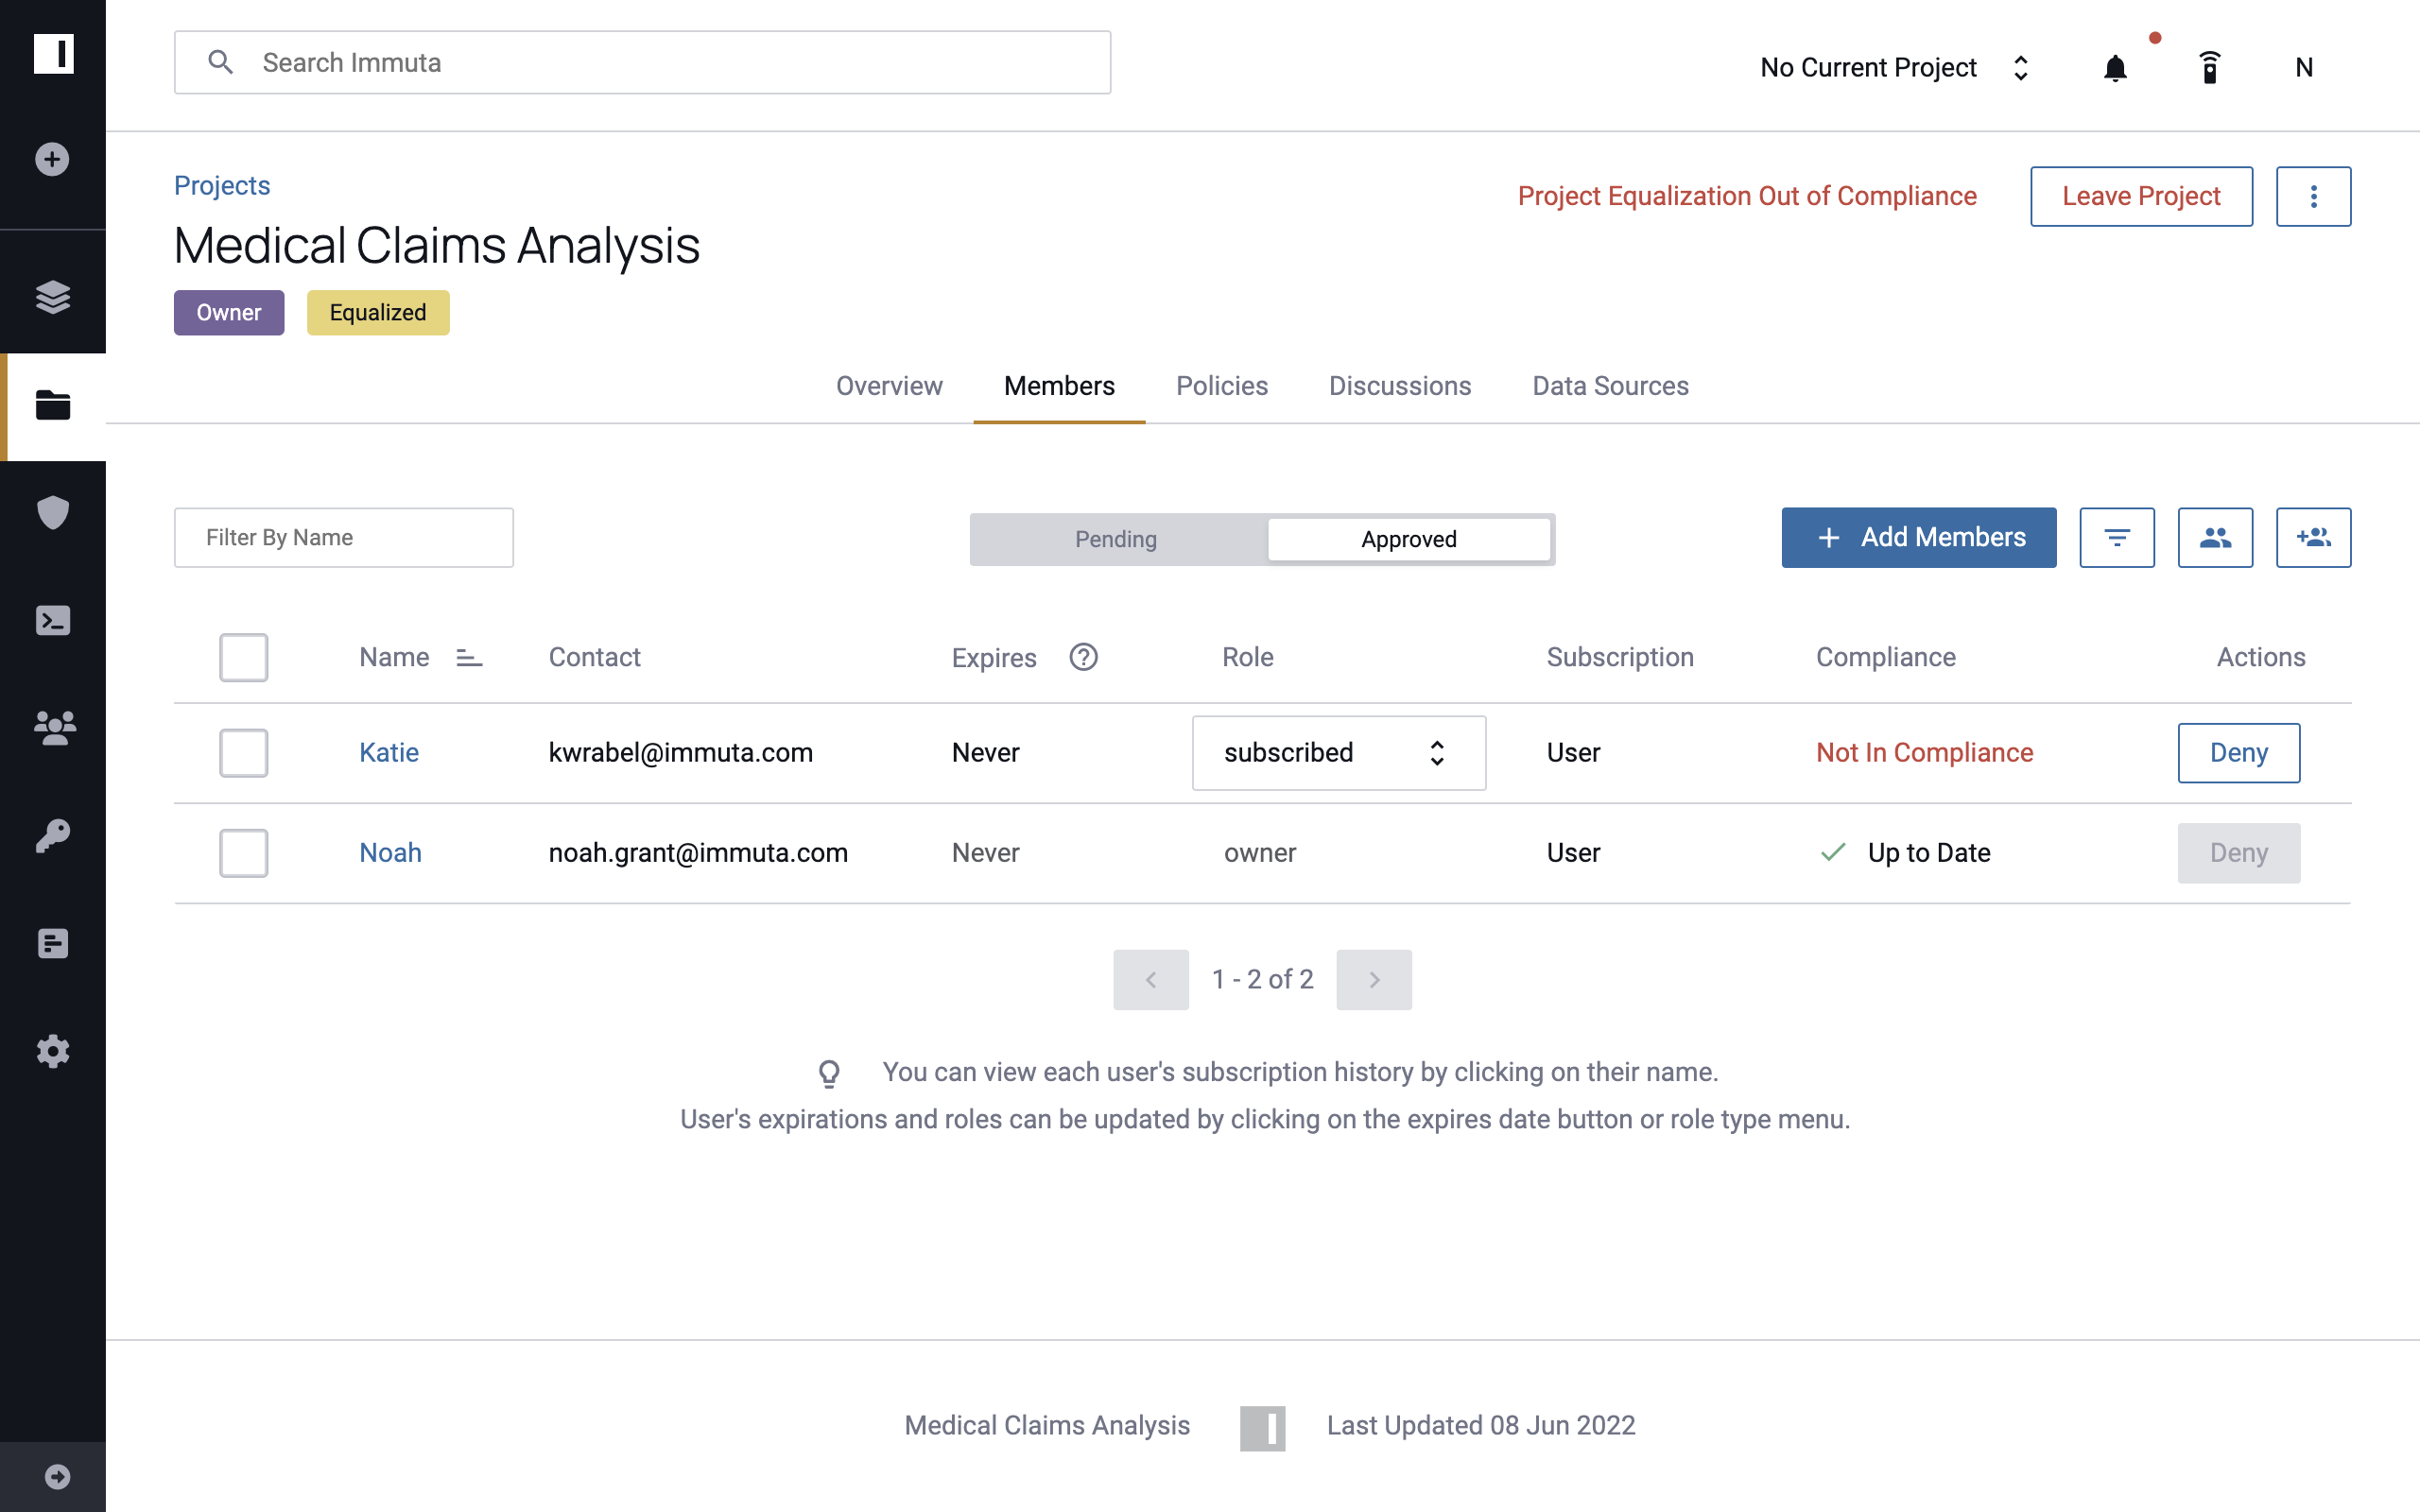
-
Click the Not In Compliance text to view the details about the user's status.
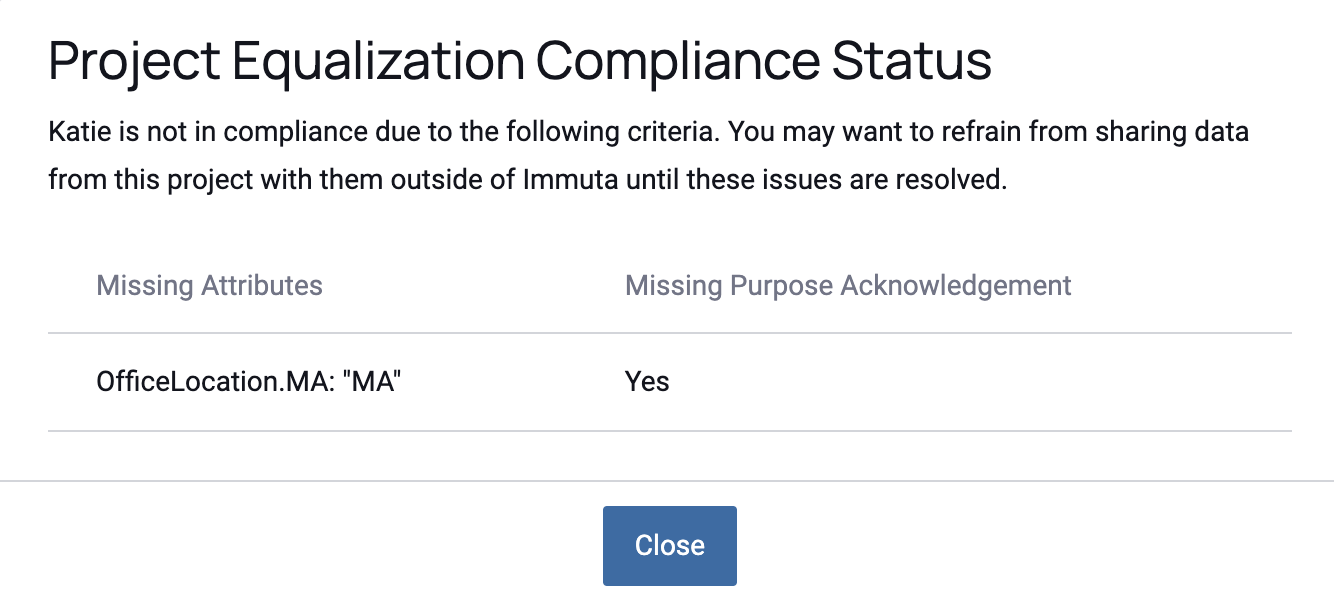
Users who are not in compliance will be unable to view data sources within the project until the compliance issues are resolved.
To revert entitlements to those recommended by Immuta,
- Click Edit next to Equalized Entitlements.
- Click Use Recommended in the top right corner of the Equalized Entitlements Builder.
- Click Confirm.
Additional Project Tutorials
You may need to configure additional project settings or use other features to meet your needs. The table below describes each of these additional options.
| Project Tutorial | Description |
|---|---|
| Disable, Enable, or Delete a Project | Project owners or Governors can disable projects, which hides the project from everyone but the project owner, or enable projects. However, only the project owner can delete a project. After a project is deleted, it cannot be enabled. |
| Enable Masked Joins | Disabled by default, this feature allows masked columns to be joined within a project. |
| Manage Data Sources | Any project member can add data sources to a project, unless the Project Equalization or Masked Joins feature is enabled; in those cases only project owners can add data sources. |
| Manage Project Discussions | Project owners can create, reply to, and delete project discussions. |
| Manage Project Documentation | Project owners can update the documentation for a project at any time. If no documentation is entered, the project name displays in this section of the Project Overview tab by default. |
| Manage Project Members | Project owners can update user roles and remove users from a project. |
| Manage Project Tags | Tags can be added to projects to drive search results and audit reports. |
Click on the tabs below for specific tutorials:
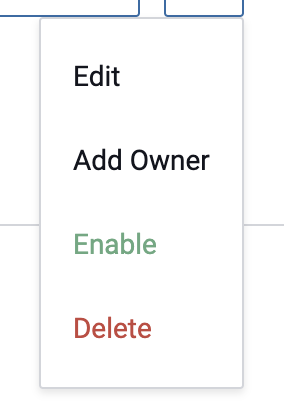
Disable a Project
- Click the Projects icon in the left sidebar and select the My Projects tab.
-
Click the menu icon next to the project and select Disable.
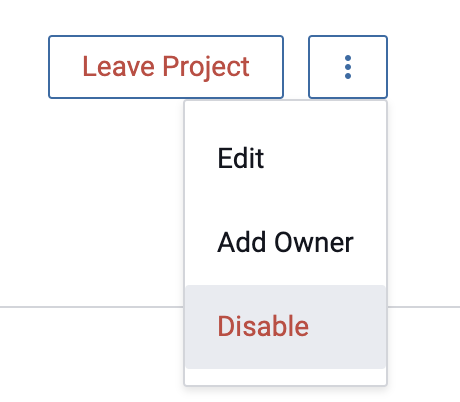
Alternatively,
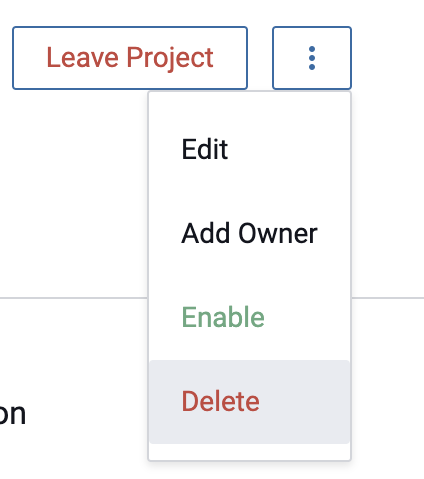
- Select a project, and then navigate to the Project Overview tab.
- Click the menu icon in the upper right corner and select Disable.
A label will appear next to the project indicating it has been disabled, and a notification will be sent out to all subscribers.
Restore a Project
- Click the Projects icon in the left sidebar and select the My Projects tab.
-
Click the menu icon next to the project and select Enable.
Alternatively,
- Select a project and navigate to the Project Overview tab.
- Click the menu icon in the upper right corner and select Enable.
The label indicating the project was disabled will disappear, and a notification will be sent out to all subscribers.
Delete a Project
Deleting a project permanently removes it from Immuta. Projects must first be disabled before they can be deleted.
- Click the Projects icon in the left sidebar and select the My Projects tab.
-
Click the menu icon next to the disabled project and select Delete.
-
Click Confirm.
Alternatively,
- Disable the project and click the Overview tab.
- Click the menu icon in the upper right corner and select Delete.
- Click Confirm.
The project is now removed from Immuta, and a notification will be sent out to all subscribers.
Enable Masked Joins
- Navigate to the Project Overview tab.
-
Click the Allow Masked Joins toggle on.
Note: While this condition is allowed, only project owners can add data sources to the project. Additionally, Immuta does not allow joining on columns masked by rounding, by making null, with a constant, or with a regex or on columns that have conditional masking policies applied to them.
Bulk Add Data Sources to a Project
- Navigate to the Data Sources page.
- Select the checkboxes for the data sources you want in a project.
- Select the main three dot drop down menu in the top right corner.
- Click Add To New Project.
- Enter the new project information.
Alternatively,
- Switch your current project to be the one you want new data sources in.
- Navigate to the Data Sources page.
- Select the checkboxes for the data sources you want in a project.
- Select the main three dot drop down menu in the top right corner.
- Click Add To Current Project.
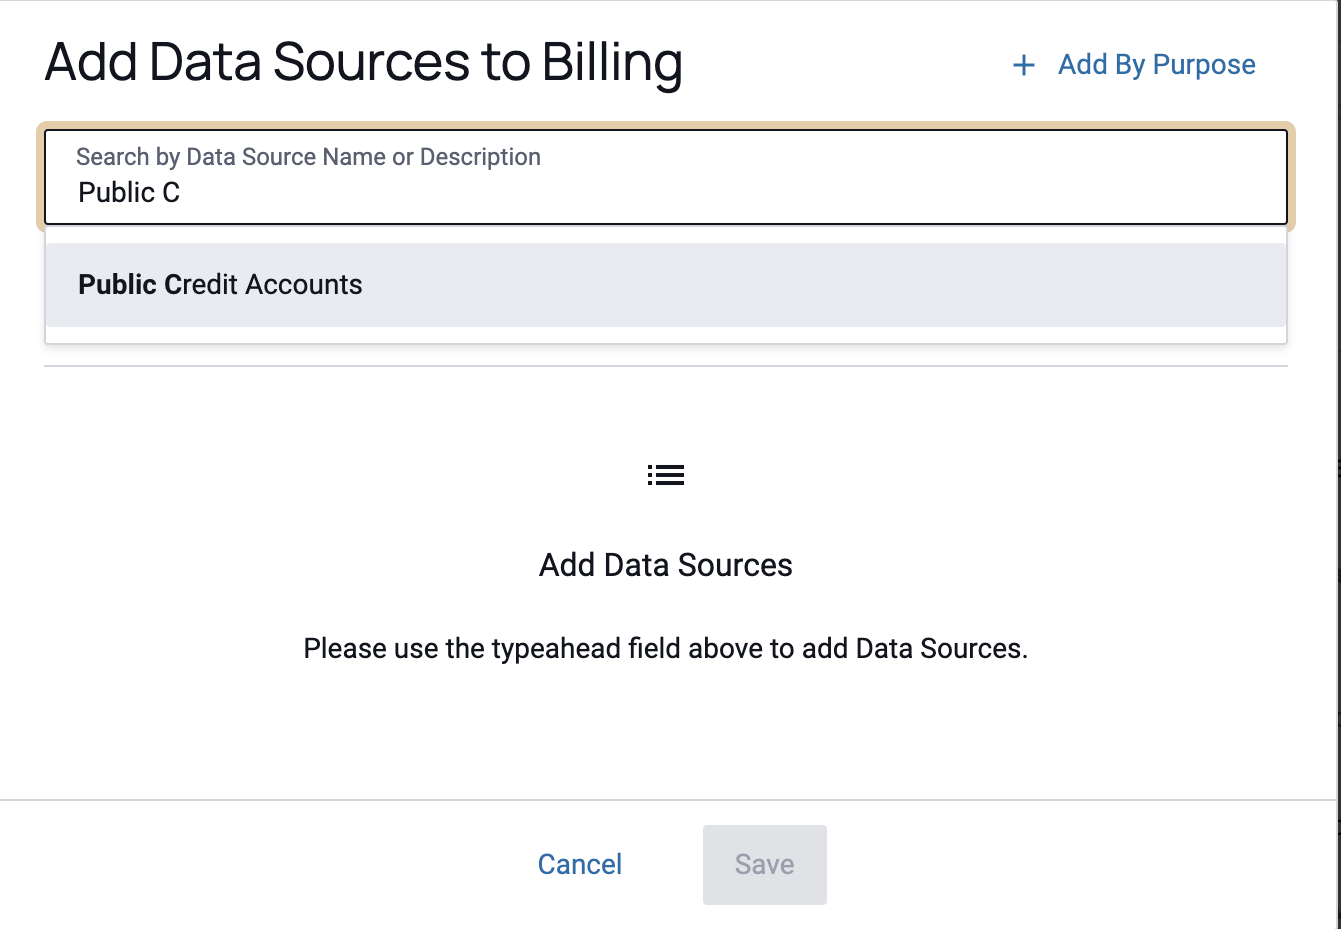
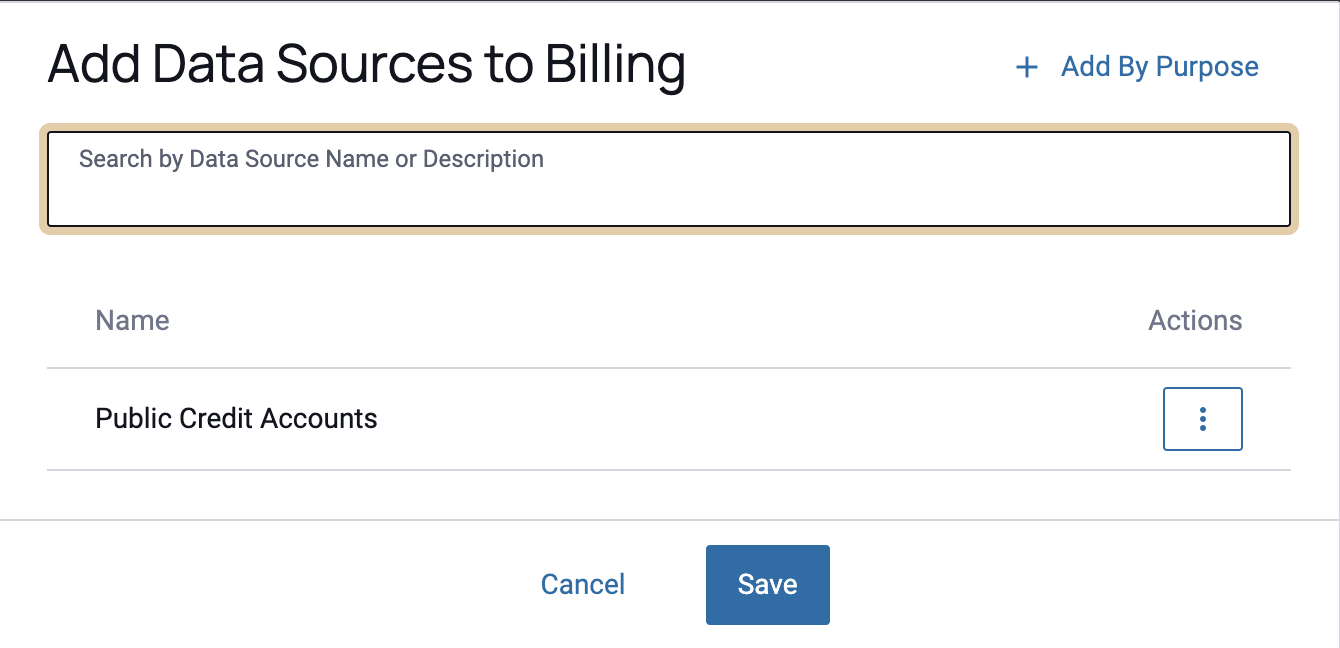
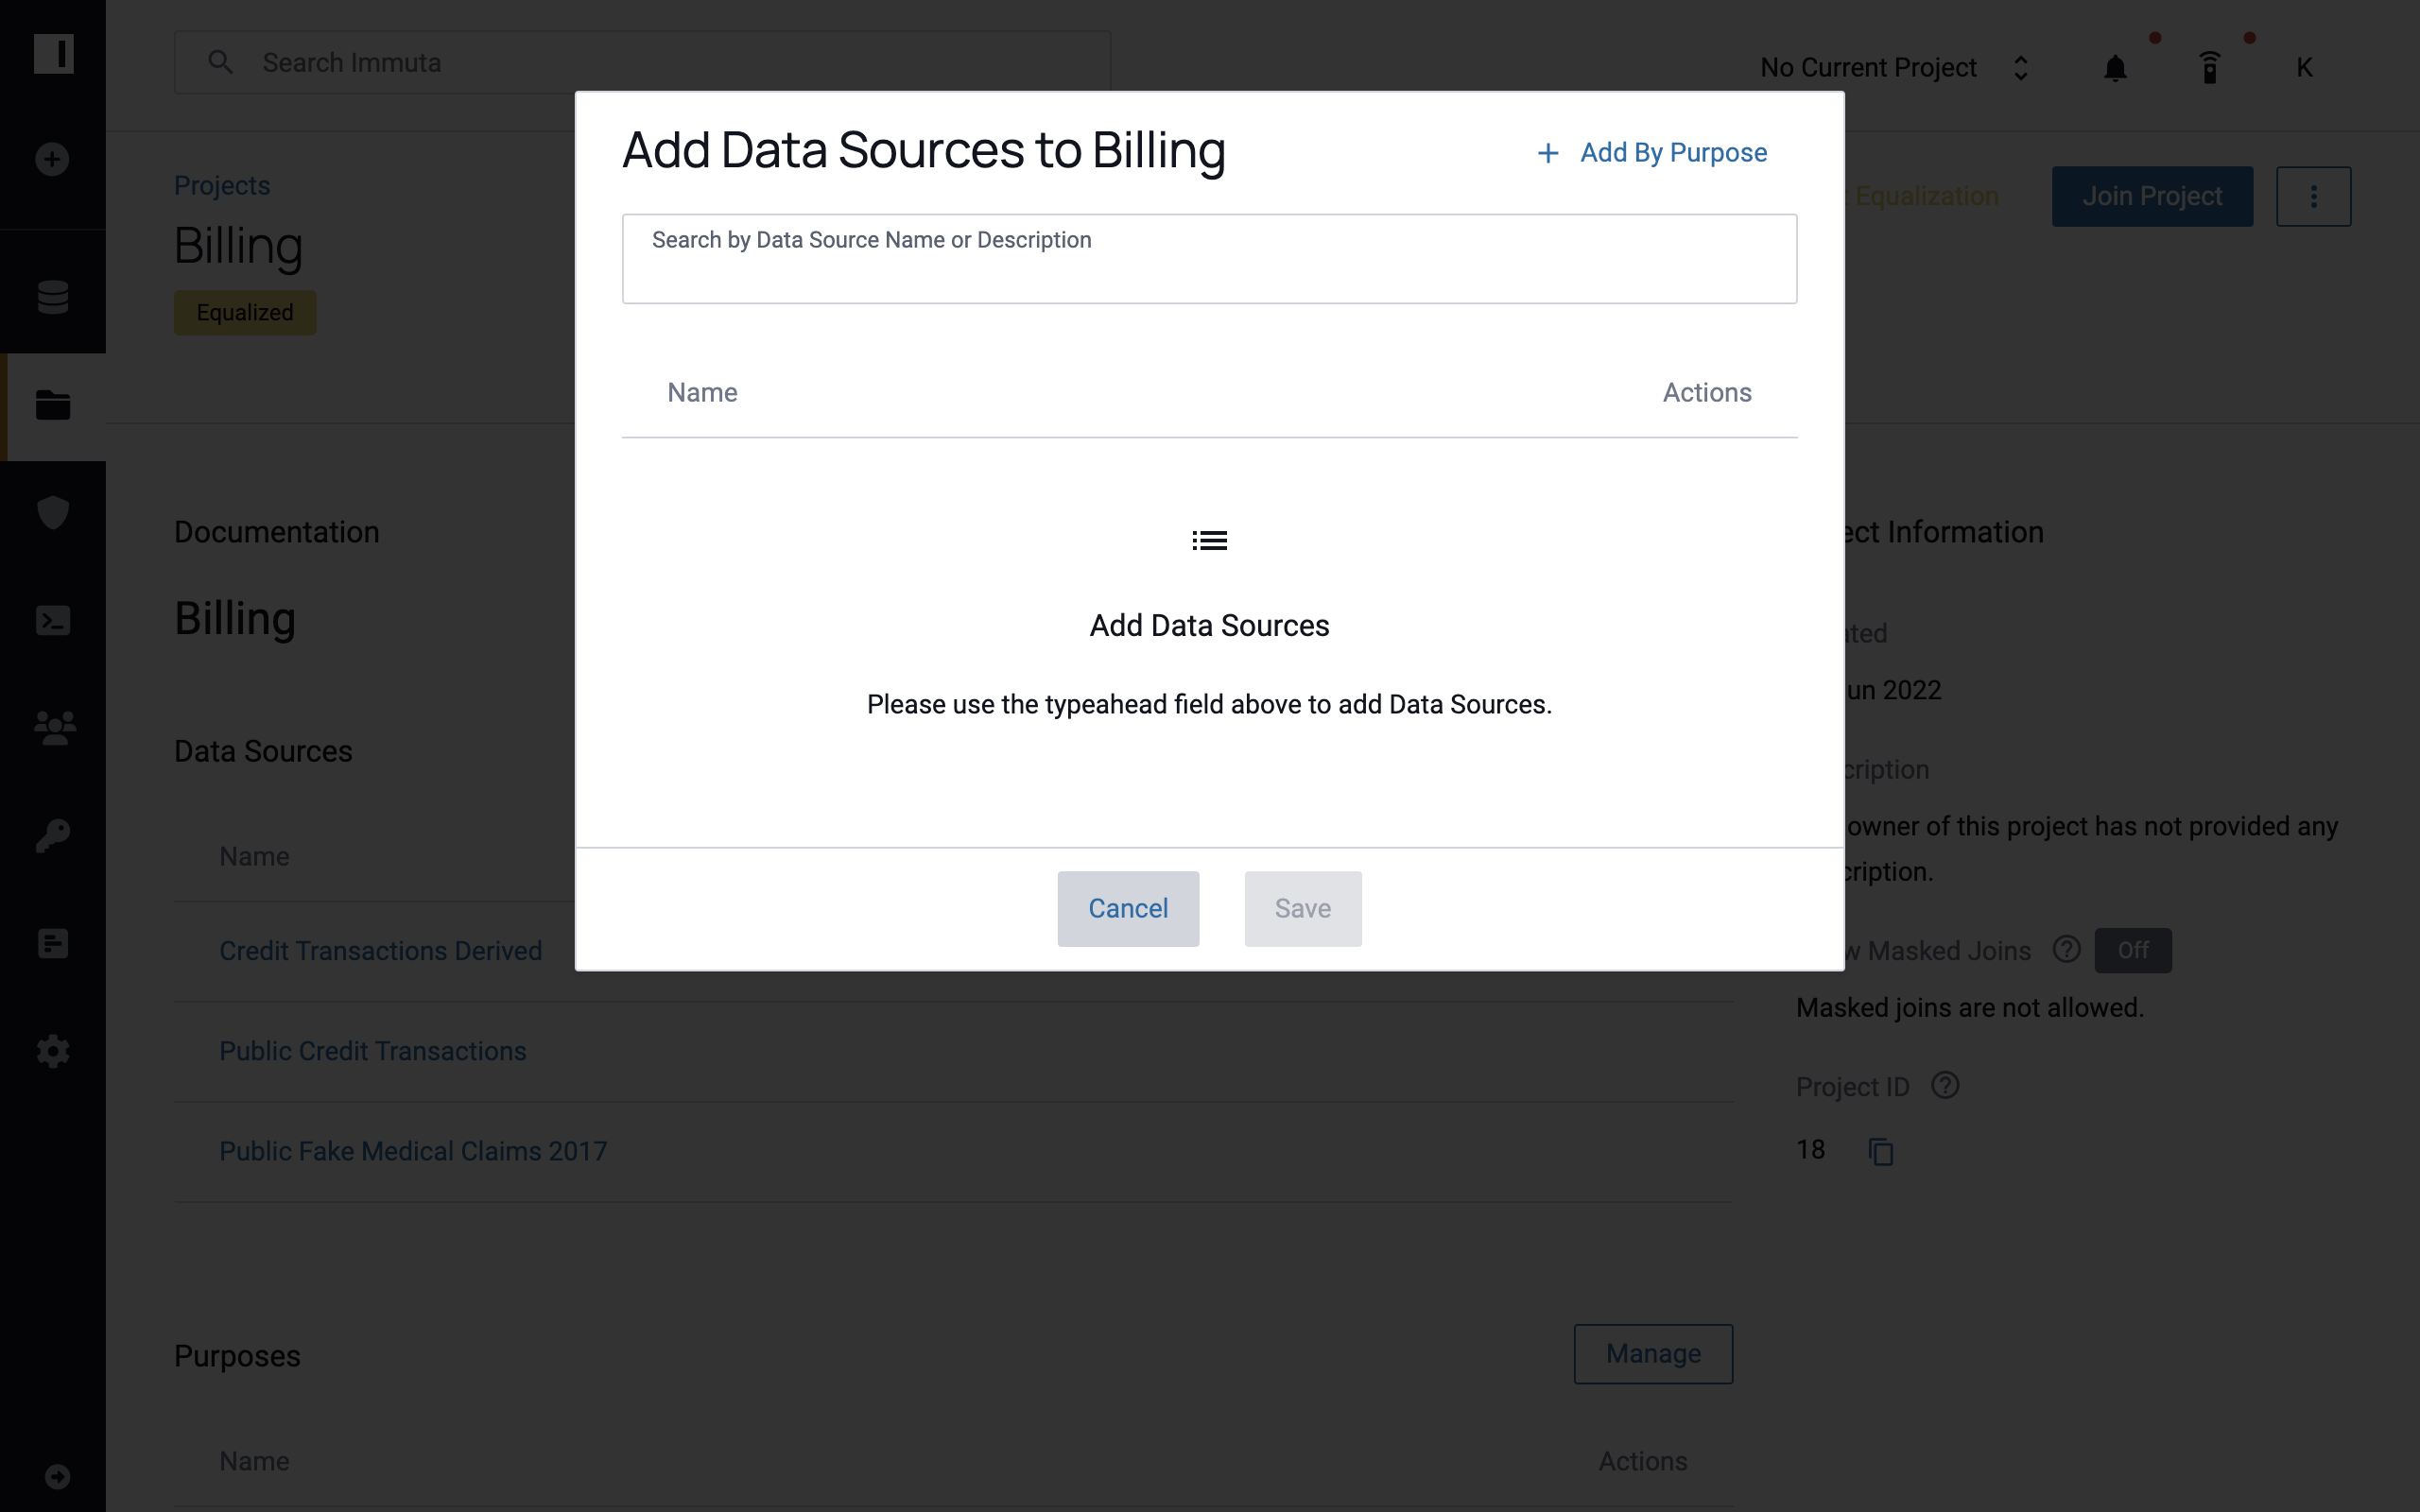
Add Data Sources to a Project
- Navigate to the Project Overview tab.
-
Click the Add Data Sources button beneath the Data Sources section in the center pane.
-
Start typing the name of a data source you'd like to include in the project.
-
Select the data source from the list of auto-completed options in the dropdown menu.
-
Repeat this process to add additional data sources to the list. You can remove them using the dropdown menu.
- When complete, click the Save button at the bottom of the list.
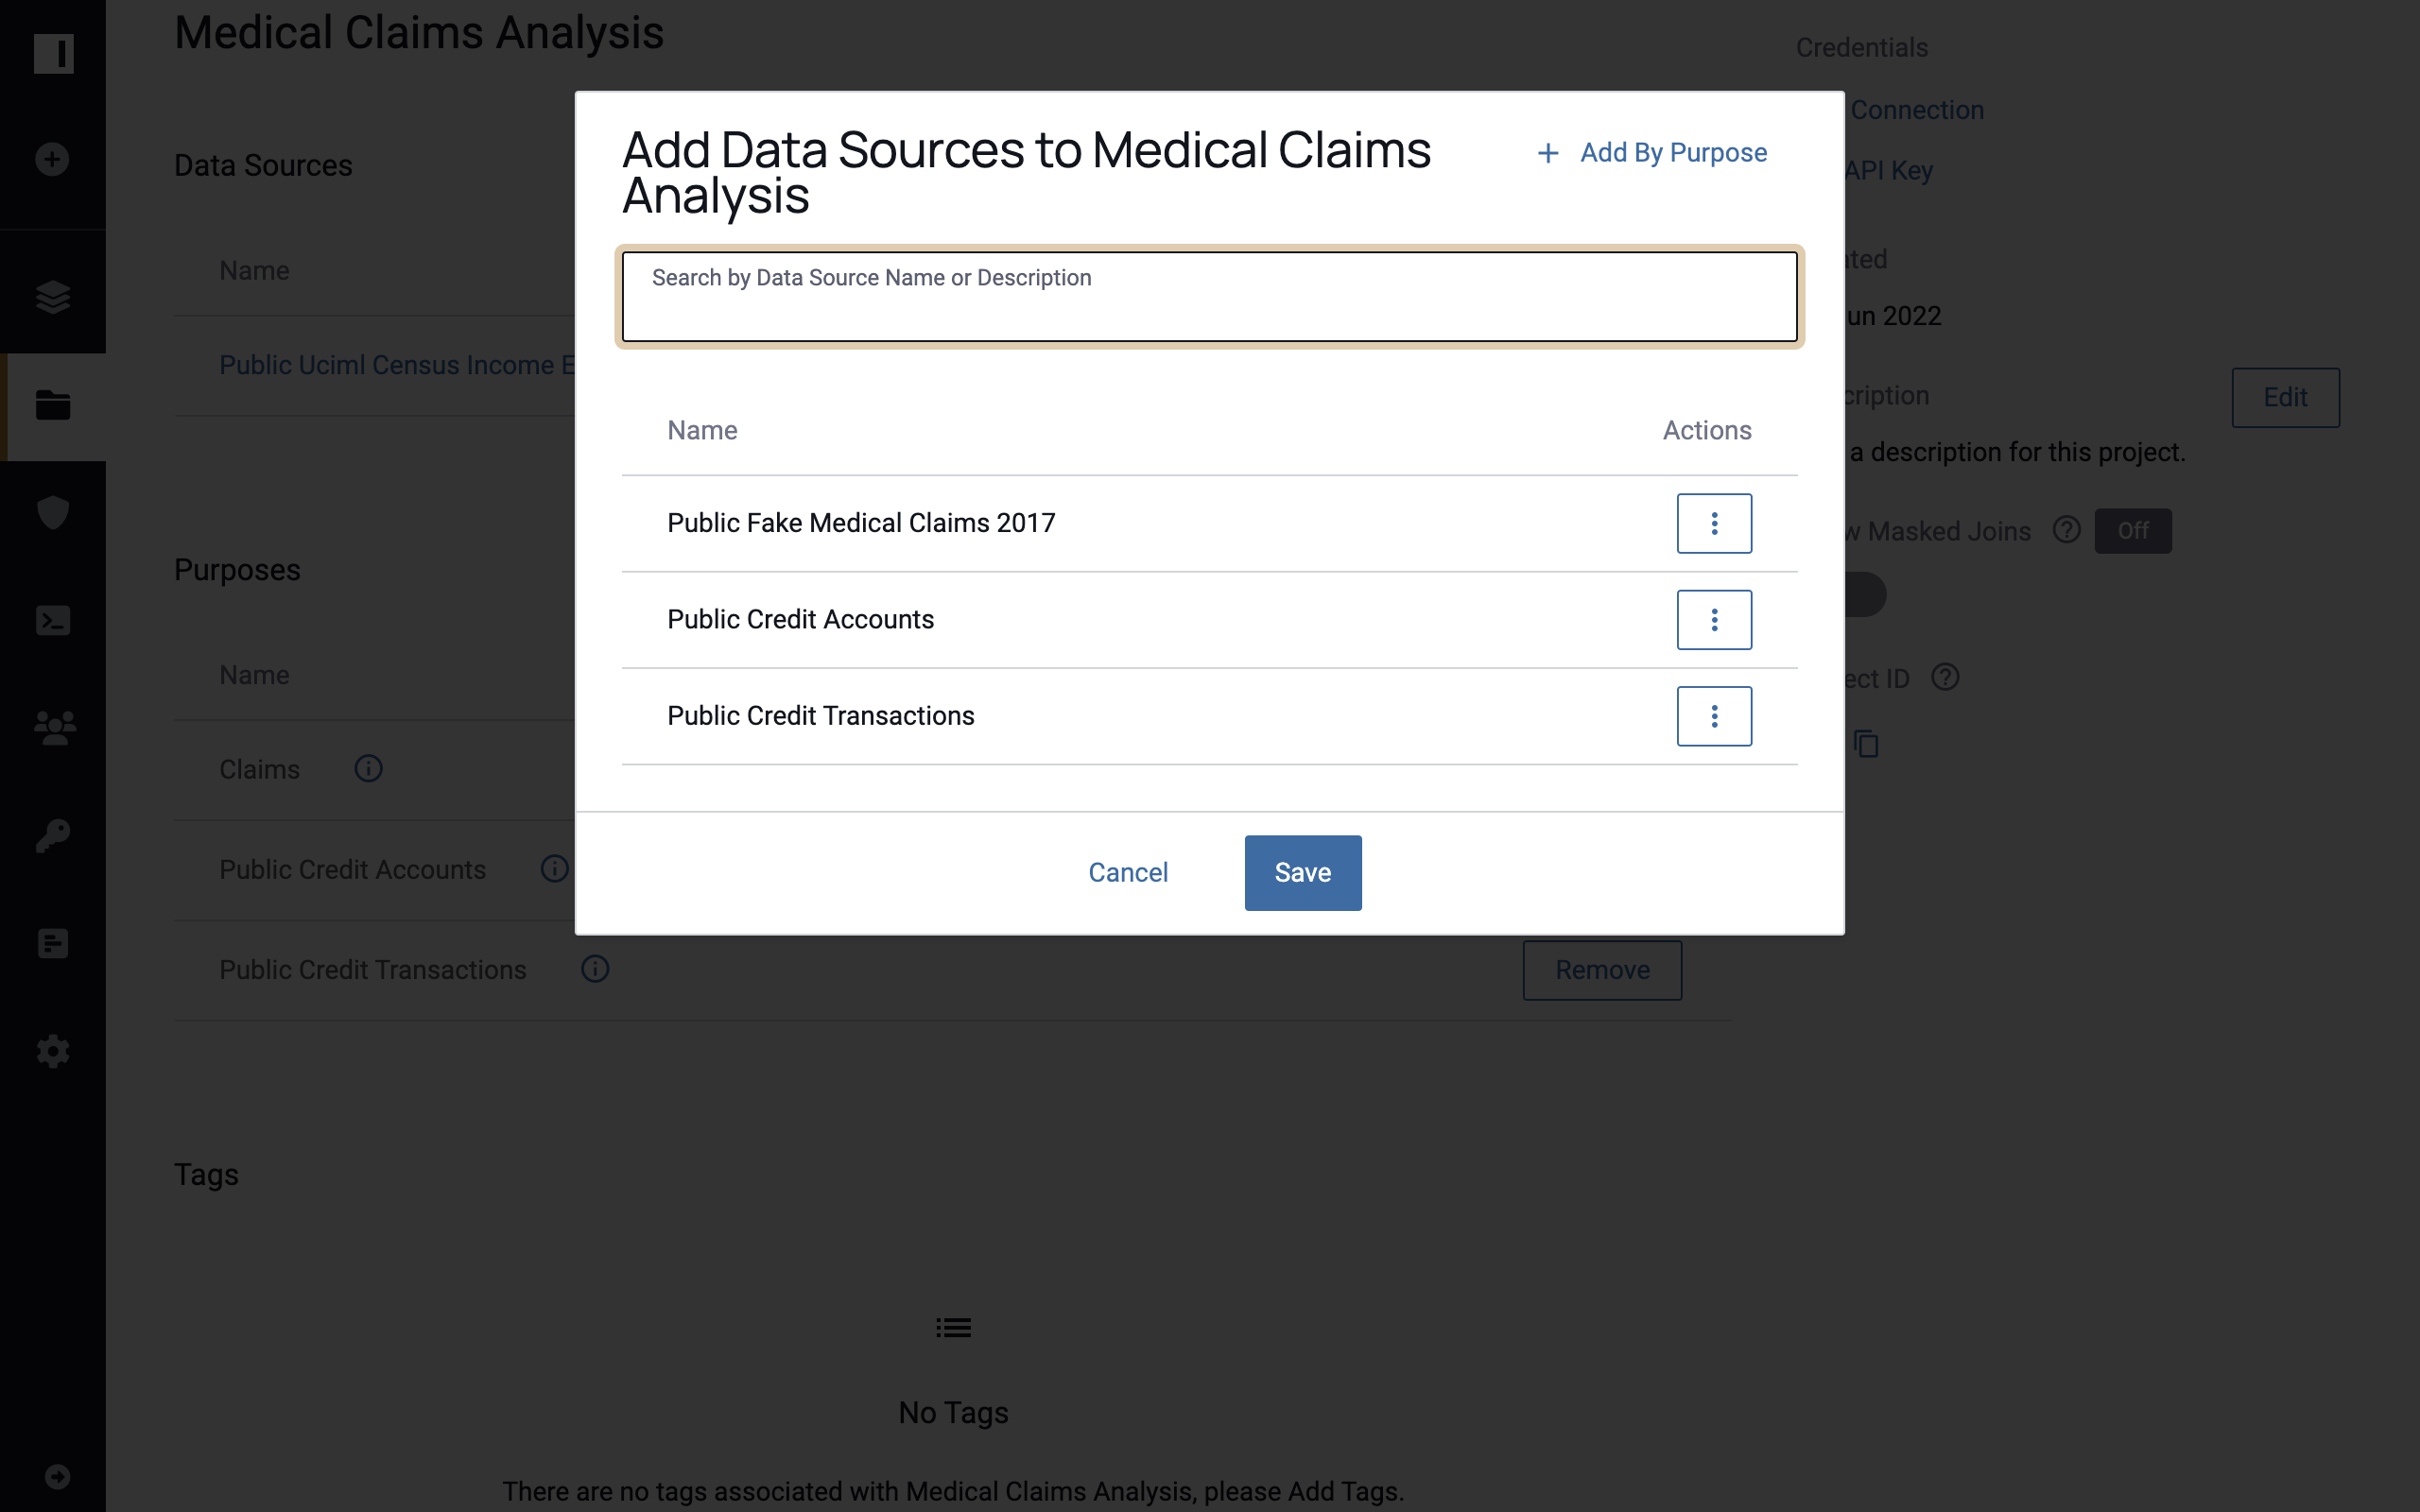
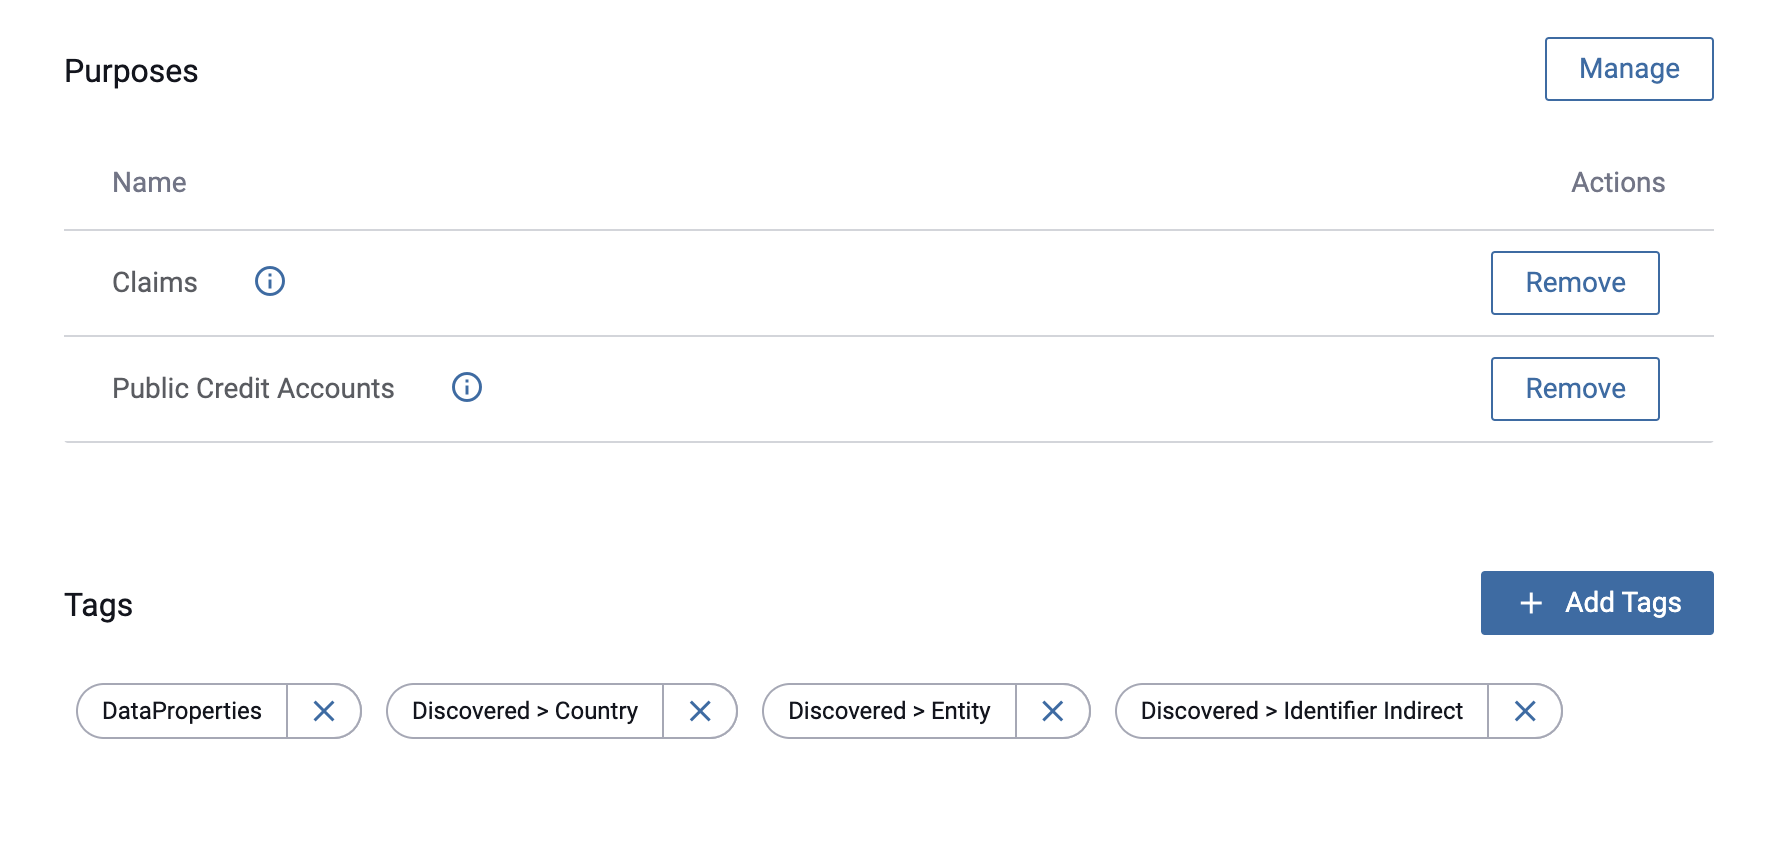
Add Data Sources by Purpose
You can automatically add all data sources to a project that contain a Limit usage to purpose policy that matches the purpose of that project.
For example, consider the following data sources and their corresponding Data Policies:
Public Fake Medical Claims 2017
Data Policy: Limit usage to purpose(s) Analyze patterns to prevent and detect fraud for everyone.
Public Credit Accounts
Data Policy: Limit usage to purpose(s) Analyze patterns to prevent and detect fraud for everyone except when user is a member of group Claims and Billing Department.
Public Credit Transactions
Data Policy: Limit usage to purpose(s) Analyze patterns to prevent and detect fraud for everyone except when user is a member of group Claims and Billing Department.
To add all data sources to a project that contains a matching purpose (in this example, "Analyze patterns to prevent and detect fraud"),
-
Select a Project, and click the Add Data Sources button on the Data Sources tab.
-
Click Add By Purpose in the top right of the dialog.
-
All data sources matching the project's purpose(s) will populate at the bottom of the dialog. Review this list, and then click Save.
Post a Discussion Thread
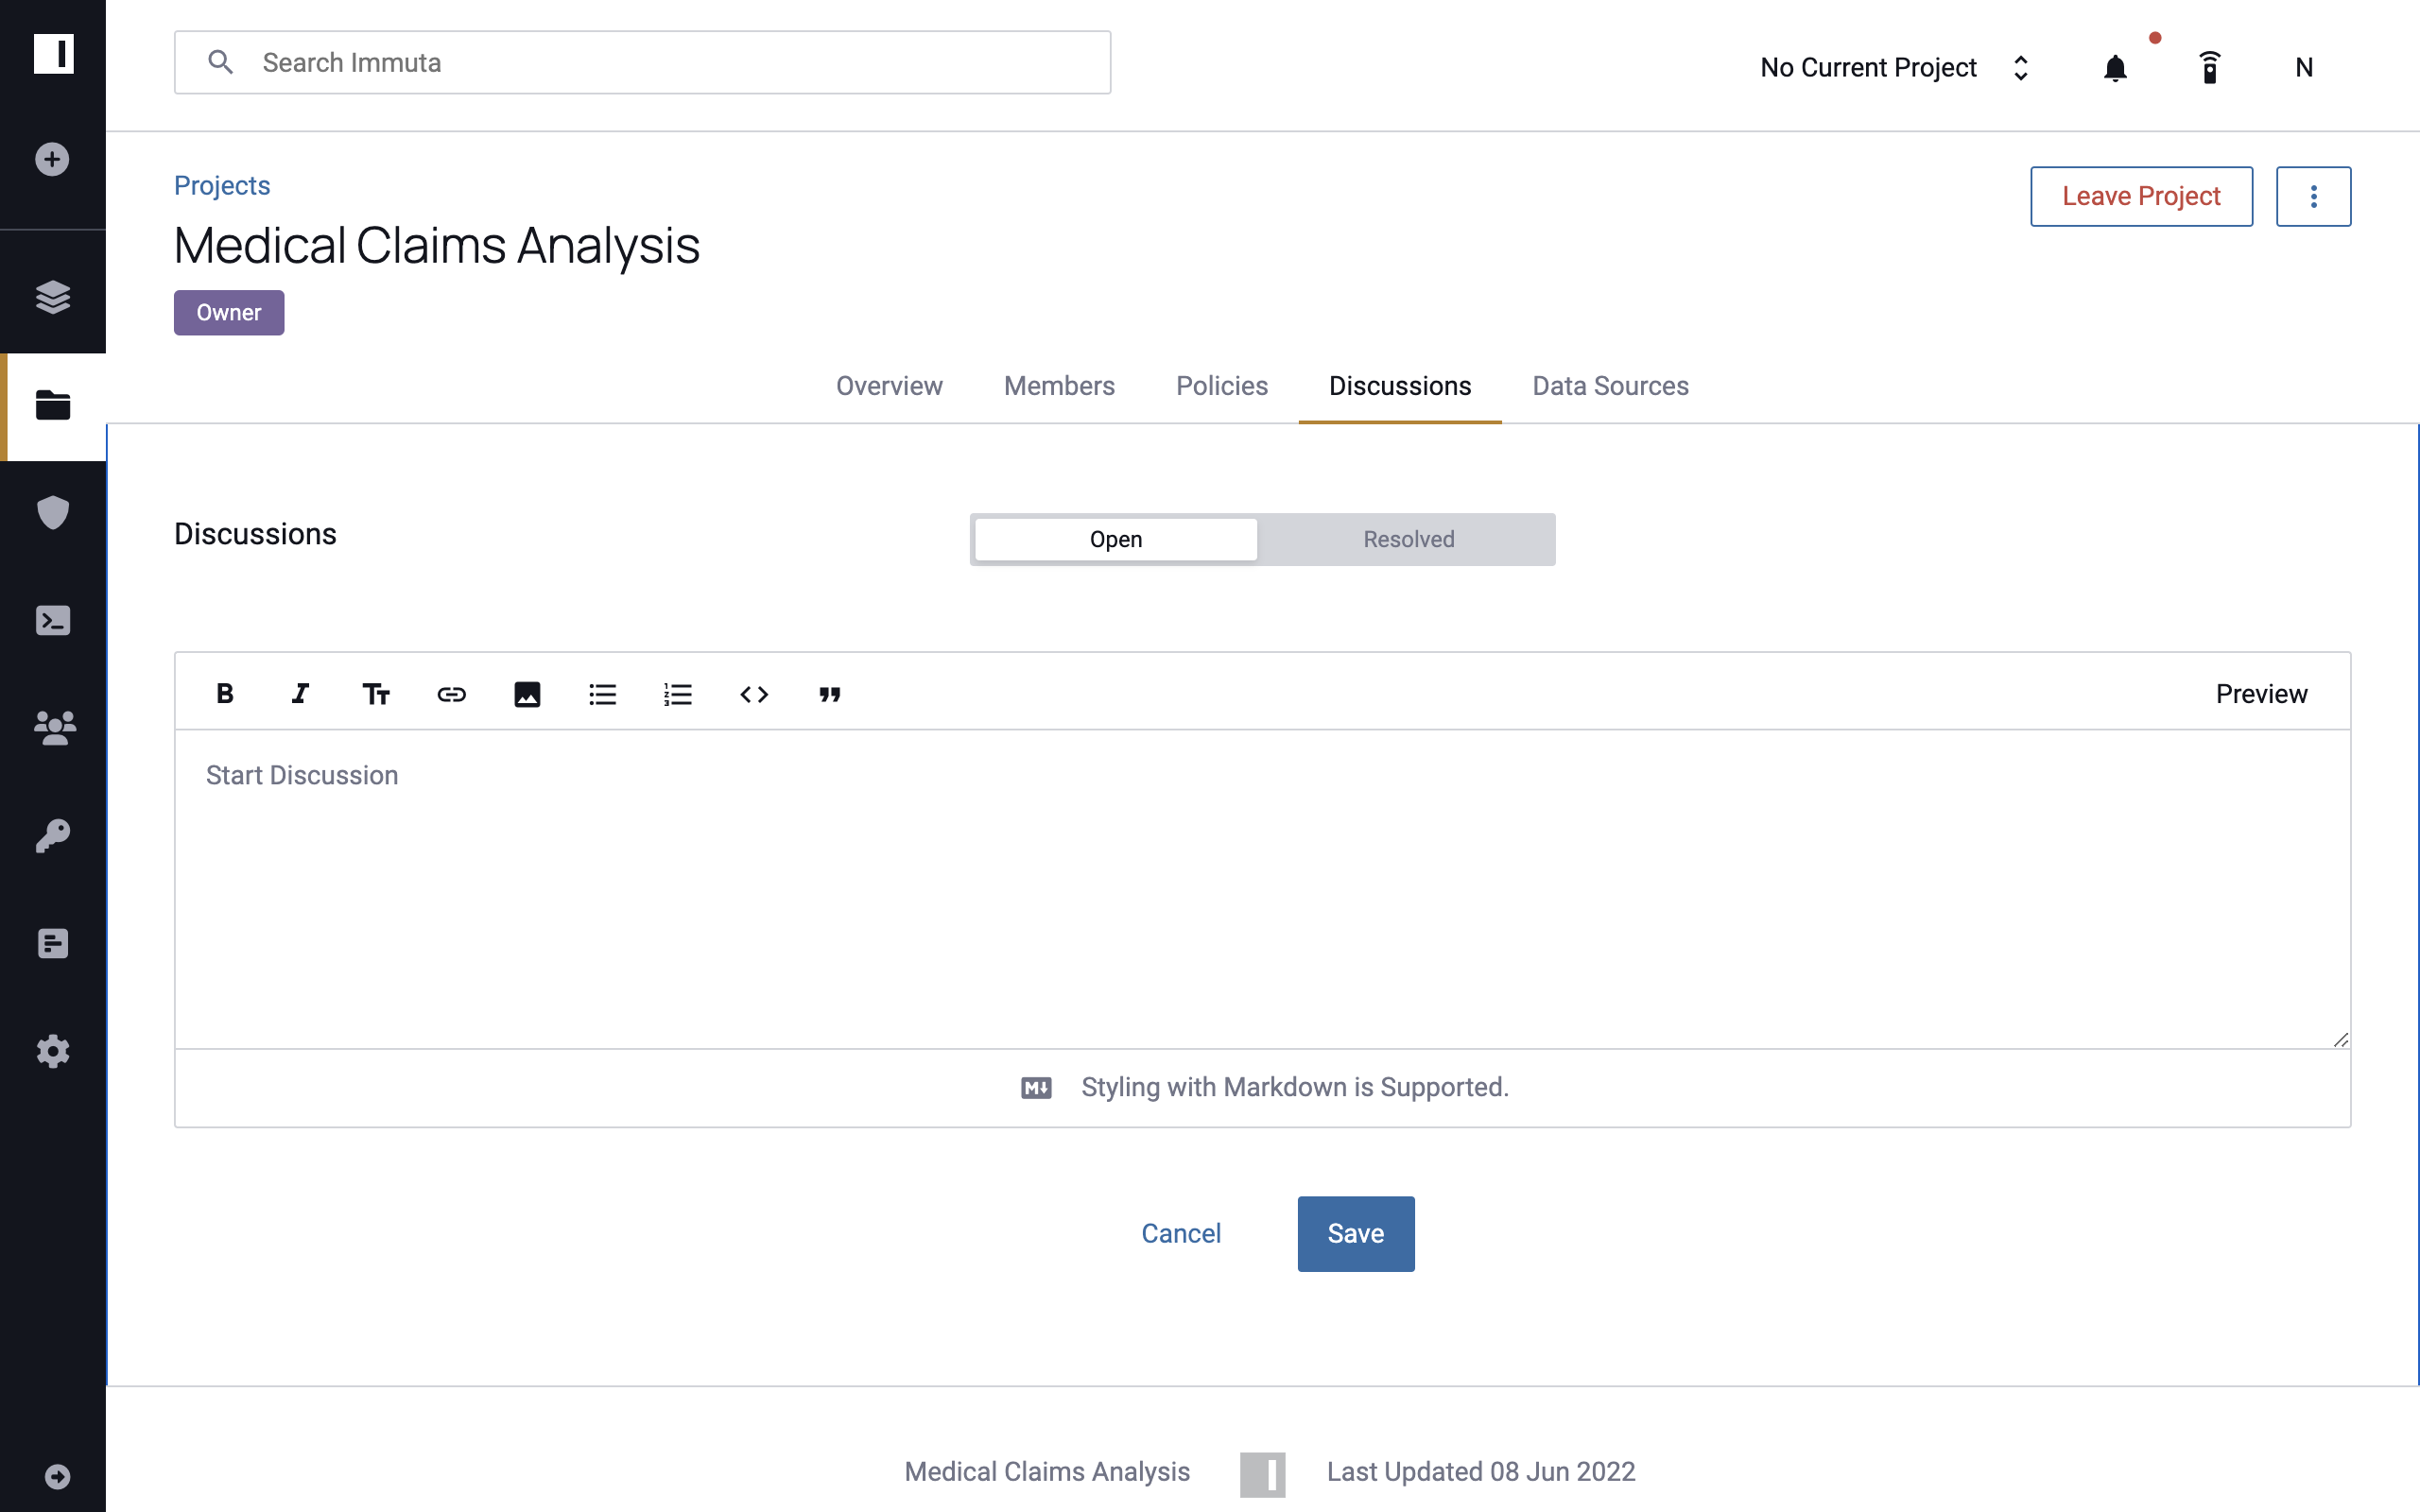
- Navigate to the Discussions tab and click New Discussion.
-
Enter your text in the Start Discussion box, and then click Save.
Reply to a Discussion Thread
- Navigate to the Discussions tab and view open and/or resolved discussions by clicking the Open or Resolved button, respectively.
- Click a discussion thread and enter your response in the Enter Reply field.
- Click Reply to post your response.
Resolve a Discussion Thread
- Navigate to the Discussions tab and click the Open button to view all open discussions.
- Click a discussion thread.
-
Click the Mark Resolved button beneath the Enter Reply field.
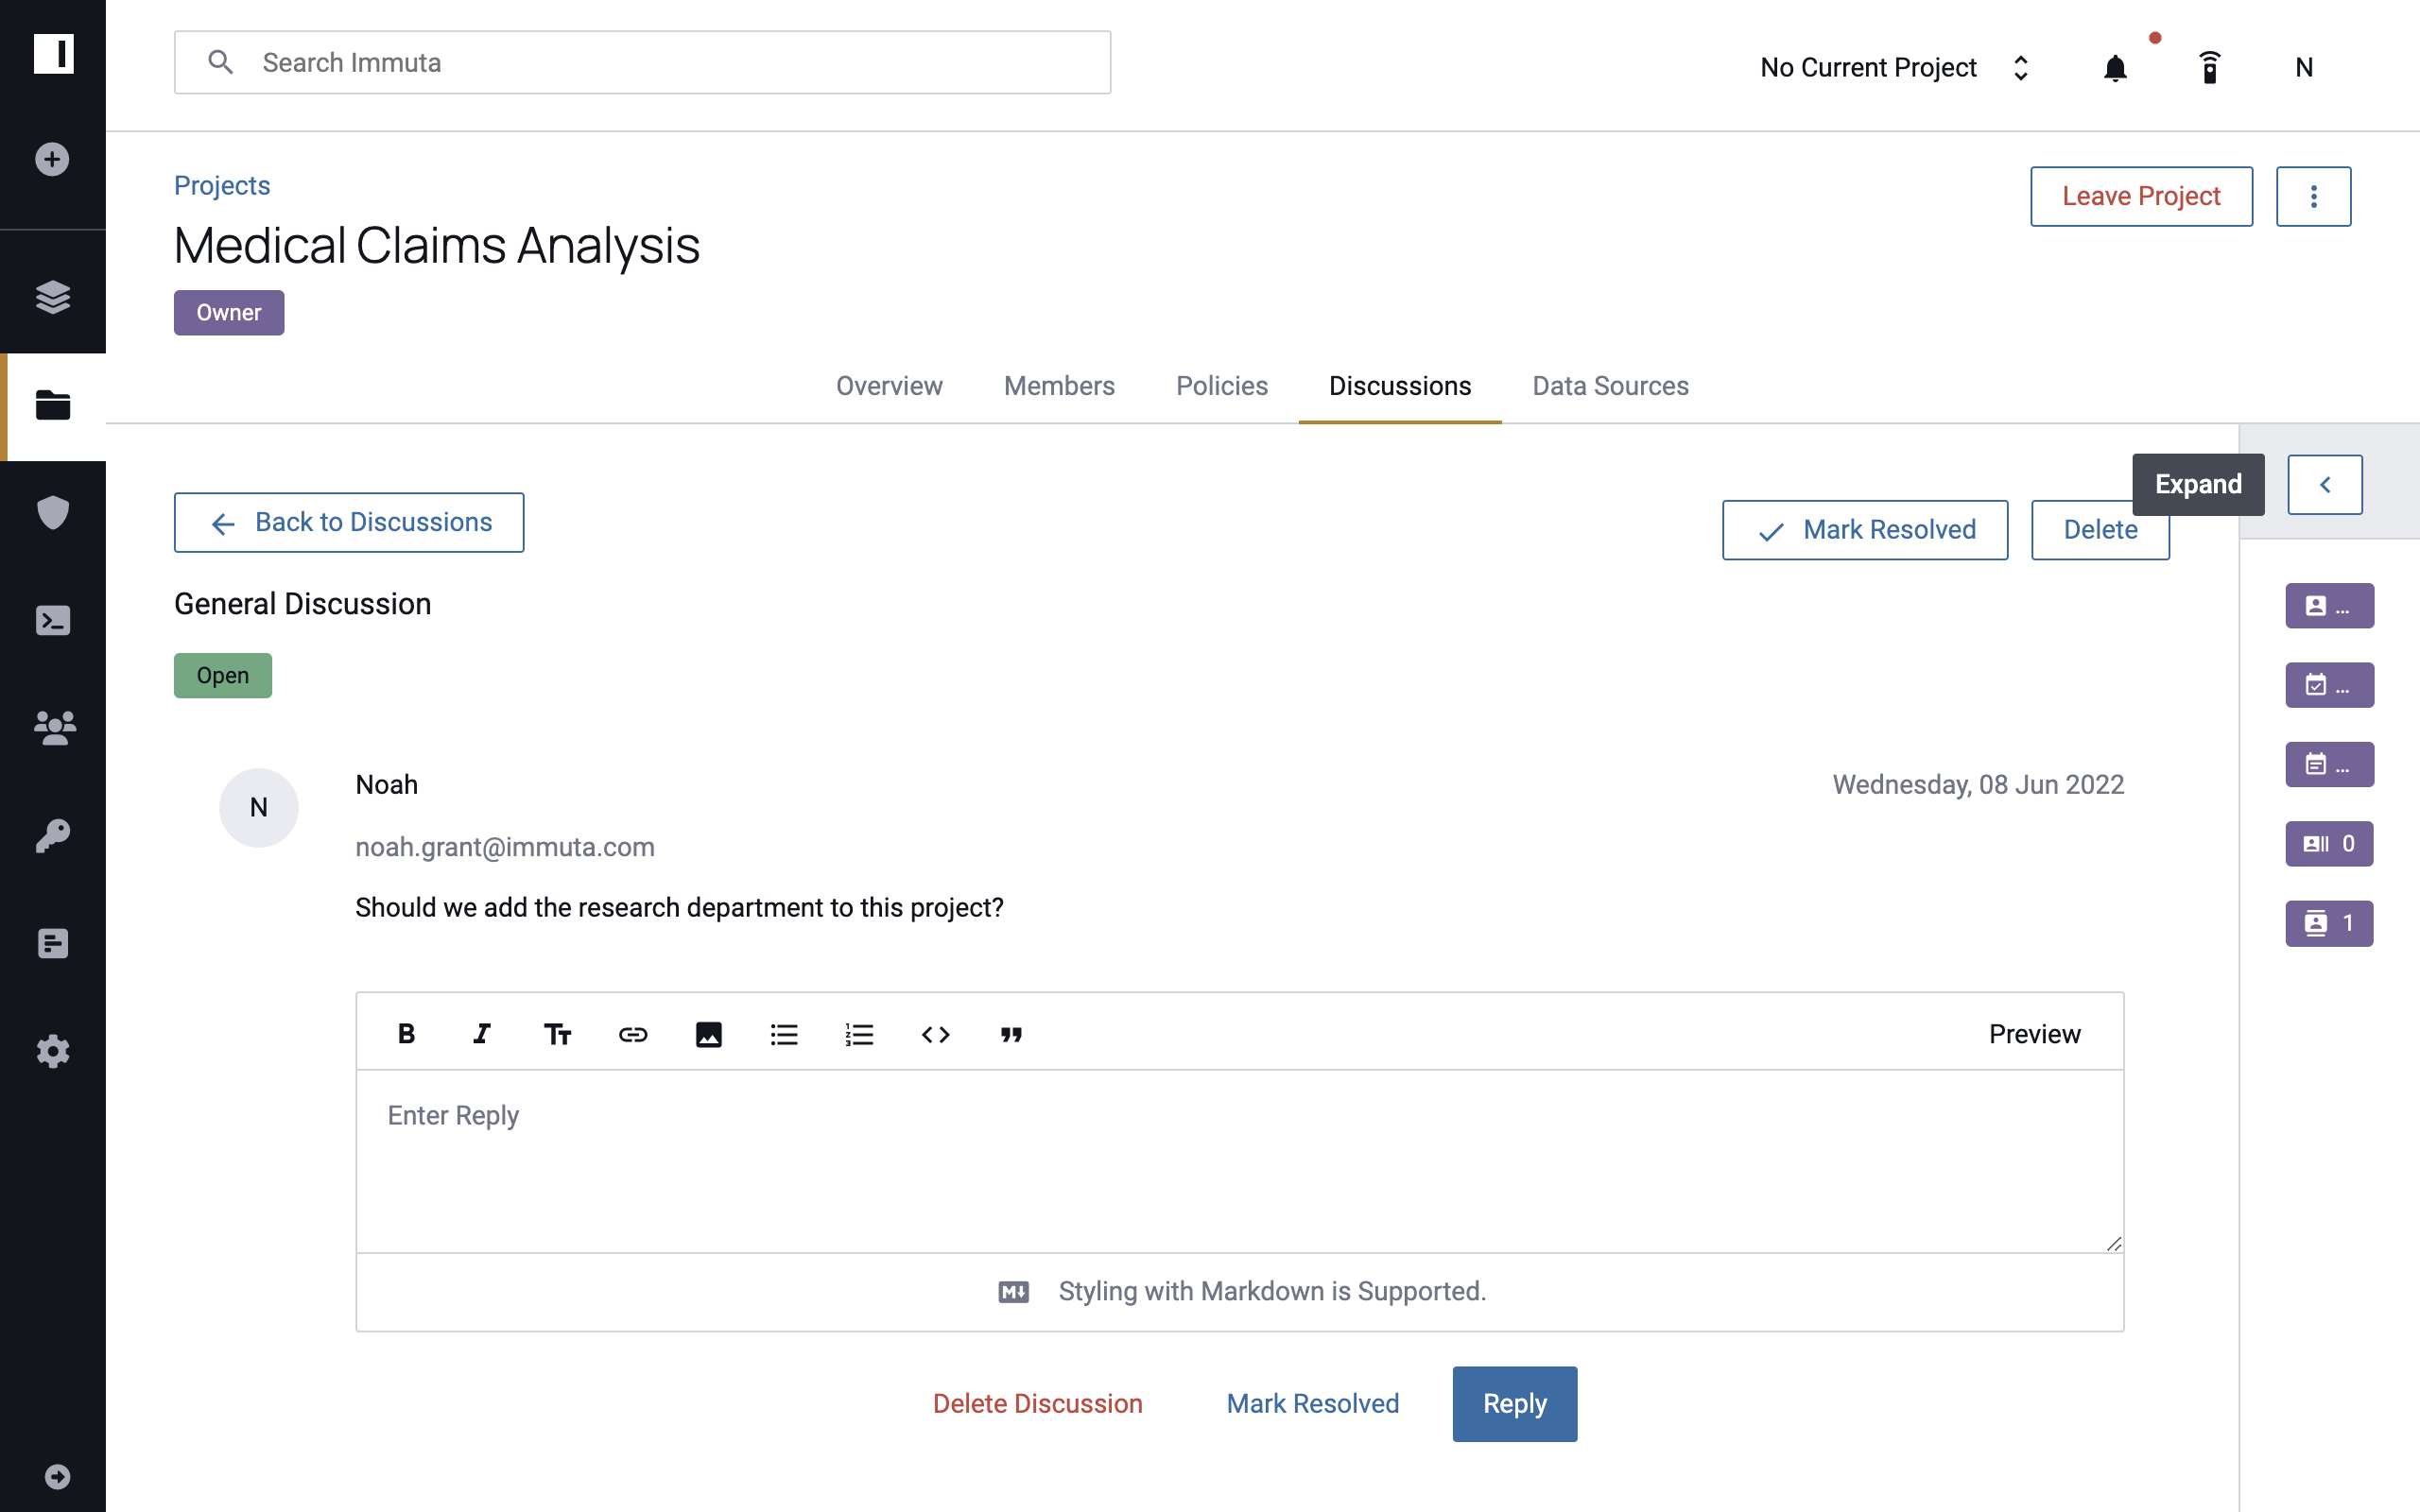
This discussion thread will now be saved with other resolved threads, and users will still be able to reply to it by clicking the Resolved button on the Discussions tab.
Delete a Discussion Thread or Reply
To permanently delete a discussion thread,
- Navigate to the Discussions tab and view open and/or resolved discussions by clicking the Open or Resolved button, respectively.
- Click the discussion thread you would like to delete, and then click Delete in the upper right corner of the discussion window.
-
Click Delete in the confirmation window that appears.
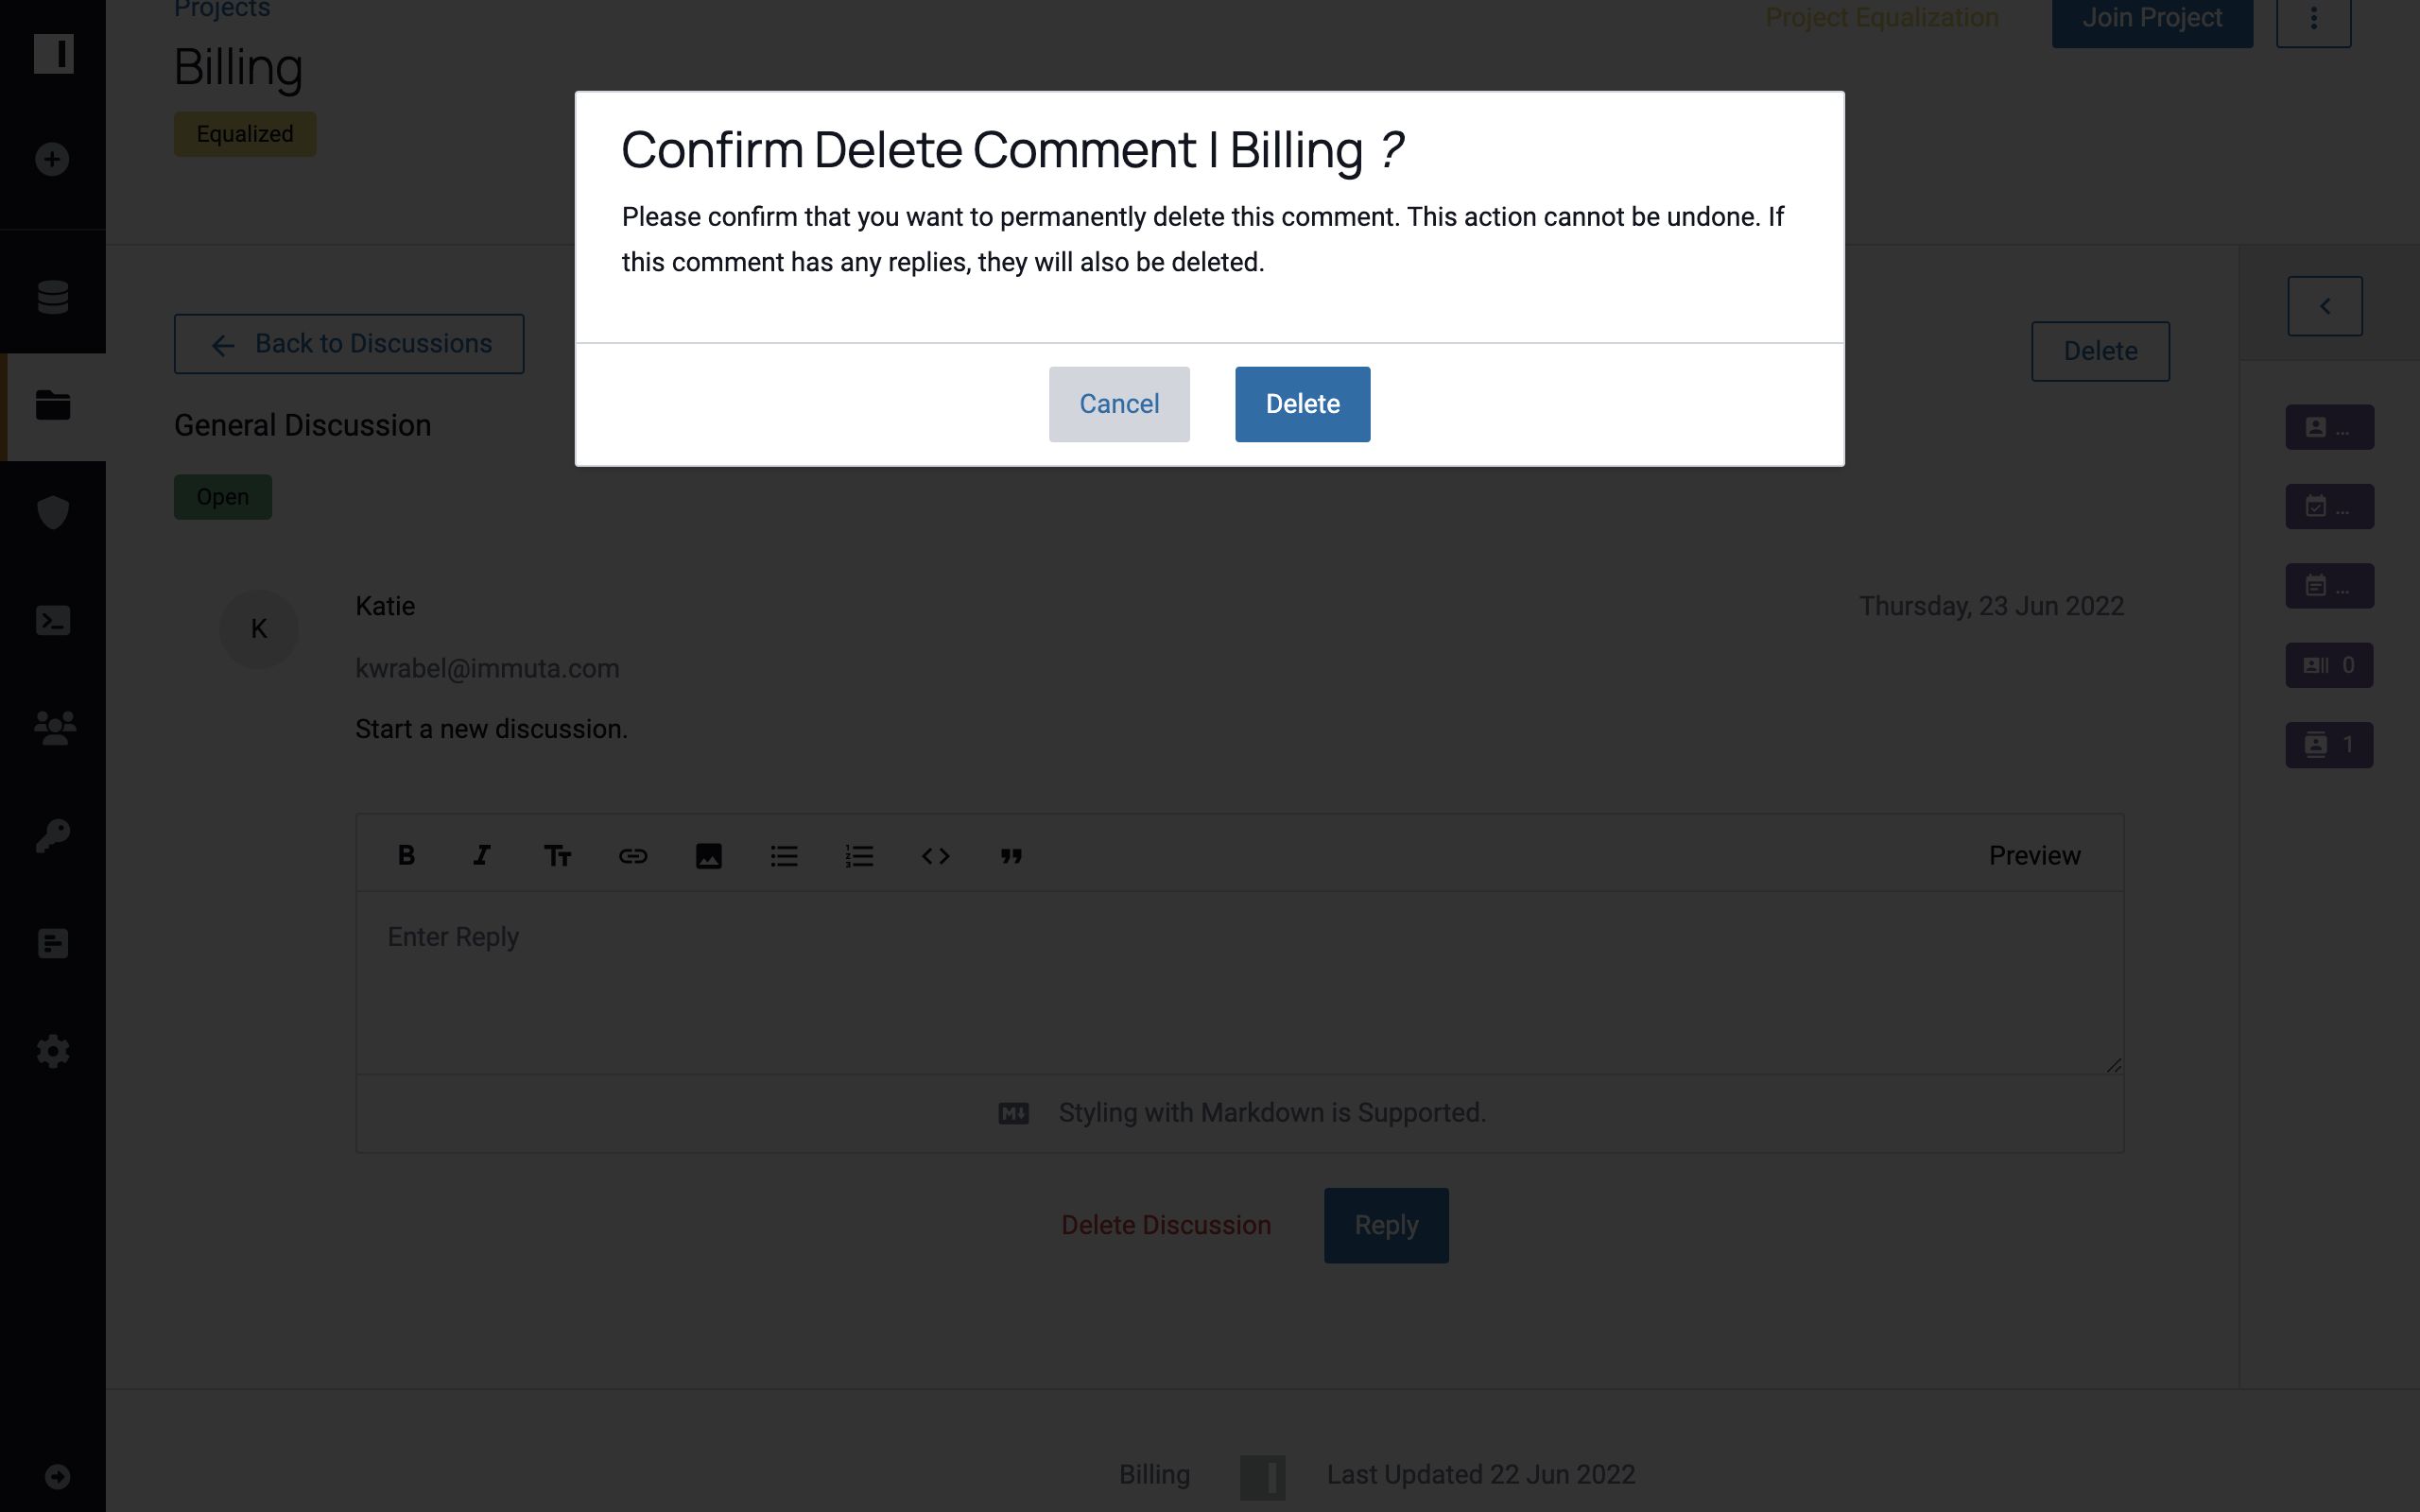
The discussion thread and all of its comments are now deleted.
To delete a single reply,
- Select a discussion thread.
- Click Delete in the upper right corner of the reply or comment you would like to delete.
- Click Confirm to permanently delete the comment.
Manage Project Documentation
- Click the Project Overview tab.
- Click the edit icon in the top right corner of the Documentation section.
-
Document the details of your project in the text box that appears, and then click Update.
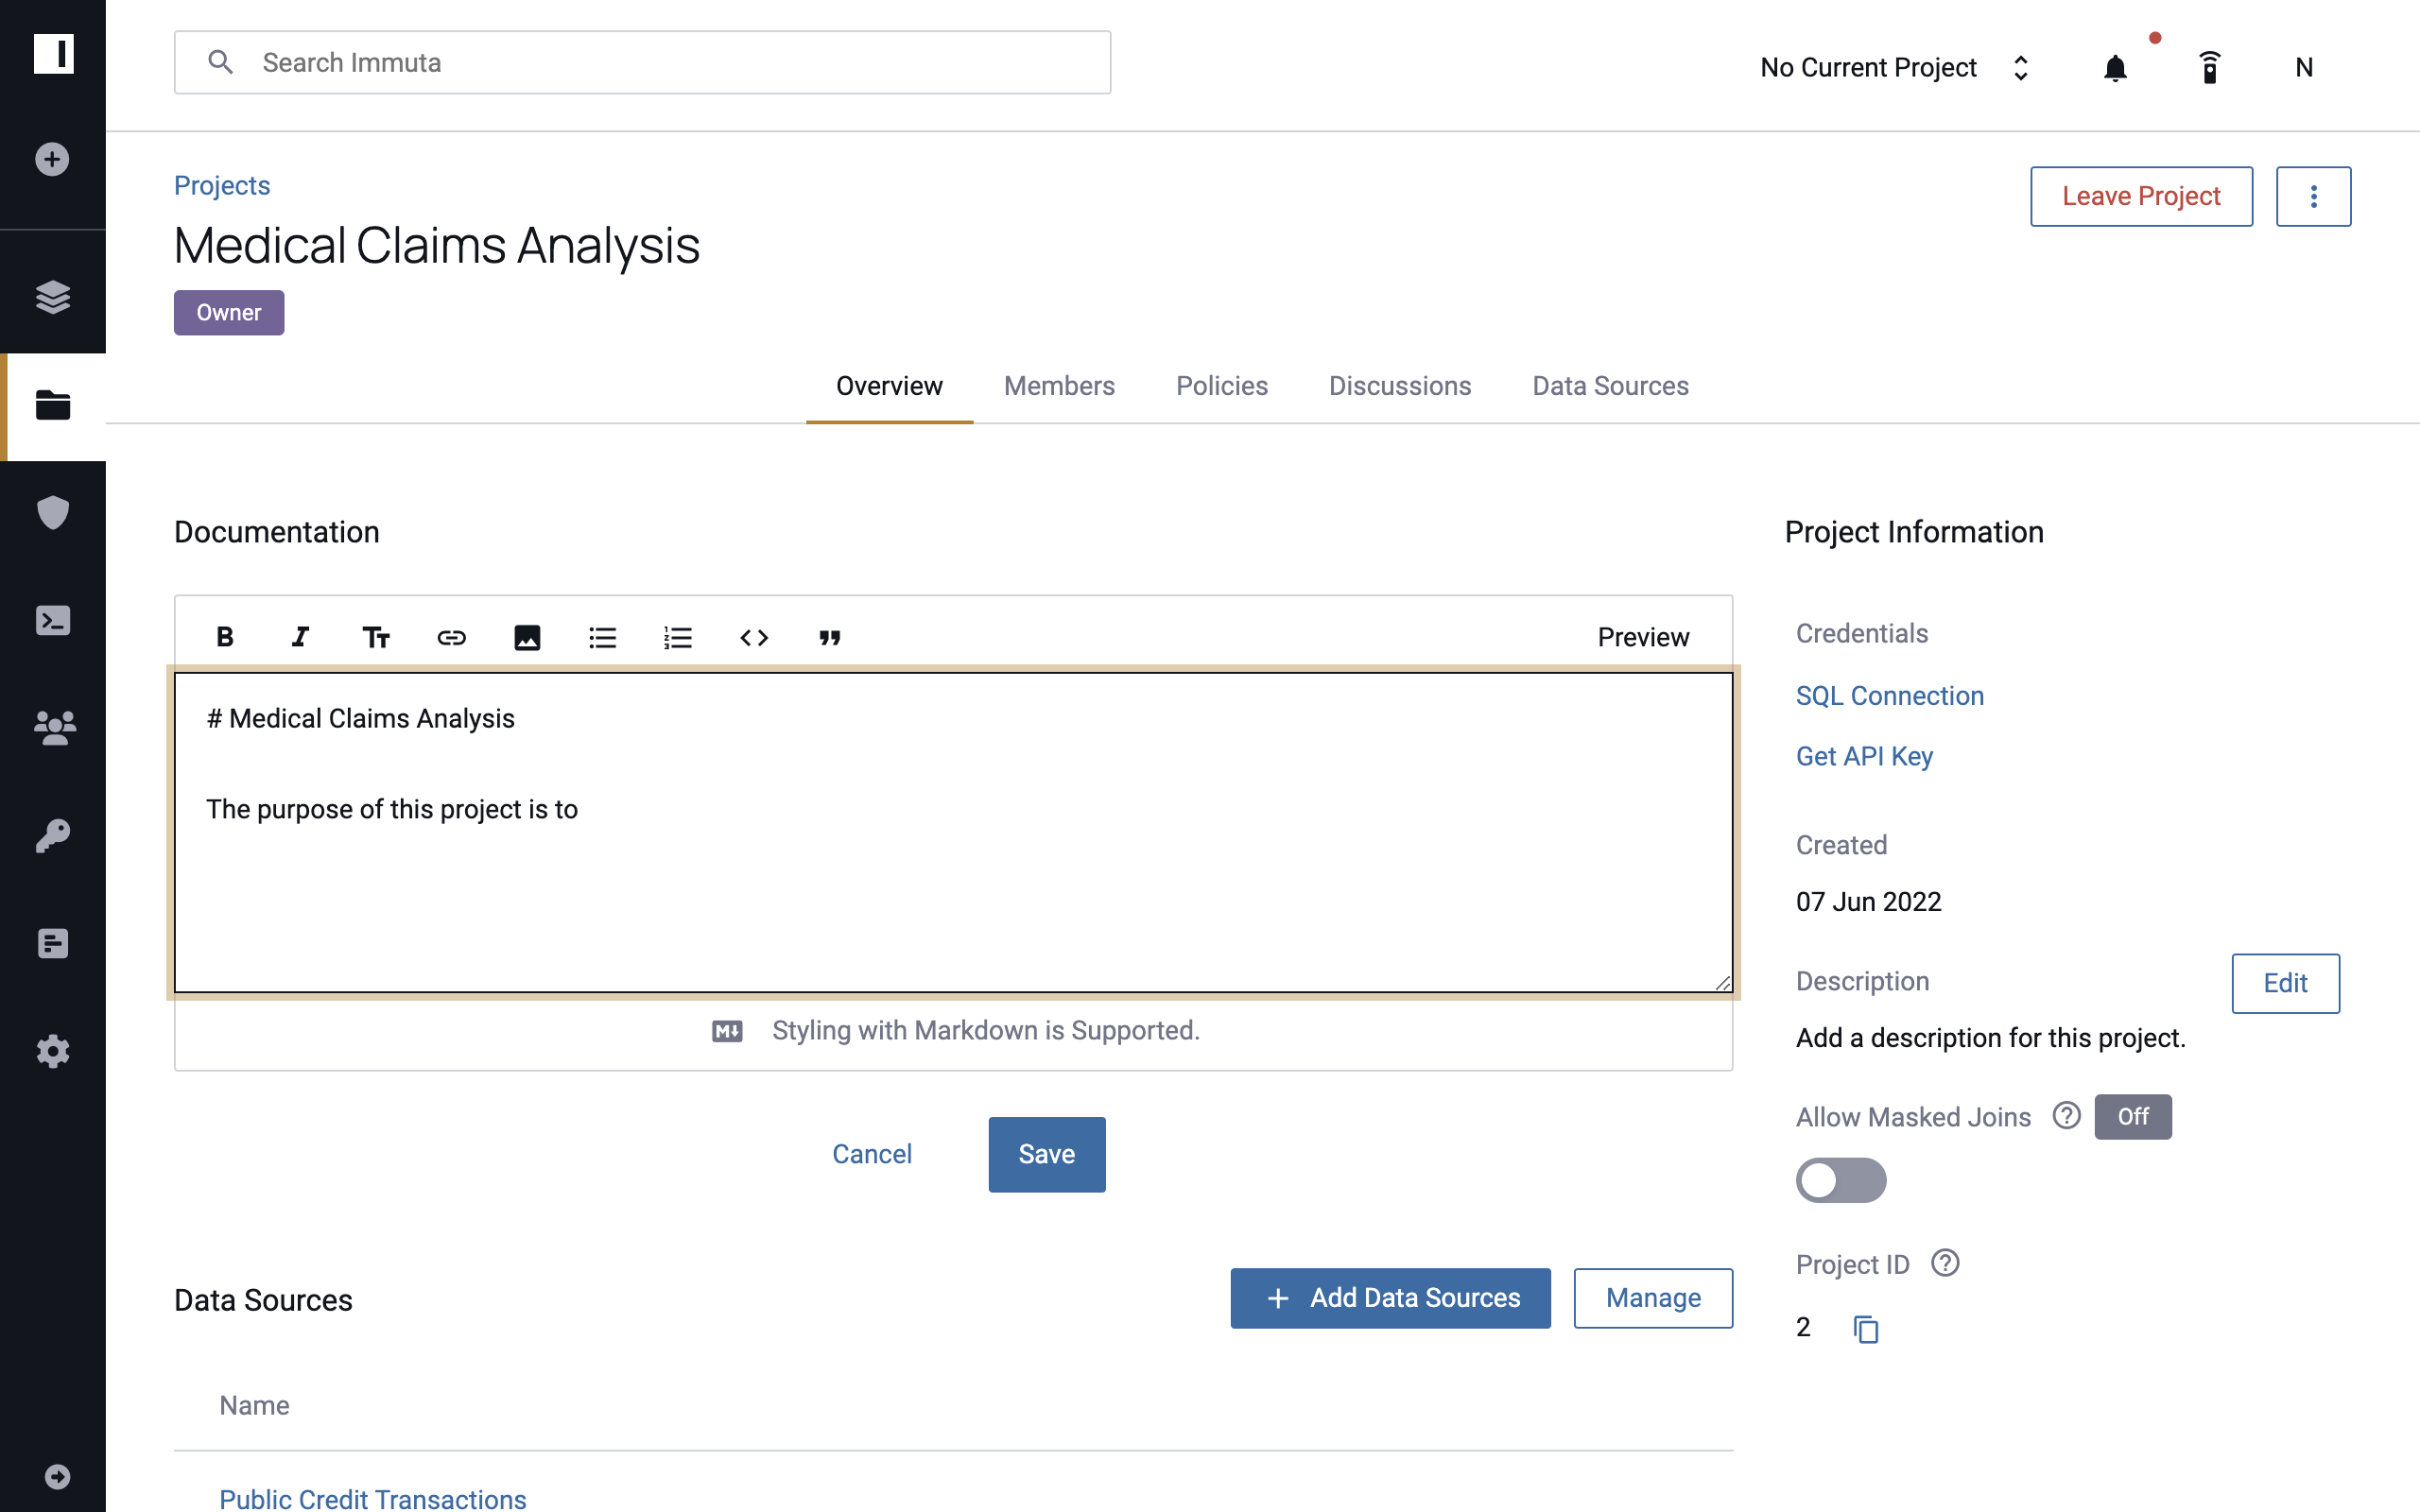
Note: Styling with Markdown is supported.
Modify a Member's Role within a Project
- On the Members tab, click the dropdown arrow under the Role column next to the member whose role you’d like to change.
-
Select a role: subscribed or owner.
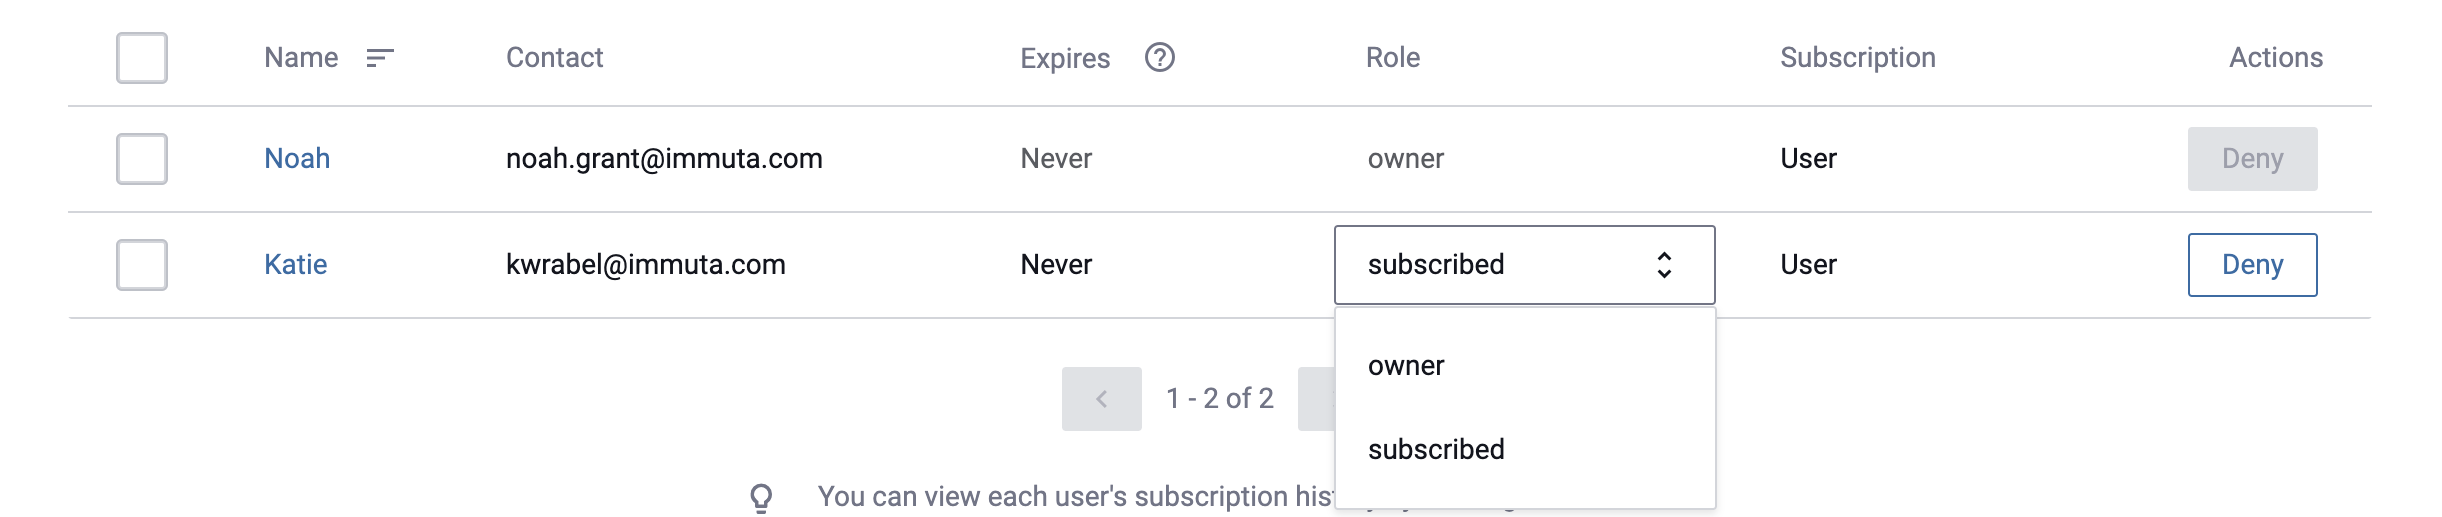
Notifications will be sent to the affected members and project owners, and a similar entry will be posted in the project's activity pane.
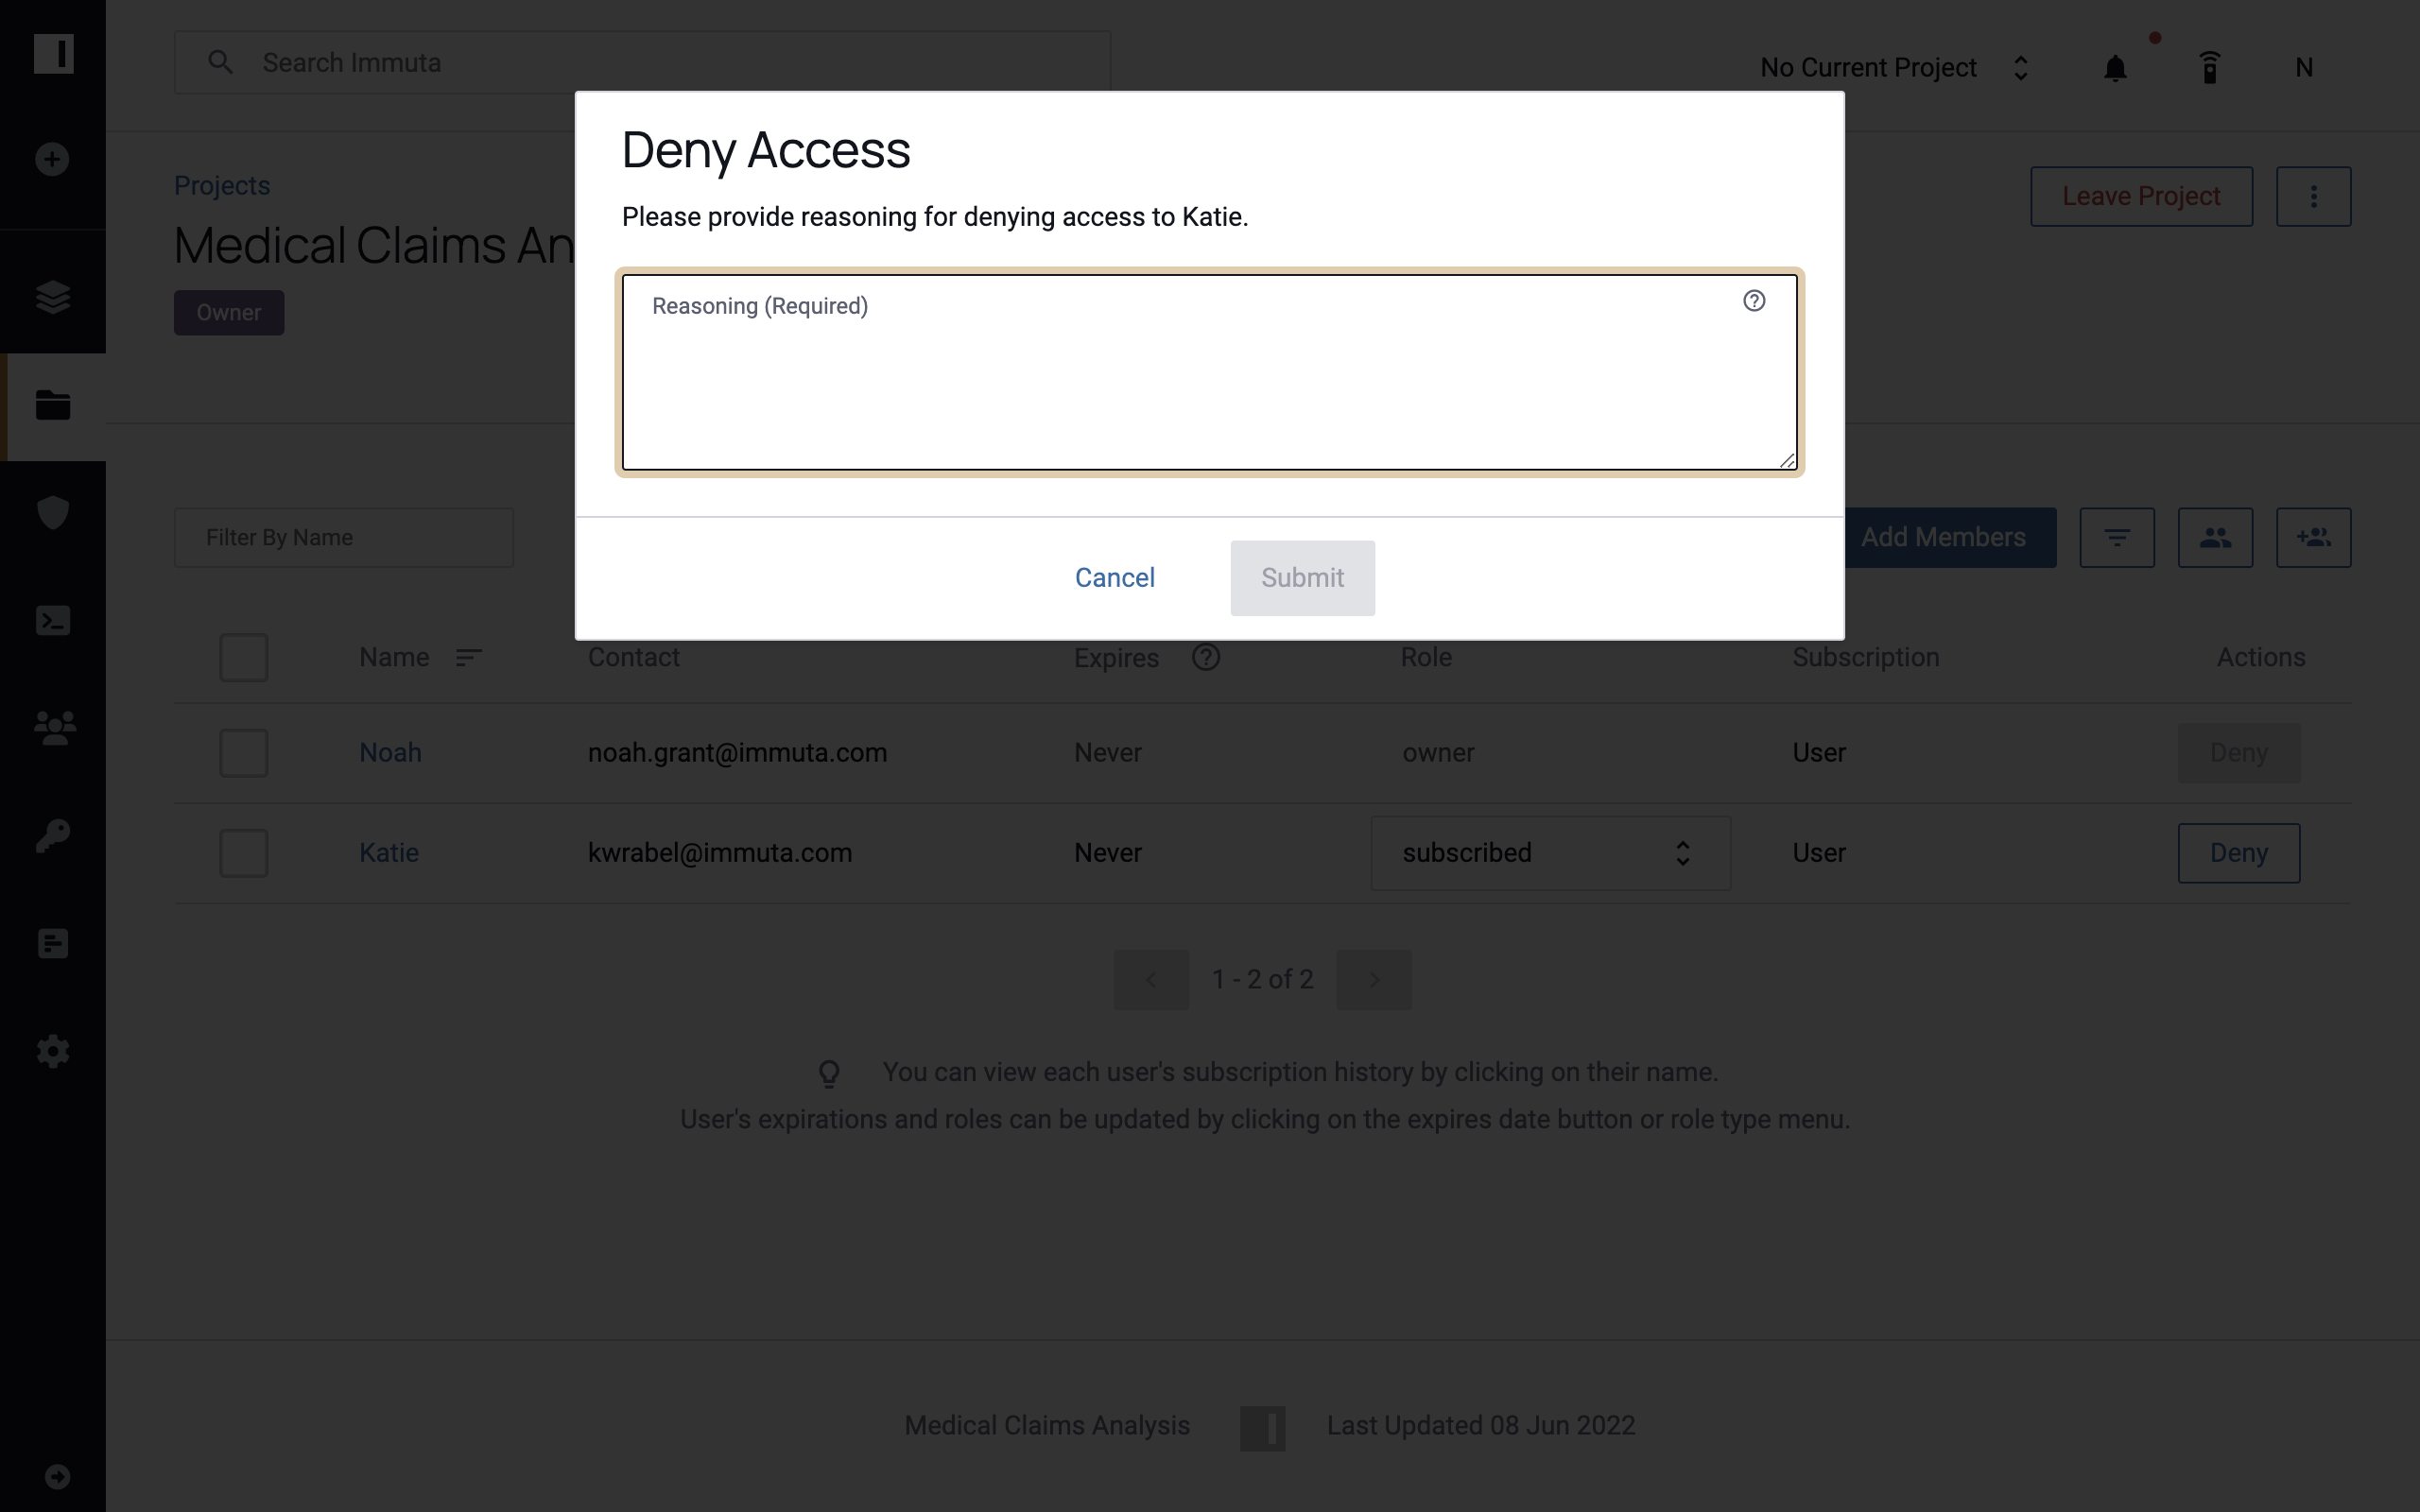
Remove Members from a Project
- On the Members tab, click the Deny button next to the user or group you would like to remove.
-
Complete the Reasoning field in the window that appears, and then click Submit.
Alternatively,
- Navigate to the Members tab.
- Click the checkbox next to the user or group name, and then click the Remove Selected button.
- Complete the Reasoning field in the window that appears, and then click Submit.
Notifications will be sent to the affected users and other project members, and a similar entry will be added to the project's activity pane.
Add Tags to a Project
- Select a project and navigate to the Project Overview tab.
- Scroll to the Tags section in the center pane and click the Add Tags button.
- Begin typing the tag name in the window that appears, and then select the tag from the dropdown menu. A list of chosen tags will populate at the bottom of this window.
- After selecting all relevant tags, click the Add button.
Remove Tags from a Project
- Navigate to the Project Overview tab.
-
Scroll to the Tags section in the center pane and click the blue "X" on the tag that you would like to remove.
-
Click Confirm to delete the tag.