Integration User Impersonation
Native impersonation allows users to natively query data as another Immuta user.
User impersonation is supported with
Impersonating users in projects
If you are impersonating a user who is currently in a project, you will only see data sources within that project. For details about this behavior, see the description of project contexts.
User Impersonation with Amazon Redshift
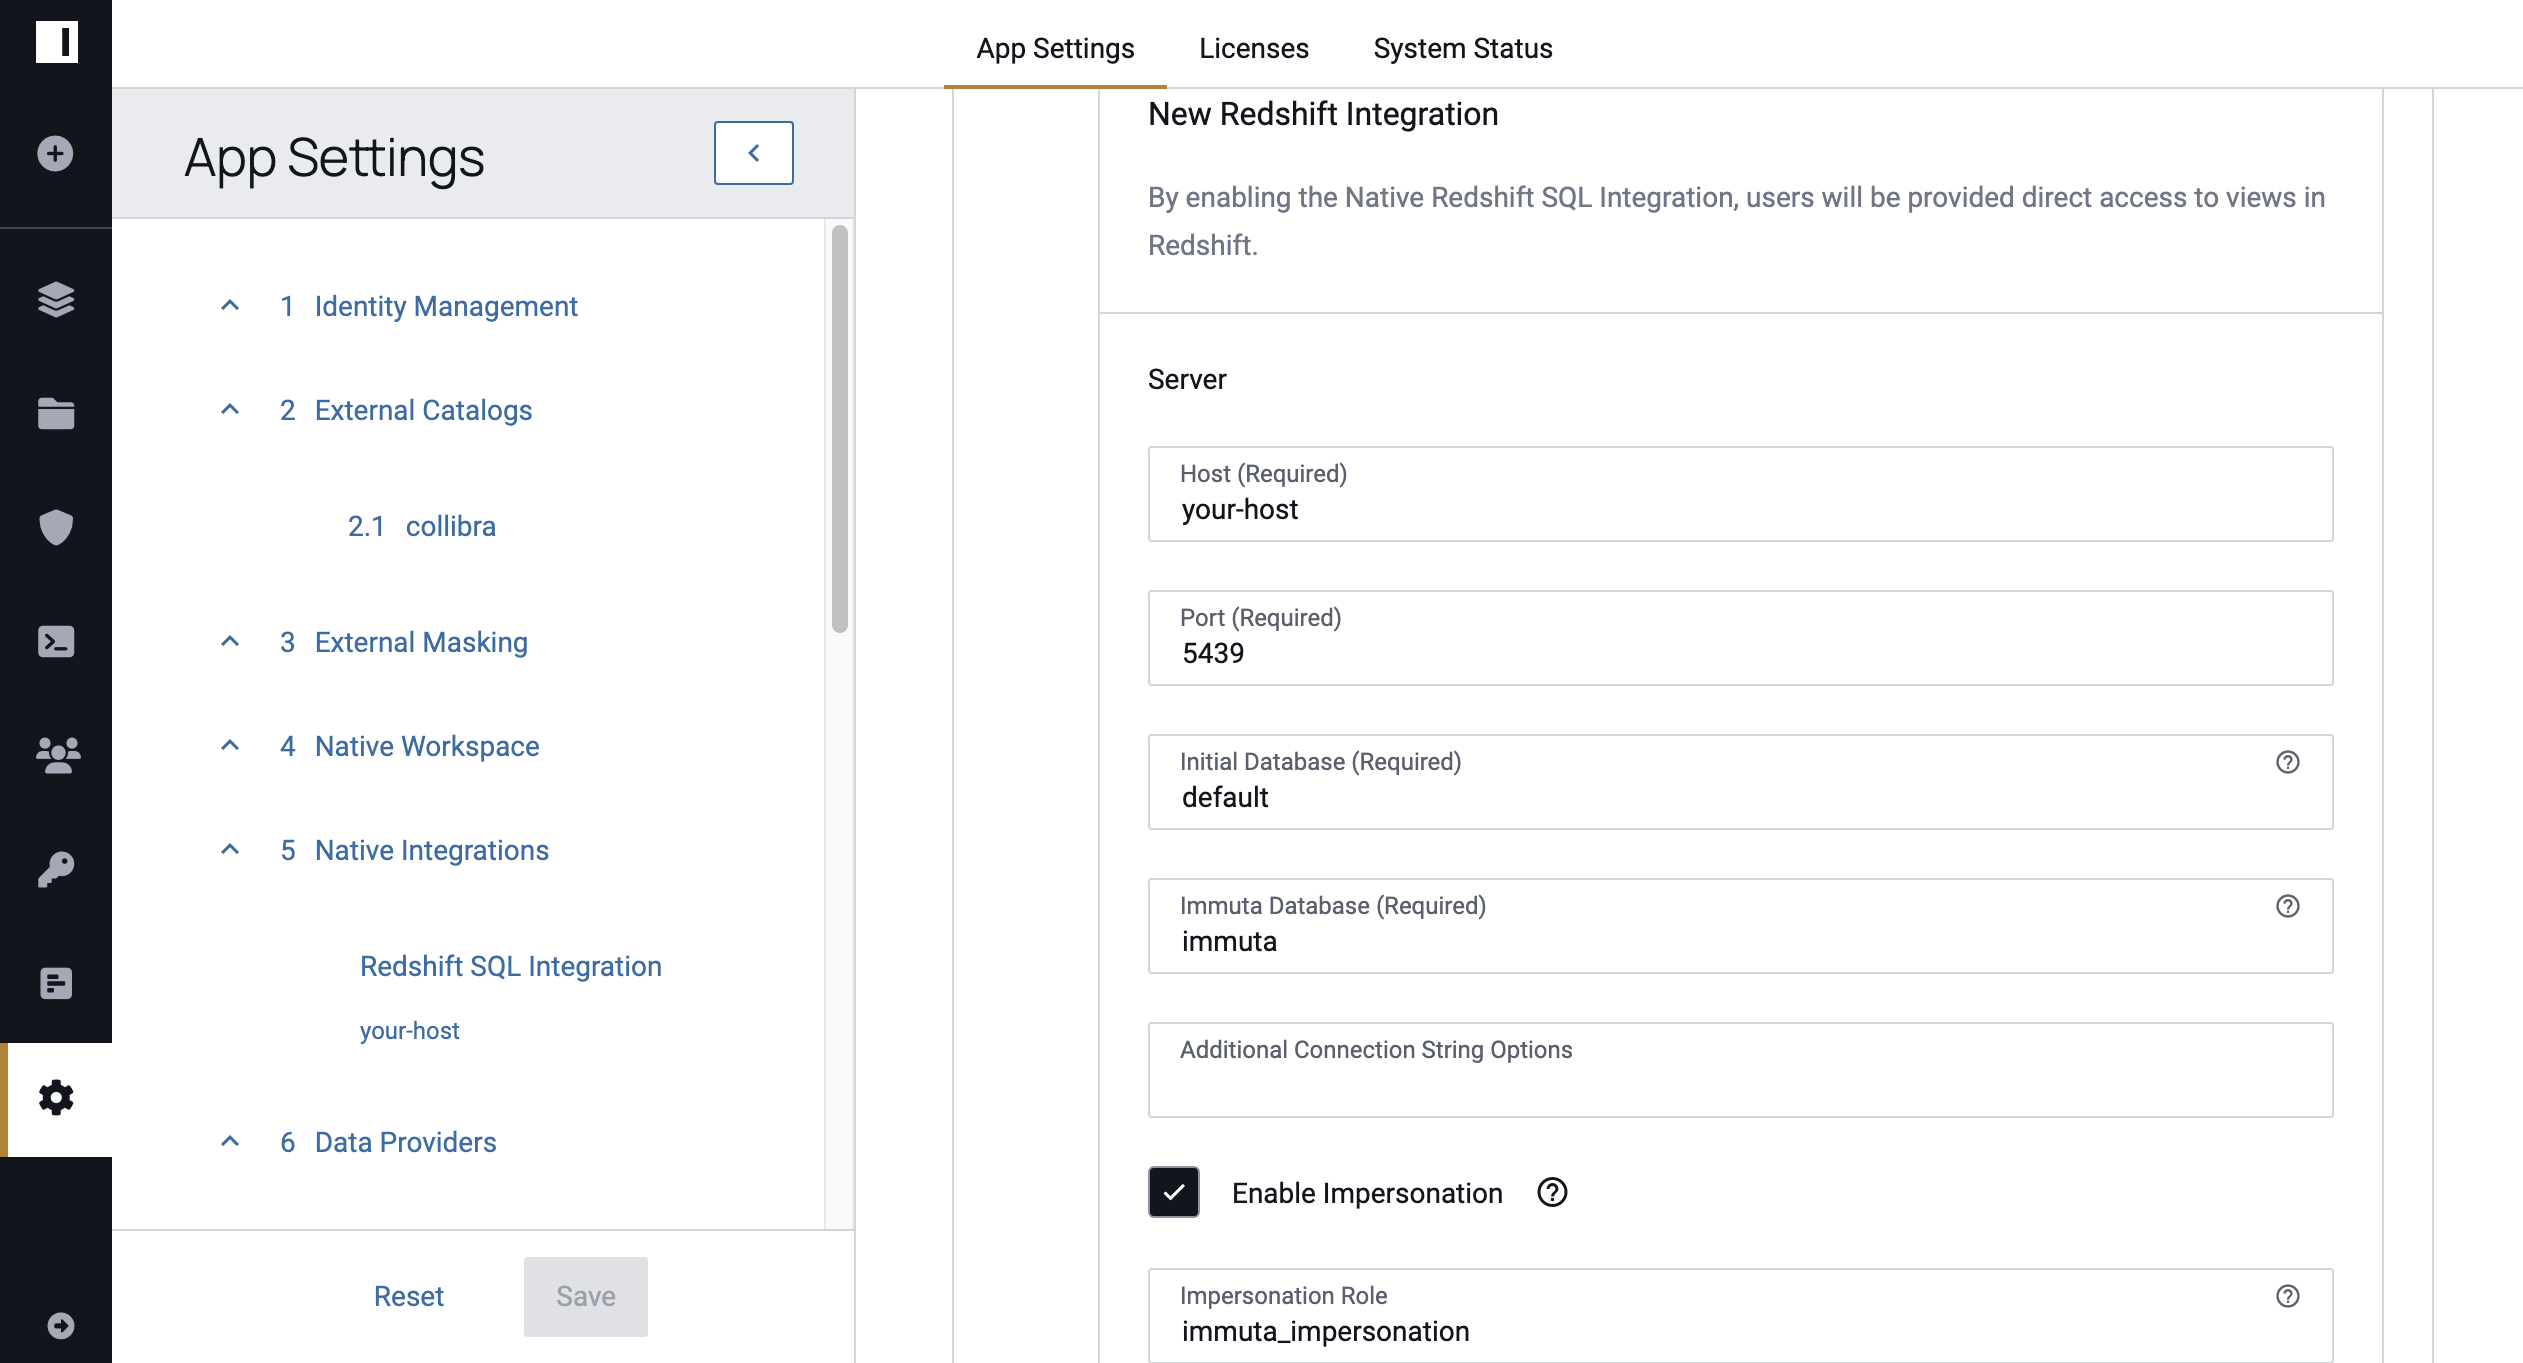
1 - Enable User Impersonation
Select Enable Impersonation when configuring the Redshift integration on the App Settings page.
2 - Grant Users the IMPERSONATE_USER Permission
After enabling user impersonation with your Amazon Redshift integration, there are two ways to give a user permission to use the feature: in the Immuta UI or in Amazon Redshift. Use the tabs below to select one method.
Permission in Immuta
As an Immuta user with the permission USER_ADMIN,
-
Navigate to your Immuta homepage.
-
Click the Admin icon in the left sidebar, and select the user from the Users tab.
-
Click Add Permissions.

-
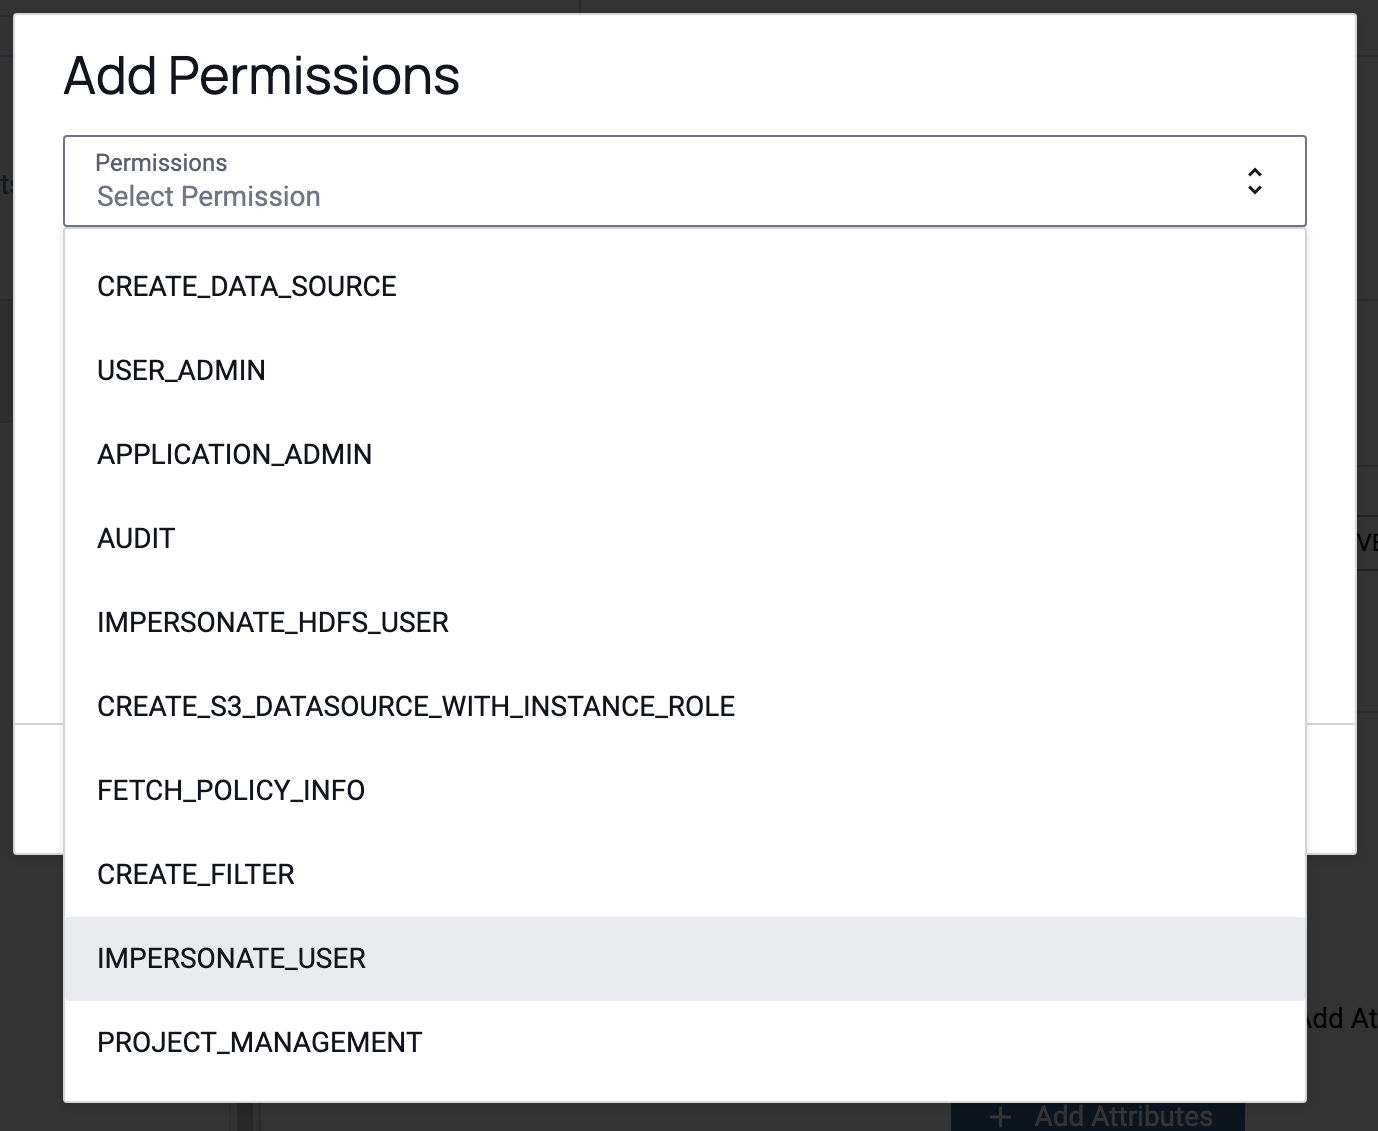
Click the Select Permission dropdown, and select the IMPERSONATE_USER permission.
-
Click Close.
Permission in Amazon Redshift
As a Redshift superuser,
-
Navigate to your Redshift instance.
-
Run
ALTER GROUP <Impersonation Group> ADD USER <Redshift User>.In this example, the
Impersonation Groupis the name entered on the Immuta App Settings page when the feature was enabled. The default is immuta_impersonation, but the admin may have customized it. TheRedshift Useris the username of the Redshift user that will now have permission to impersonate other users.
3 - Impersonate a User
To impersonate another user in Redshift,
-
Run
CALL immuta_procedures.impersonate_user(<Immuta username of the user to impersonate>). -
Run queries.
4 - End User Impersonation
To end user impersonation in Redshift, run CALL immuta_procedures.impersonate_user(<NULL>).
5 - Revoke Users' IMPERSONATE_USER Permission
To revoke permission to impersonate users,
Revoke Permission in Immuta
As an Immuta user with the permission USER_ADMIN,
-
Navigate to your Immuta homepage.
-
Click the Admin icon in the left sidebar, and select the user from the Users tab.
-
Click the delete icon on the IMPERSONATE_USER permission.

Permission in Amazon Redshift
As a Redshift superuser,
-
Navigate to your Redshift instance.
-
Run
ALTER GROUP <Impersonation Group> DROP USER <Redshift User>.In this example, the
Impersonation Groupis the name entered on the Immuta App Settings page when the feature was enabled. The default is immuta_impersonation, but the admin may have customized it. TheRedshift Useris the username of the Redshift user that will now have permission to impersonate other users.
Redshift-Specific Caveats
User impersonation is specific to the script and session in which it was set. Using a new script or running a subset of script queries without setting the context will result in the queries being run as the regular user.
User Impersonation with Azure Synapse Analytics
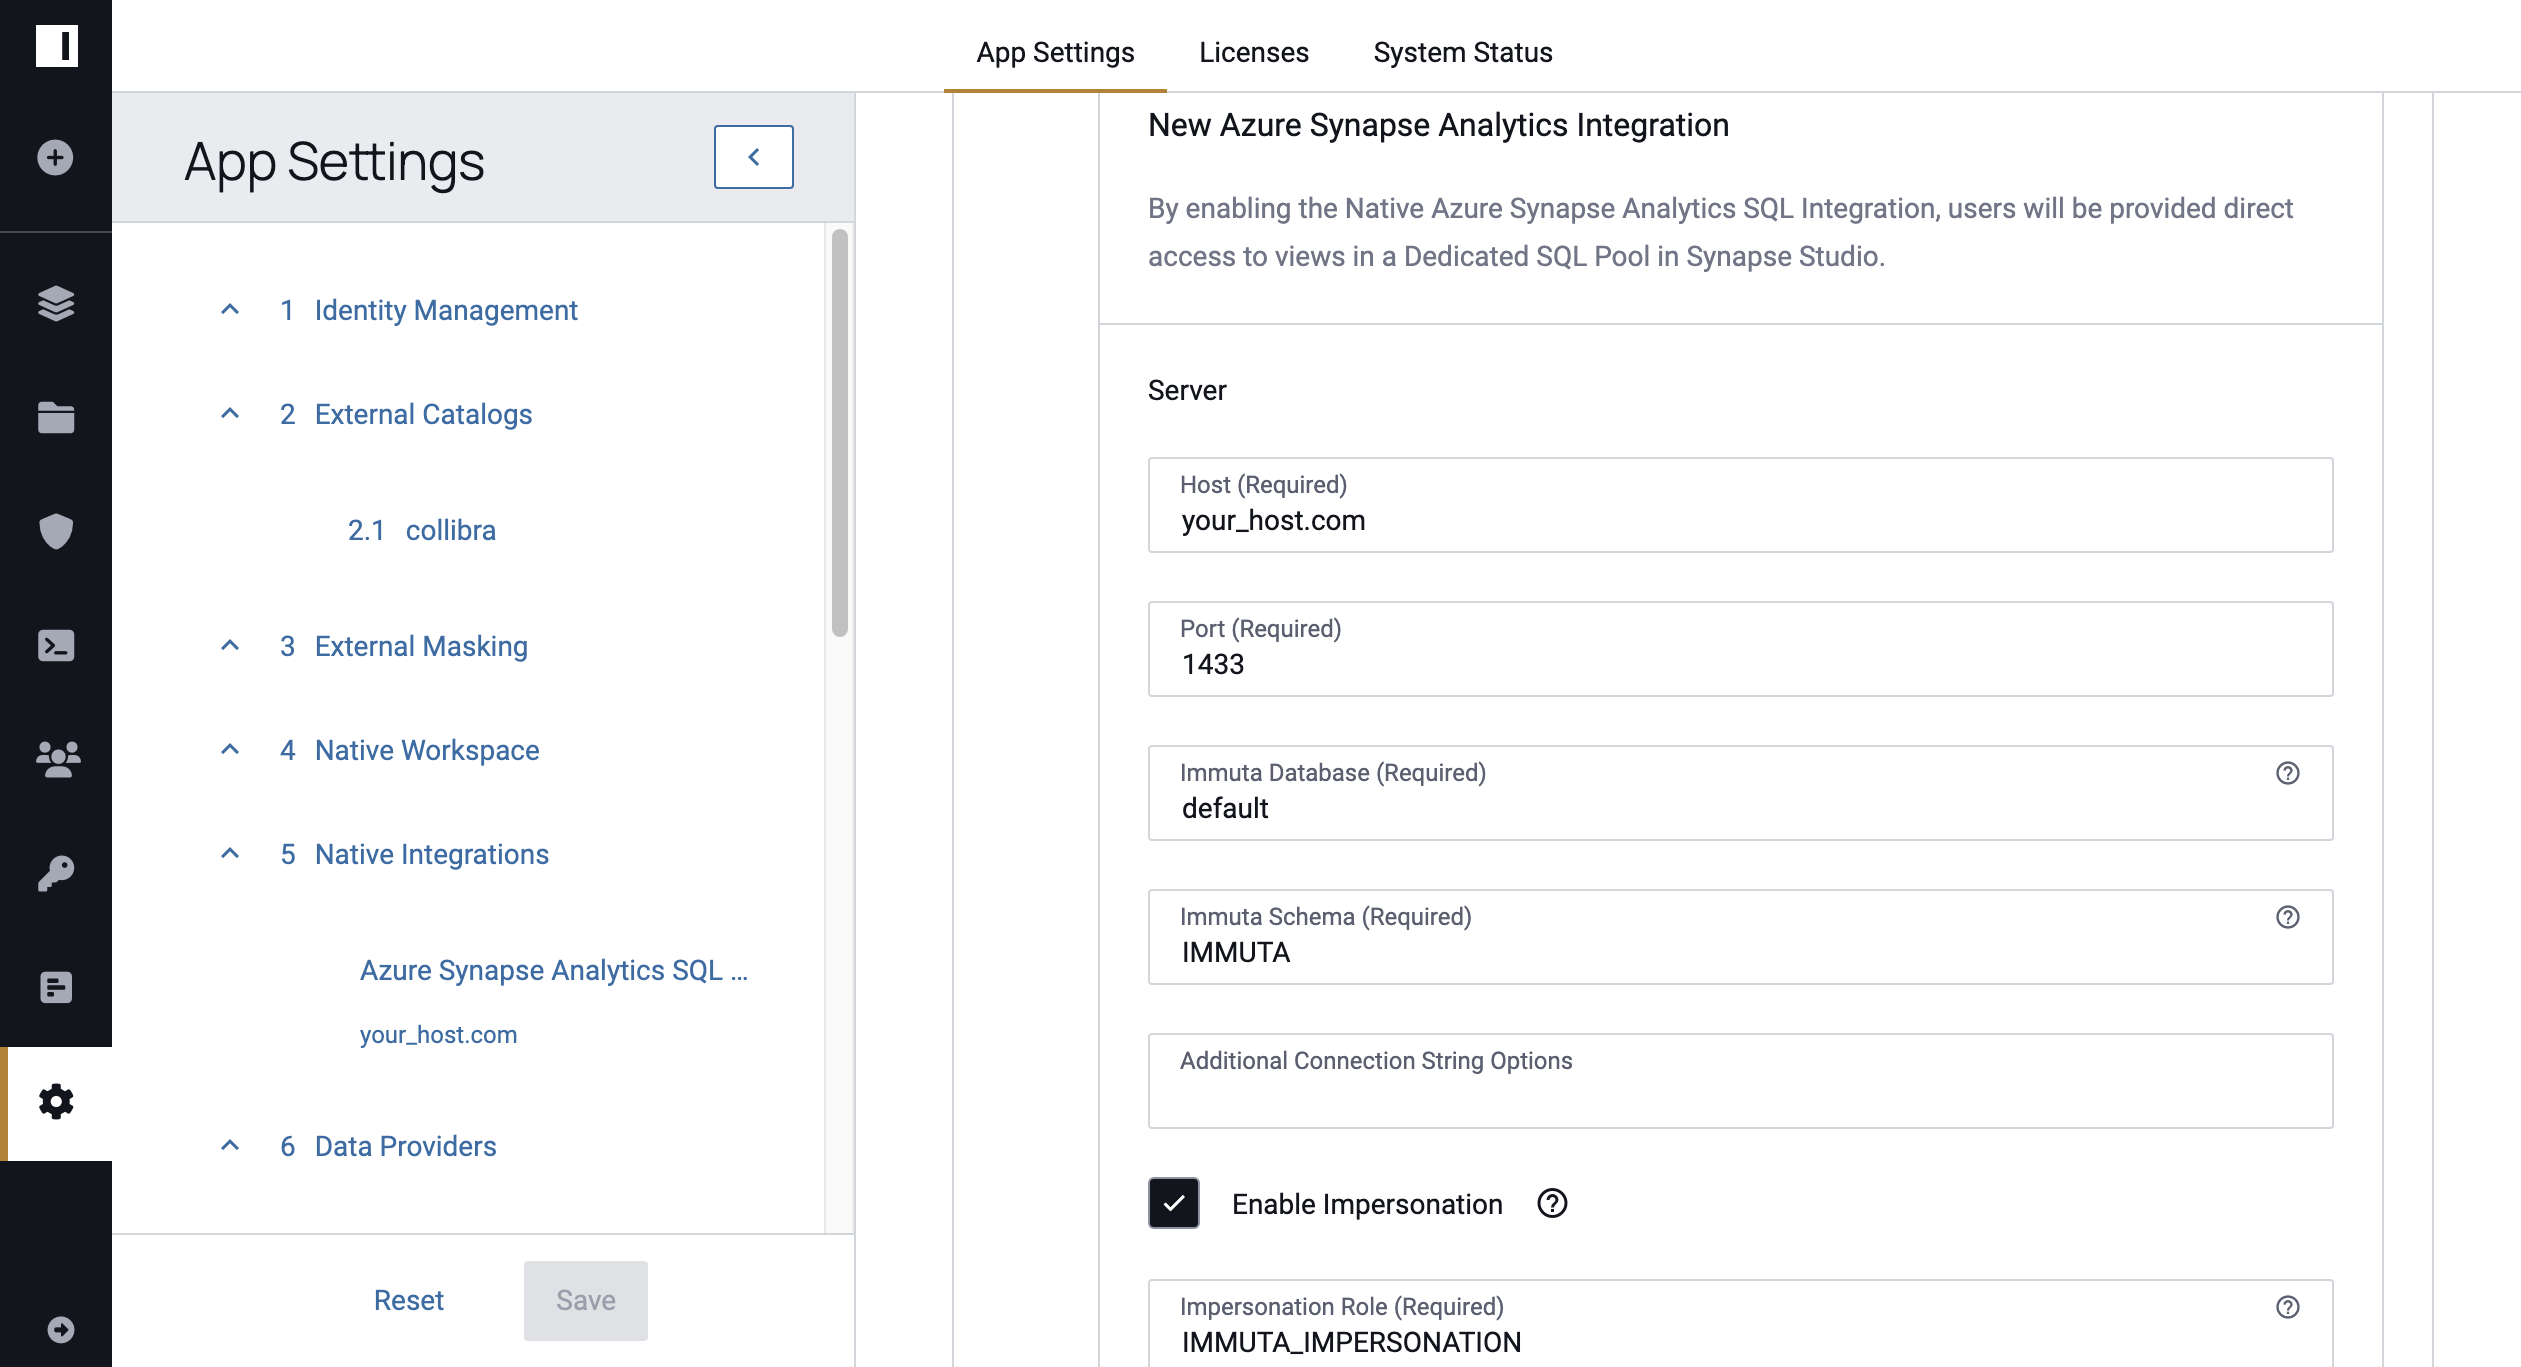
1 - Enable User Impersonation
Select Enable Impersonation when configuring the Synapse Analytics integration on the App Settings page.
2 - Grant Users the IMPERSONATE_USER Permission
After enabling user impersonation with your Azure Synapse Analytics integration, there are two ways to give a user permission to use the feature: in the Immuta UI or in Azure Synapse Analytics. Use the tabs below to select one method.
Permission in Immuta
As an Immuta user with the permission USER_ADMIN,
-
Navigate to your Immuta homepage.
-
Click the Admin icon in the left sidebar, and select the user from the Users tab.
-
Click Add Permissions.
-
Click the Select Permission dropdown, and select the IMPERSONATE_USER permission.
-
Click Close.
Permission in Azure Synapse Analytics
As a Synapse user,
-
Navigate to your Synapse instance.
-
Run
EXEC sp_addrolemember N'<Impersonation Role>', N'<Synapse User>'.In this example, the
Impersonation Roleis the name entered on the Immuta App Settings page when the feature was enabled. The default is IMMUTA_IMPERSONATION, but the admin may have customized it. TheSynapse Useris the username of the Synapse user that will now have permission to impersonate other users.
3 - Impersonate a User
To impersonate another user in Synapse,
-
Run the following command:
EXEC sys.sp_set_session_context @key = N'immuta_user', @value = '<Synapse username linked to the Immuta user you want to impersonate>'; -
Run queries.
4 - End User Impersonation
To end user impersonation in Synapse, run EXEC sys.sp_set_session_context @key = N'NULL', @value = '<NULL>'.
5 - Revoke Users' IMPERSONATE_USER Permission
To revoke permission to impersonate users,
Revoke Permission in Immuta
As an Immuta user with the permission USER_ADMIN,
-
Navigate to your Immuta homepage.
-
Click the Admin icon in the left sidebar, and select the user from the Users tab.
-
Click the delete icon on the IMPERSONATE_USER permission.
Revoke Permission in Azure Synapse Analytics
As a Synapse user,
-
Navigate to your Synapse.
-
Run
EXEC sp_droprolemember N'<Impersonation Role>', N'<Synapse User>'.In this example, the
Impersonation Roleis the name entered on the Immuta App Settings page when the feature was enabled. The default is IMMUTA_IMPERSONATION, but the admin may have customized it. TheSynapse Useris the username of the Synapse user that will now have permission to impersonate other users.
Synapse-Specific Caveats
- User impersonation is specific to the script and session in which it was set. Opening a new script will revert the user back to themselves.
User Impersonation with Databricks Spark
Scala Clusters
Immuta discourages use of this feature with Scala clusters, as the proper security mechanisms were not built to account for user isolation limitations in Scala clusters. Instead, this feature was developed for the BI tool use case in which service accounts connecting to the Databricks cluster need to impersonate Immuta users so that policies can be enforced.
Databricks user impersonation allows a Databricks user to impersonate an Immuta user. With this feature,
- the Immuta user who is being impersonated does not have to have a Databricks account, but they must have an Immuta account.
- the Databricks user who is impersonating an Immuta user does not have to be associated with Immuta. For example, this could be a service account.
When acting under impersonation, the Databricks user loses their privileged access, so they can only access the tables the Immuta user has access to and only perform DDL commands when that user is acting under an allowed circumstance (such as workspaces, scratch paths, or non-Immuta reads/writes).
1 - Configure User Impersonation
Follow one of these methods to allow specified Databricks users to impersonate Immuta users:
-
In the cluster policy JSON in the Immuta UI, add a comma-separated list of Databricks users who are allowed to impersonate Immuta users for the
IMMUTA_SPARK_DATABRICKS_ALLOWED_IMPERSONATION_USERSSpark environment variable."spark_env_vars.IMMUTA_SPARK_DATABRICKS_ALLOWED_IMPERSONATION_USERS": { "type": "fixed", "value": "edixon@example.com,dakota@example.com" } -
In the Spark environment variables section of the Databricks UI, add
IMMUTA_SPARK_DATABRICKS_ALLOWED_IMPERSONATION_USERSfollowed by a comma-separated list of Databricks users who are allowed to impersonate Immuta users.IMMUTA_SPARK_DATABRICKS_ALLOWED_IMPERSONATION_USERS=edixon@example.com,dakota@example.com -
In the
immuta_conf.xmlfile, addimmuta.spark.databricks.allowed.impersonation.usersfollowed by a comma-separated list of Databricks users who are allowed to impersonate Immuta users. Note: This file is no longer required or staged as a deployment artifact, but can still be used to set properties.immuta.spark.databricks.allowed.impersonation.users edixon@example.com,dakota@example.com
Prevent Users from Changing Impersonation User in a Given Session
If your BI tool or other service allows users to submit arbitrary SQL or issue SET commands, set
IMMUTA_SPARK_DATABRICKS_SINGLE_IMPERSONATION_USER to
true to prevent users from changing their impersonation user once it has been set for a given Spark session.
2 - Impersonate a User
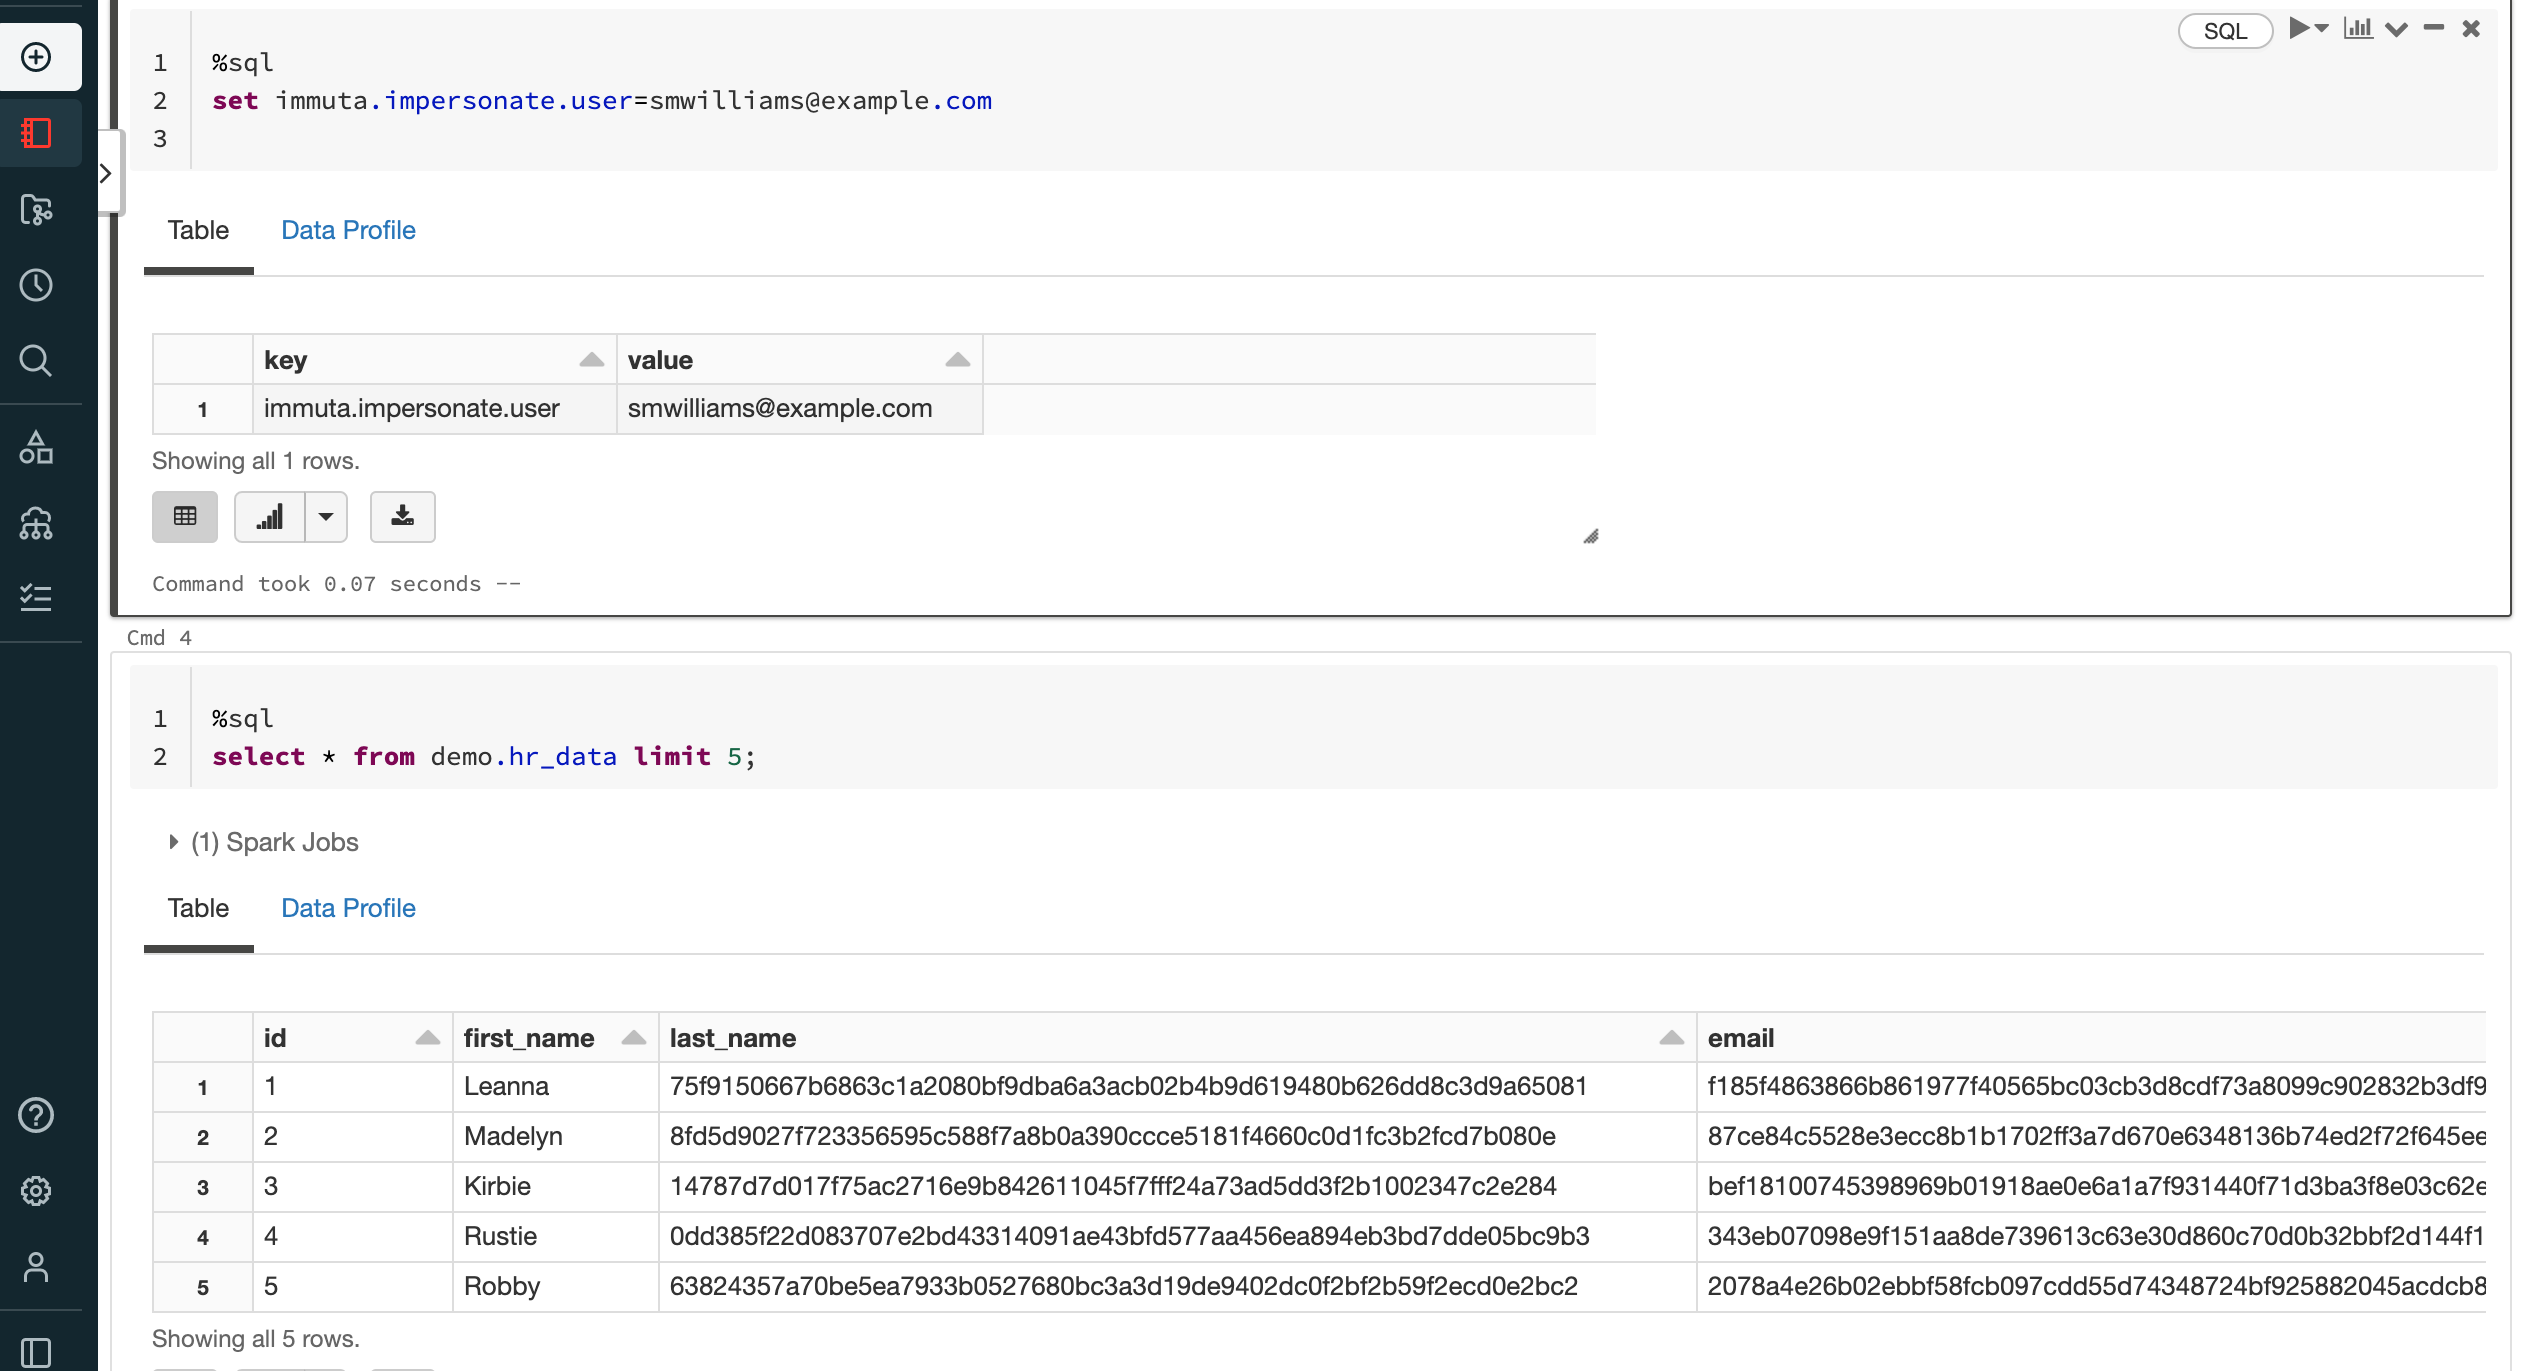
Once the cluster is configured with a list of Databricks users who are allowed to impersonate Immuta users, run the following SQL command to set the user you want to impersonate:
%sql
set immuta.impersonate.user=smwilliams@example.com
This command generates an API token for the specified user that queries Immuta for metadata pertinent to that user.
When generating the token, the impersonated username is matched with the corresponding IAM user. The IAM used by
default is the built-in IAM in Immuta, but can be set using the
IMMUTA_USER_MAPPING_IAMID
environment variable.
3 - Query Data
Run queries as the impersonated Immuta user:
%sql
set immuta.impersonate.user=smwilliams@example.com
select * from demo.hr_data limit 10;
Example Queries
Once impersonation is active, any query issued in the session will have the appropriate data and subscription policies applied for the impersonated user. Consider the example queries in the tabs below.
Without User Impersonation
Policies on this data source mask sensitive values unless users possess a specified attribute.
In the screenshot below, the user querying the data possesses that attribute, so they can see the values in the clear.

With User Impersonation
Policies on this data source mask sensitive values unless users possess a specified attribute.
In the screenshot below, the user queries the data source impersonating an Immuta user (smwilliams@example.com)
who does not possess that attribute, so the sensitive data is masked.
Audited Queries
Audited queries include an impersonationUser field, which identifies the Databricks user impersonating the Immuta
user:
{
  "id": "query-a20e-493e-id-c1ada0a23a26",
  "dateTime": "1639684812845",
  "month": 1463,
  "profileId": 4,
  "userId": "smwilliams@example.com",
  "dataSourceId": 1,
  "dataSourceName": "Hr Data",
  "count": 1,
  "recordType": "spark",
  "success": true,
  "component": "dataSource",
  "accessType": "query",
  "query": "Relation[id#2644,first_name#2645,last_name#2646,email#2647,gender#2648,race#2649,ssn#2650,dept#2651,job#2652,skills#2653,salary#2654,type#2655] parquet\n",
  "extra": {
    "databricksWorkspaceID": "0",
    "maskedColumns": {},
    "metastoreTables": [
      "demo.hr_data"
    ],
    "clusterName": "your-cluster-name",
    "pathUris": [
      "dbfs:/user/hive/warehouse/demo.db/hr_data"
    ],
    "queryText": "select * from demo.hr_data limit 10;",
    "queryLanguage": "sql",
    "clusterID": "your-171358-cluster-id",
    "impersonationUser": "edixon@example.com"
  },
  "dataSourceTableName": "demo_hr_data",
  "createdAt": "2021-12-16T20:00:12.850Z",
  "updatedAt": "2021-12-16T20:00:12.850Z"
}
4 - End User Impersonation
To end user impersonation for the session, run
%sql
set immuta.impersonate.user=
Databricks-Specific Caveats
- The only way to enable this feature is through cluster configuration. The
IMPERSONATE_USERpermission in Immuta will not allow a user to perform native impersonation in Databricks.
User Impersonation with Starburst (Trino)
1 - Grant Users the IMPERSONATE_USER Permission
User impersonation is automatically enabled with your Starburst (Trino) integration, but the authenticated user must be
given the IMPERSONATE_USER
permission in Immuta or match the Starburst (Trino)
immuta.user.admin regex configuration property.
To grant the user IMPERSONATE_USER permission, as an Immuta user with the permission USER_ADMIN,
-
Navigate to your Immuta homepage.
-
Click the Admin icon in the left sidebar, and select the user from the Users tab.
-
Click Add Permissions.
-
Click the Select Permission dropdown, and select the IMPERSONATE_USER permission.
-
Click Close.
2 - Impersonate a User
The Starburst (Trino) integration supports the native Trino impersonation approaches:
-
JDBC method: In your JDBC connection driver properties, set the
sessionUserproperty to the Immuta user you want to impersonate. See the Trino JDBC driver documentation for details. -
Trino CLI method: Set the
--session-userproperty to specify the session user as the Immuta user you want to impersonate when invoking the Trino CLI. See the Trino release notes for details.
3 - Check User Impersonation
To view the user you are impersonating, run SHOW SESSION like 'immuta.immuta_user'.
4 - End User Impersonation
To end user impersonation, run RESET SESSION immuta.immuta_user.
5 - Revoke Users' IMPERSONATE_USER Permission
To revoke permission to impersonate users, as an Immuta user with the permission USER_ADMIN,
-
Navigate to your Immuta homepage.
-
Click the Admin icon in the left sidebar, and select the user from the Users tab.
-
Click the delete icon on the IMPERSONATE_USER permission.
Caveats
- The user's permissions to impersonate users are not checked until the query is run. If the user does not have the IMPERSONATE_USER permission in Immuta, they will be able to run the command to impersonate a role, but will not be able to query as that role.
User Impersonation with Snowflake
1 - Enable User Impersonation
Select Enable Impersonation when configuring the Snowflake integration on the App Settings page.
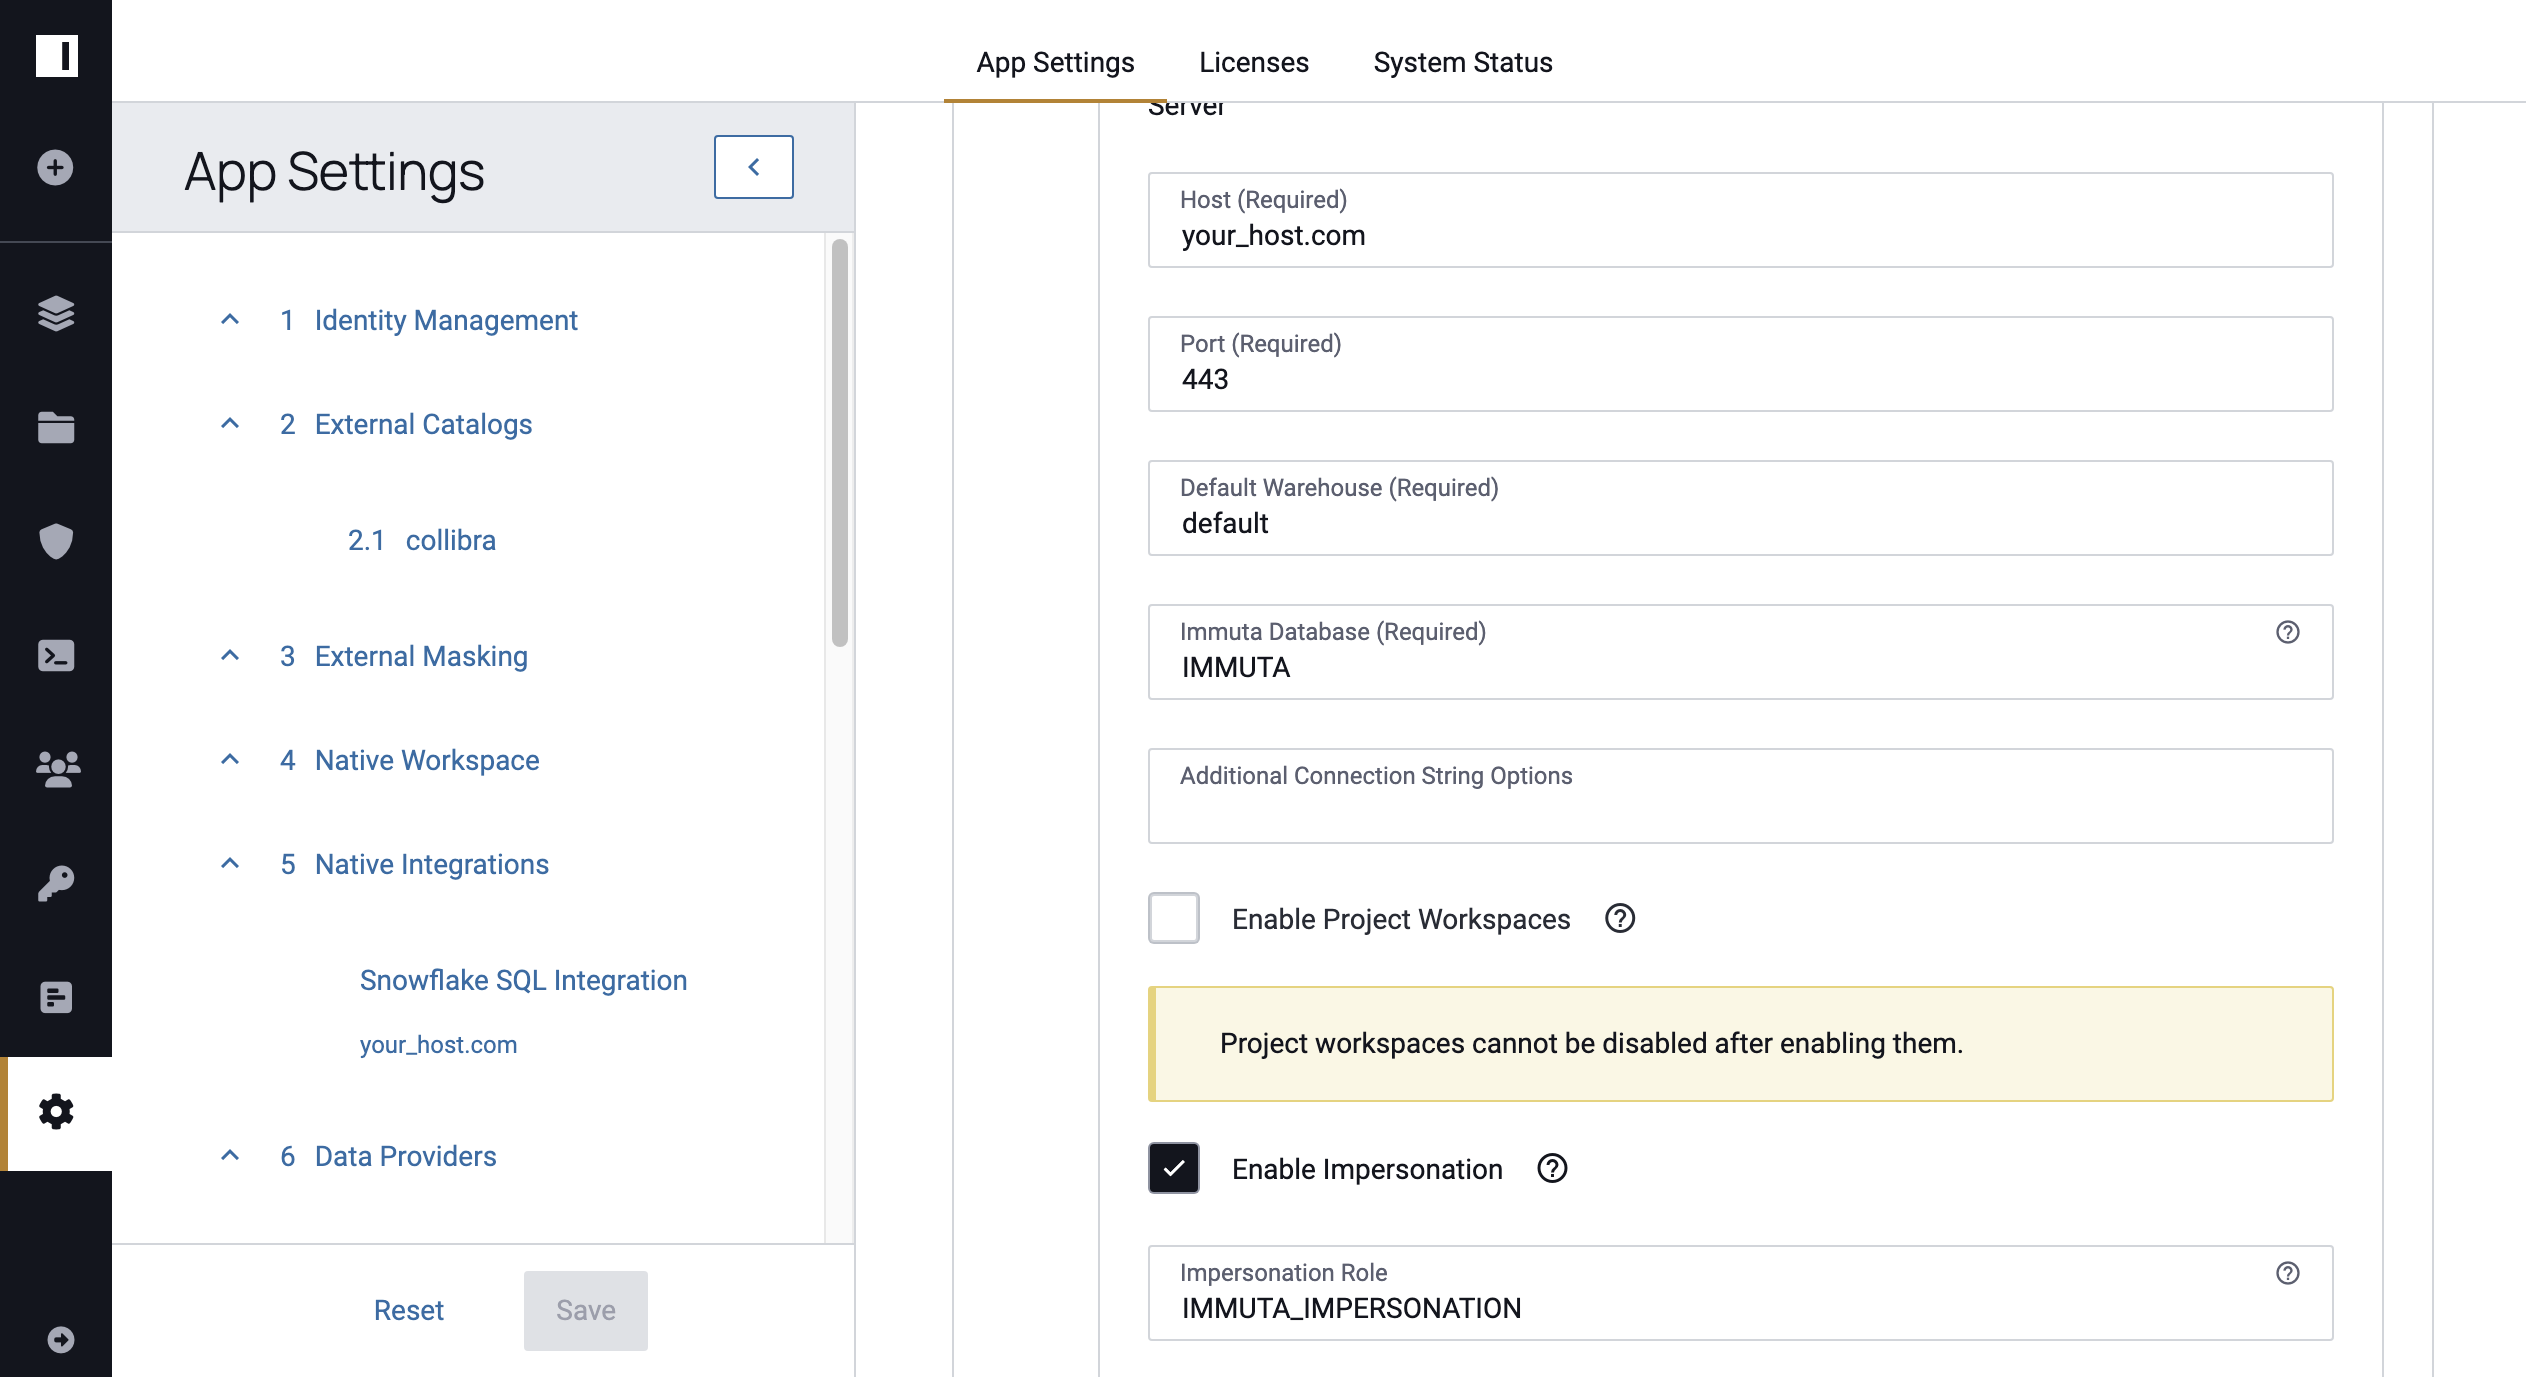
2 - Grant Users the IMPERSONATE_USER Permission
After enabling user impersonation with your Snowflake integration, there are two ways to give a user permission to use the feature: in the Immuta UI or in Snowflake. Use the tabs below to select one method.
Permission in Immuta
As an Immuta user with the permission USER_ADMIN,
-
Navigate to your Immuta homepage.
-
Click the Admin icon in the left sidebar, and select the user from the Users tab.
-
Click Add Permissions.
-
Click the Select Permission dropdown, and select the IMPERSONATE_USER permission.
-
Click Close.
Permission in Snowflake
As a Snowflake user with the ACCOUNTADMIN role,
-
Navigate to your Snowflake instance.
-
In a worksheet run
GRANT ROLE <<Impersonation_Role>> TO USER "<<Snowflake User>>".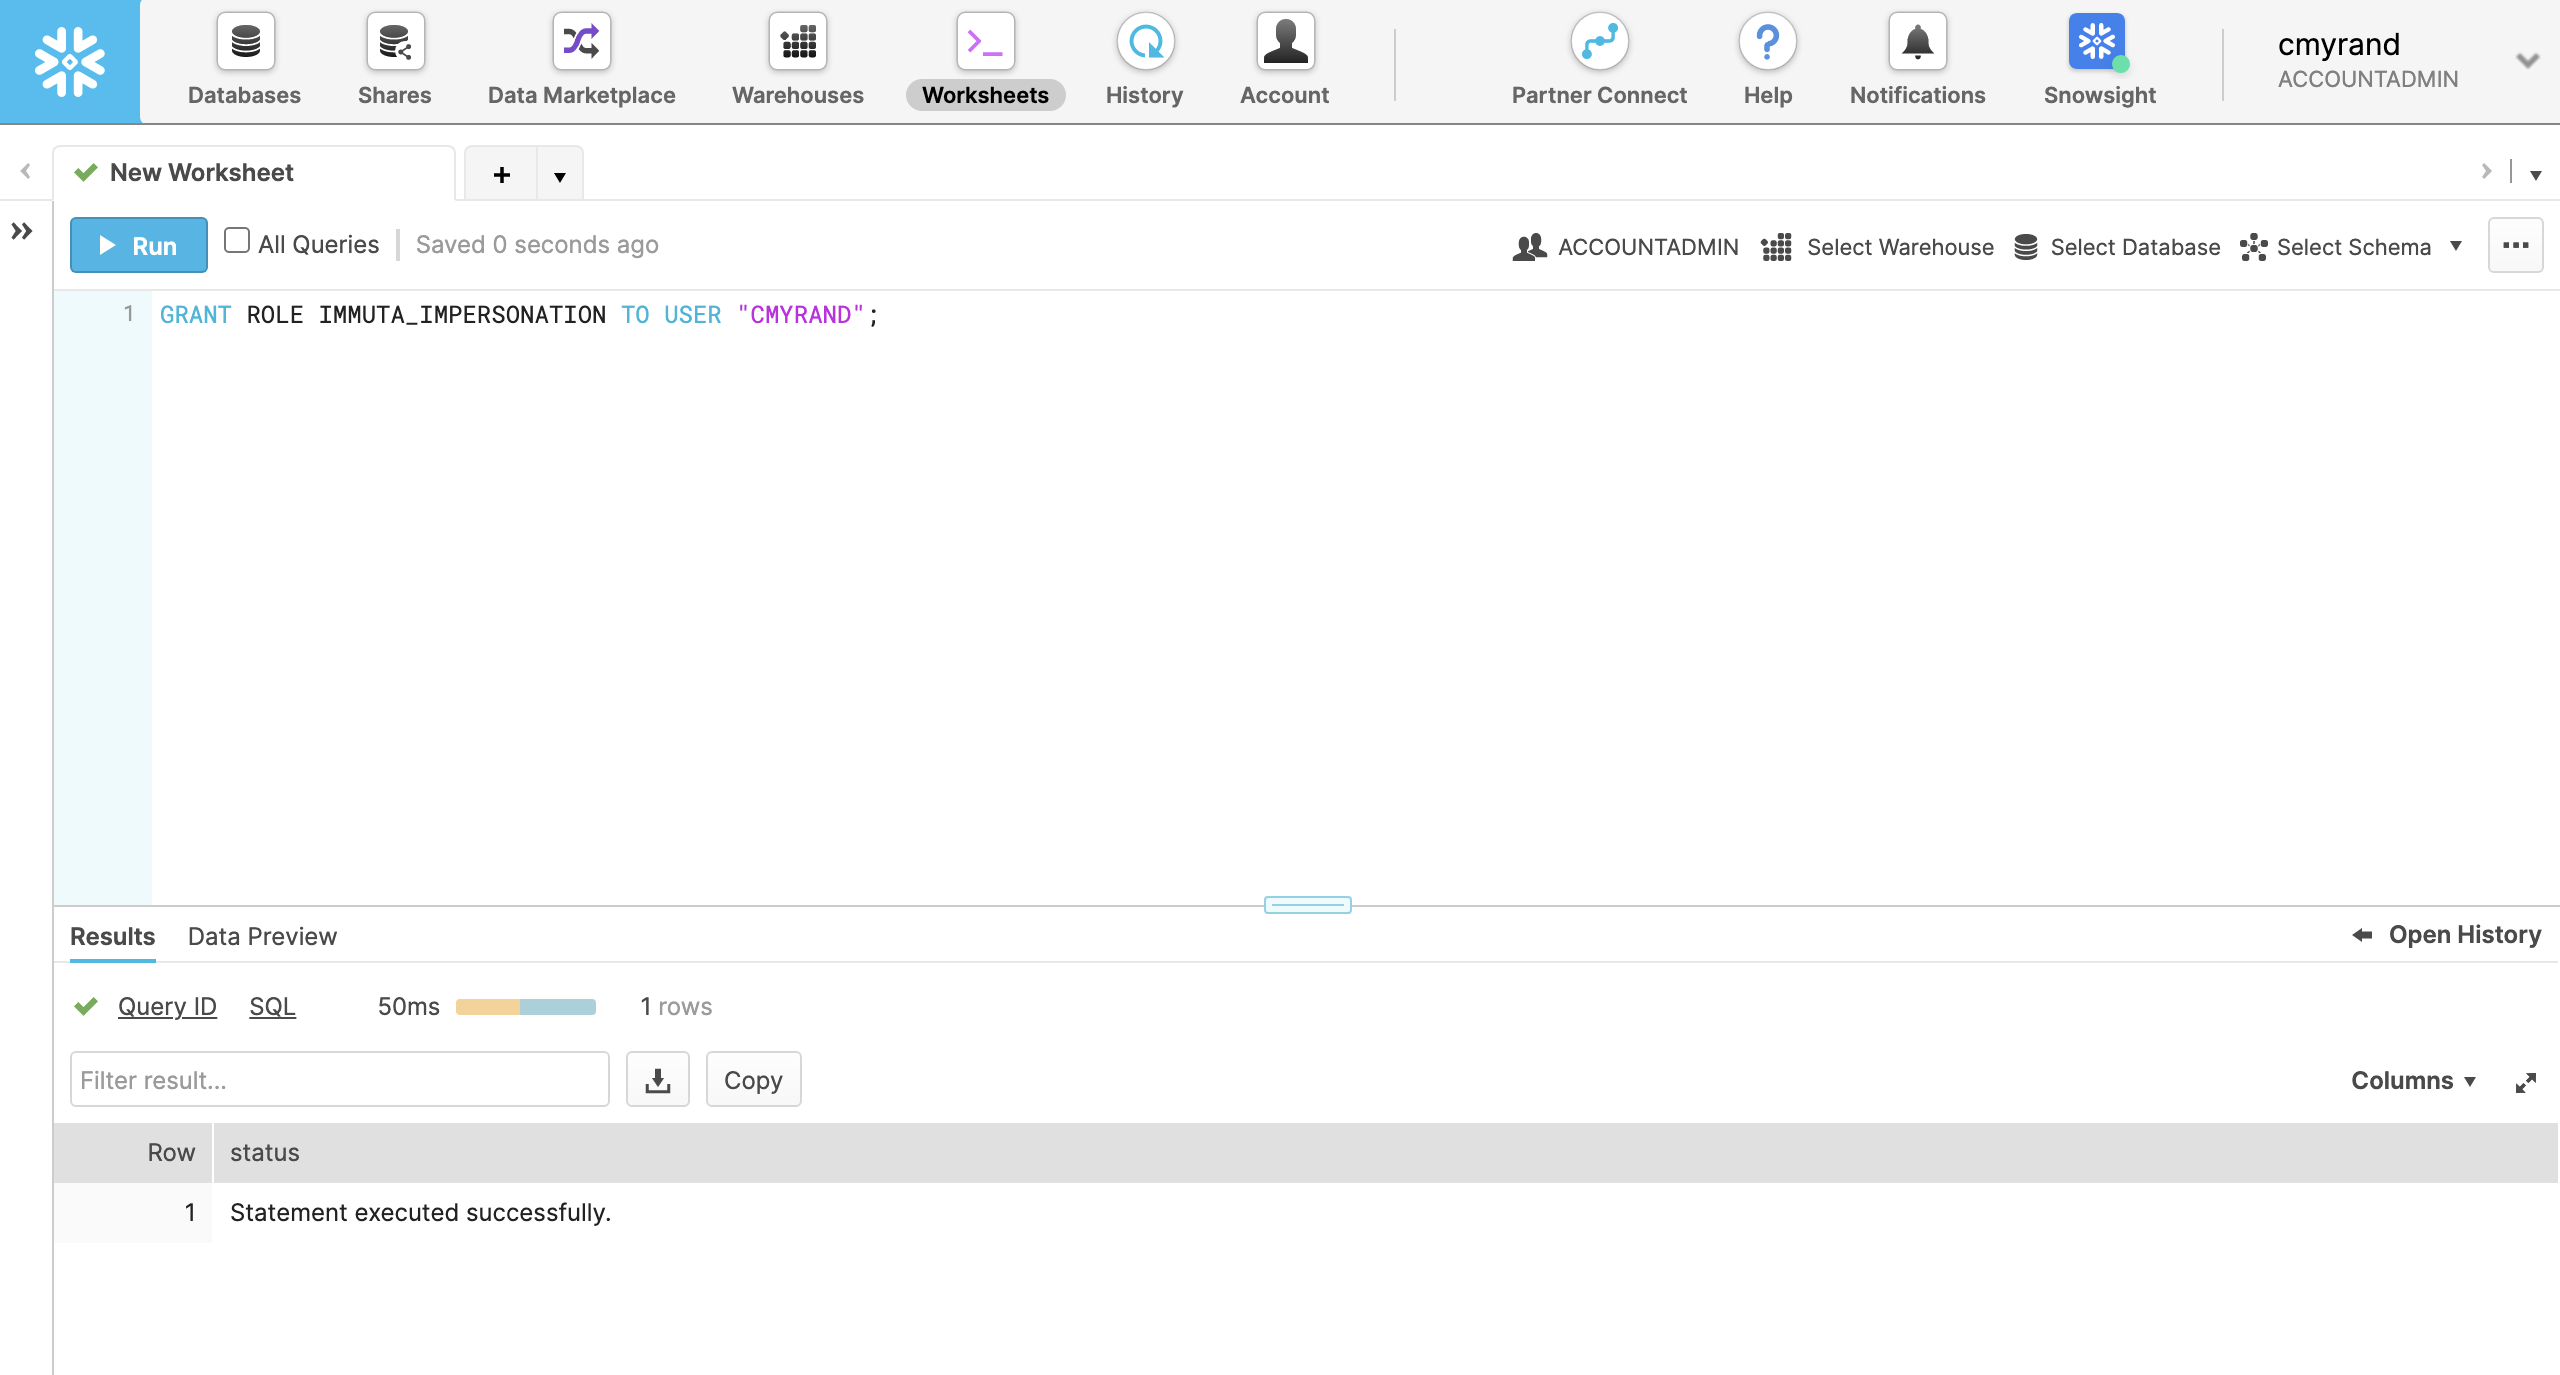
In this example, the
Impersonation Roleis the name entered on the Immuta App Settings page when the feature was enabled. The default is IMMUTA_IMPERSONATION, but the admin may have customized it. TheSnowflake Useris the username of the Snowflake user that will now have permission to impersonate other users.
3 - Impersonate a User
To impersonate another user in Snowflake,
- Open a New Worksheet and set your role to the impersonation role specific to your organization.
-
Run
SET immuta_user = '<<Immuta username of the user to impersonate>>'.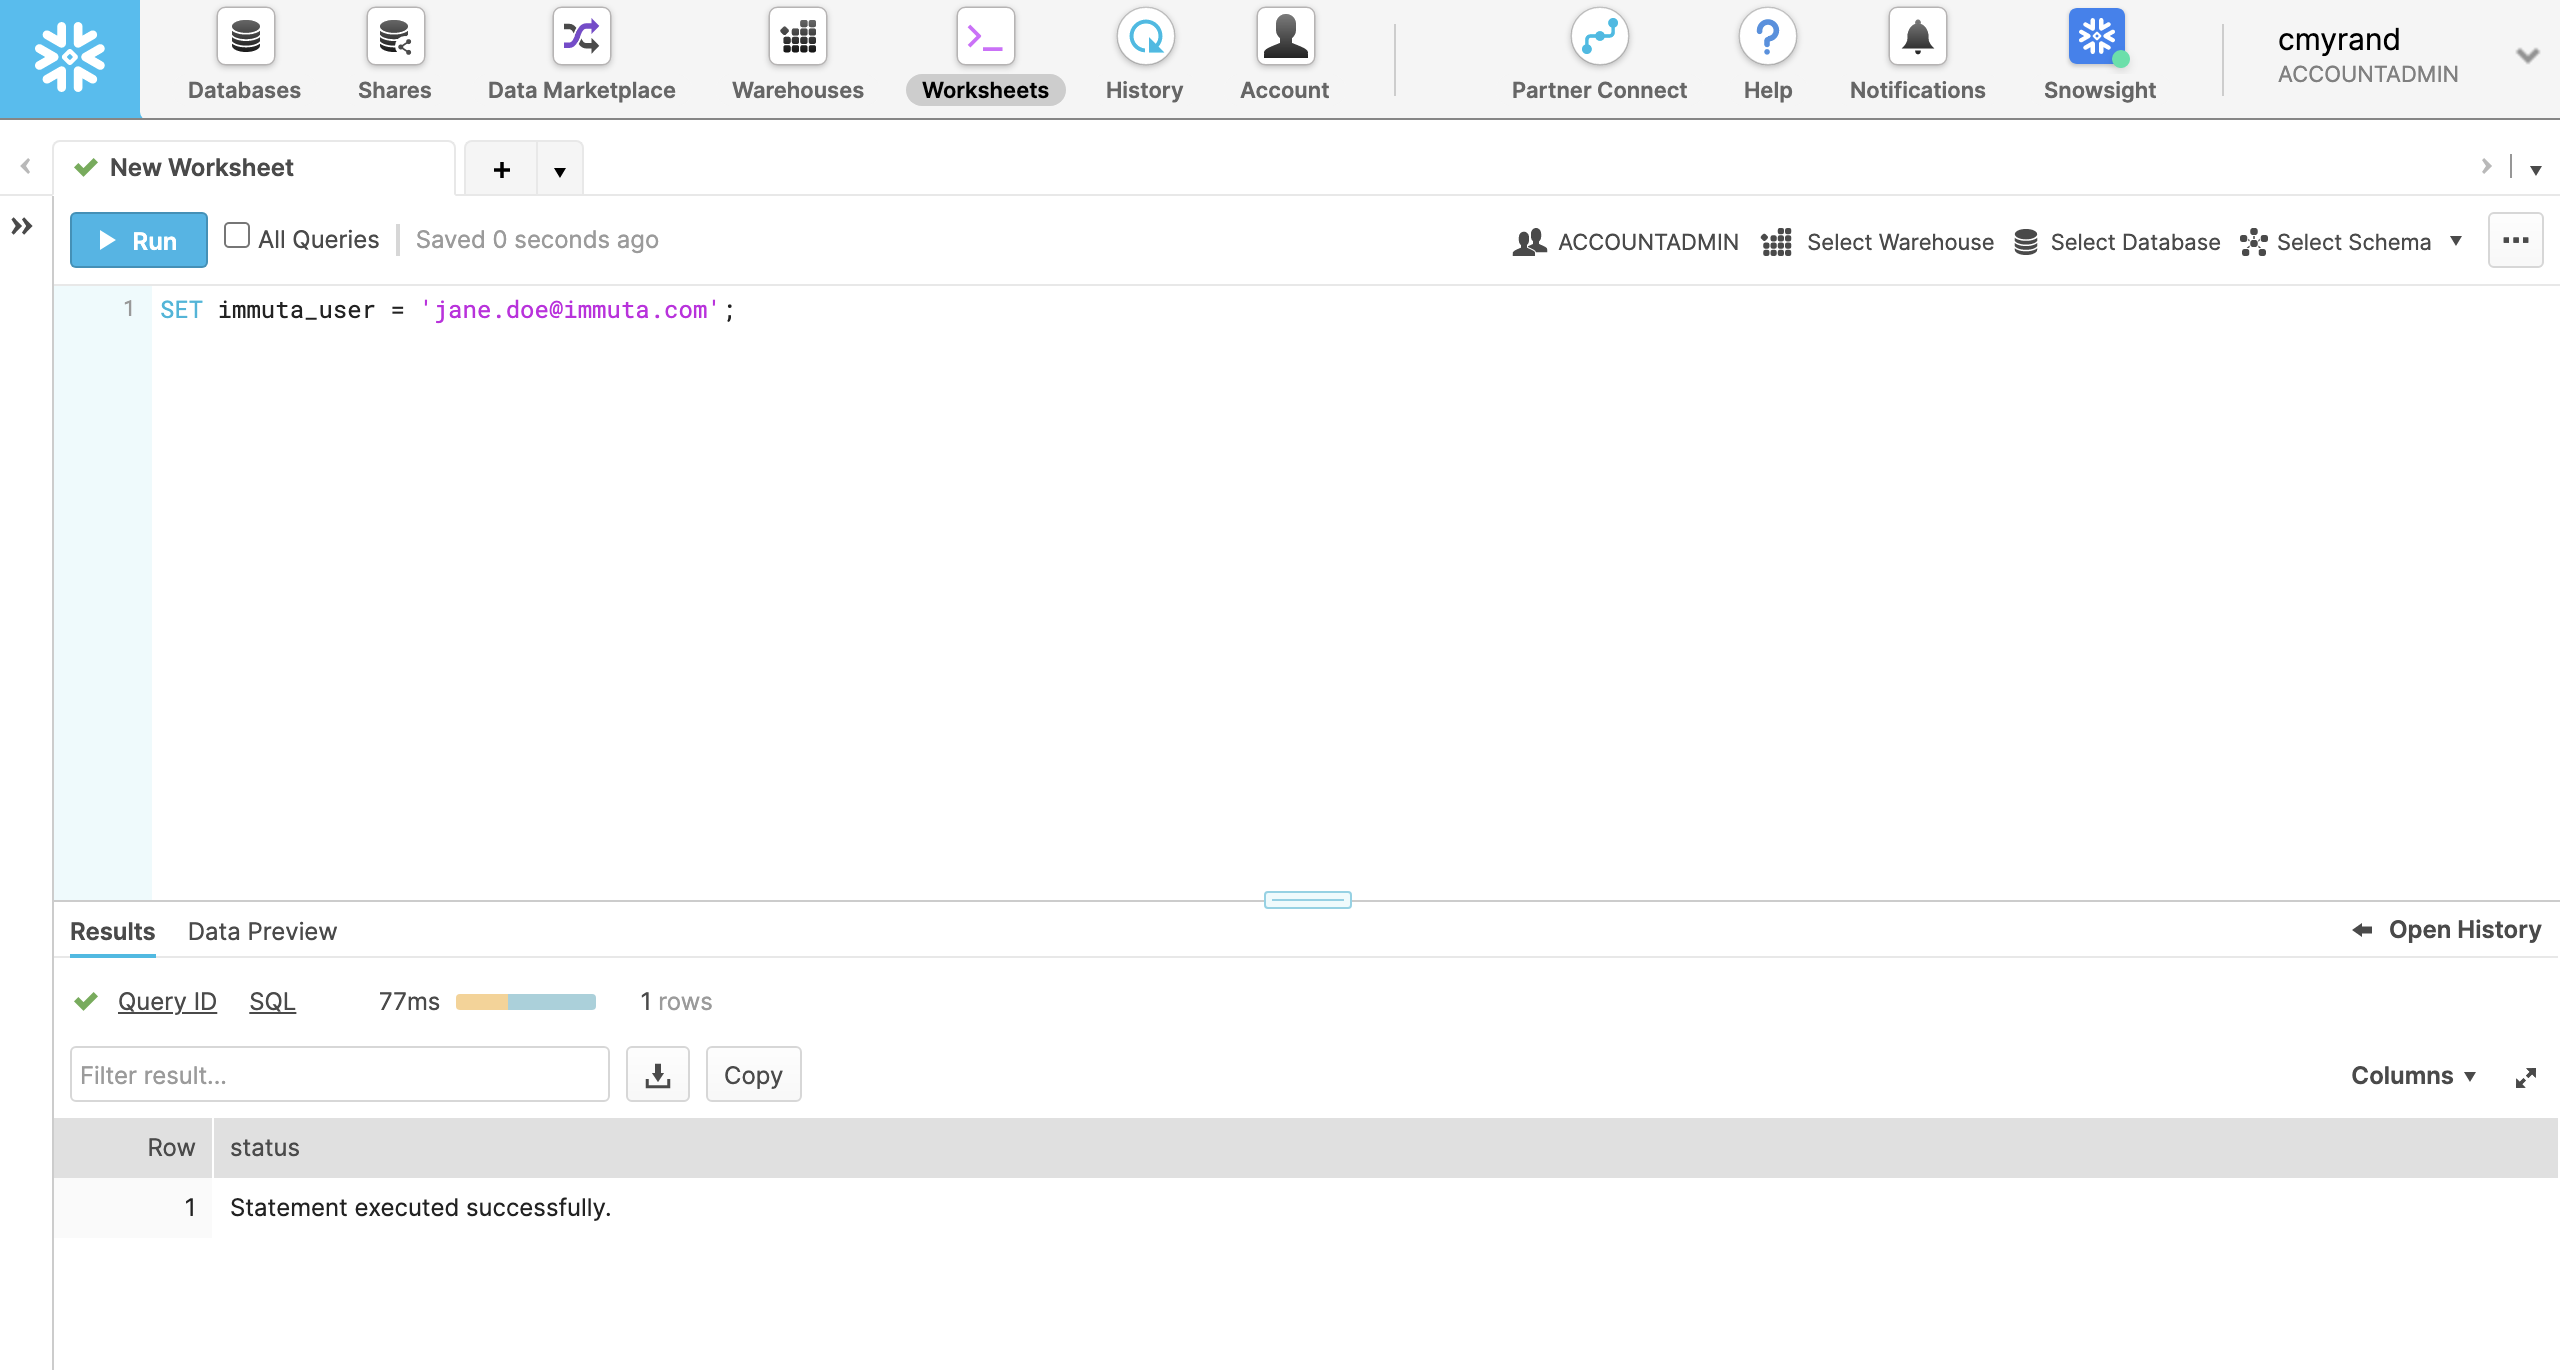
-
Run queries within that worksheet.
4 - Revoke Users' IMPERSONATE_USER Permission
To revoke permission to impersonate users,
Revoke Permission in Immuta
As an Immuta user with the permission USER_ADMIN,
-
Navigate to your Immuta homepage.
-
Click the Admin icon in the left sidebar, and select the user from the Users tab.
-
Click the delete icon on the IMPERSONATE_USER permission.
Revoke Permission in Snowflake
As a Snowflake user with the ACCOUNTADMIN role,
-
Navigate to your Snowflake instance.
-
In a worksheet run
REVOKE ROLE <<Impersonation Role>> FROM USER "<<Snowflake User>>".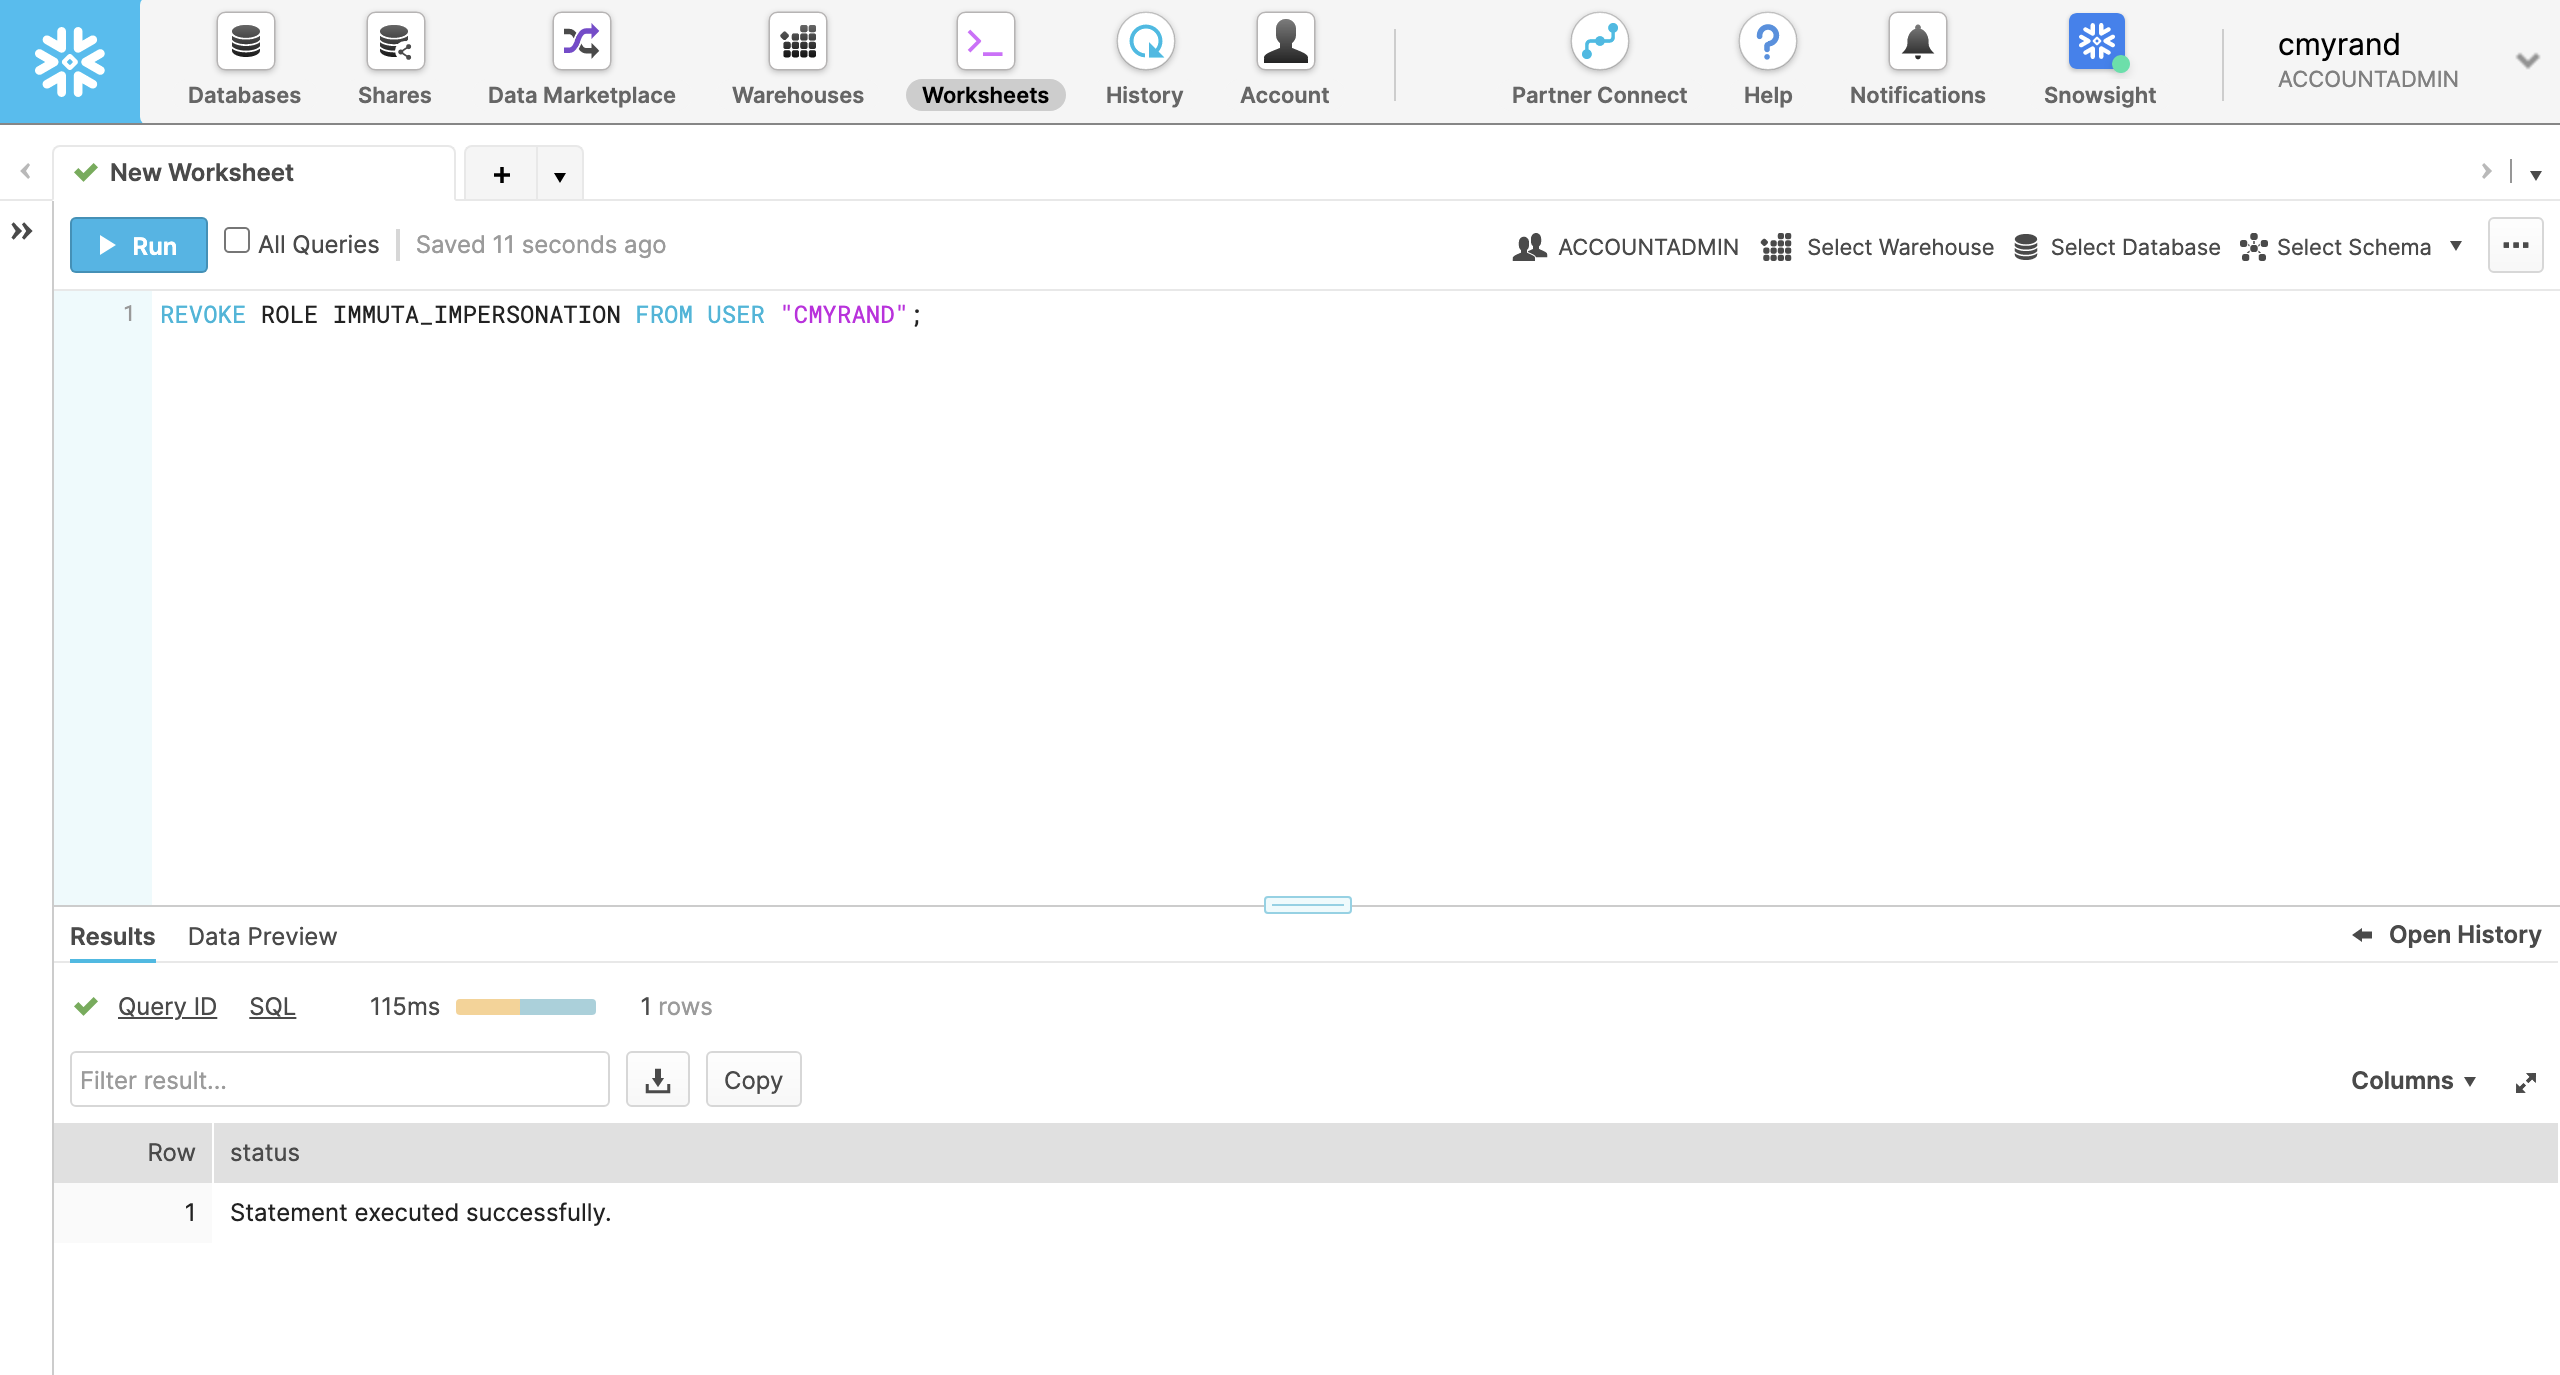
In this example, the
Impersonation Roleis the name entered on the Immuta App Settings page when the feature was enabled. The default is IMMUTA_IMPERSONATION, but the admin may have customized it. TheSnowflake Useris the username of the Snowflake user that will now have permission to impersonate other users.
Snowflake-Specific Caveats
- Native impersonation is specific to the workspace and session in which it was set. Opening a new worksheet will revert the user back to themselves.
- Snowflake auditing will show the user running the queries as the user logged in to Snowflake not as the user they are impersonating.