Configure Starburst (Trino) Integration
Deprecation notice
Support for this integration has been deprecated. Use the Starburst (Trino) v2.0 integration instead.
This page details how to configure the Starburst (Trino) integration.
Overview
The plugin comes pre-installed with Starburst Enterprise, so this page provides separate sets of guidelines for configuration:
- Starburst Cluster Configuration: These instructions are specific to Starburst Enterprise clusters.
- Trino Cluster Configuration: These instructions are specific to open-source Trino clusters.
Starburst Cluster Configuration
Installation Method
This installation method is only available to users on Starburst Enterprise. If you are using any other form of Trino, see the Trino Cluster Configuration section.
Prerequisite
The Starburst ODBC driver must be uploaded on the App Settings page.
1 - Enable the Integration
- Click the App Settings icon in the left sidebar.
- Scroll to the Native Integrations section and click Add Native Integration.
- Select Trino from the Native Integration Type dropdown menu.
- Click Save.
2 - Configure the Immuta Connector
-
Create a configuration file
immuta.propertieswith the following contents in theetc/catalogfolder:connector.name=immuta immuta.endpoint=https://your-immuta-url.com/ immuta.apikey=<your-api-key>
For more details, see Starburst's Event Listener documentation.
3 - Configure the Event Listener
- Create an
etc/event-listener.propertiesfile in the sameetc/catalogfolder. -
Copy the Event Listener Configuration items from the App Settings page and paste it in the
event-listener.propertiesfile: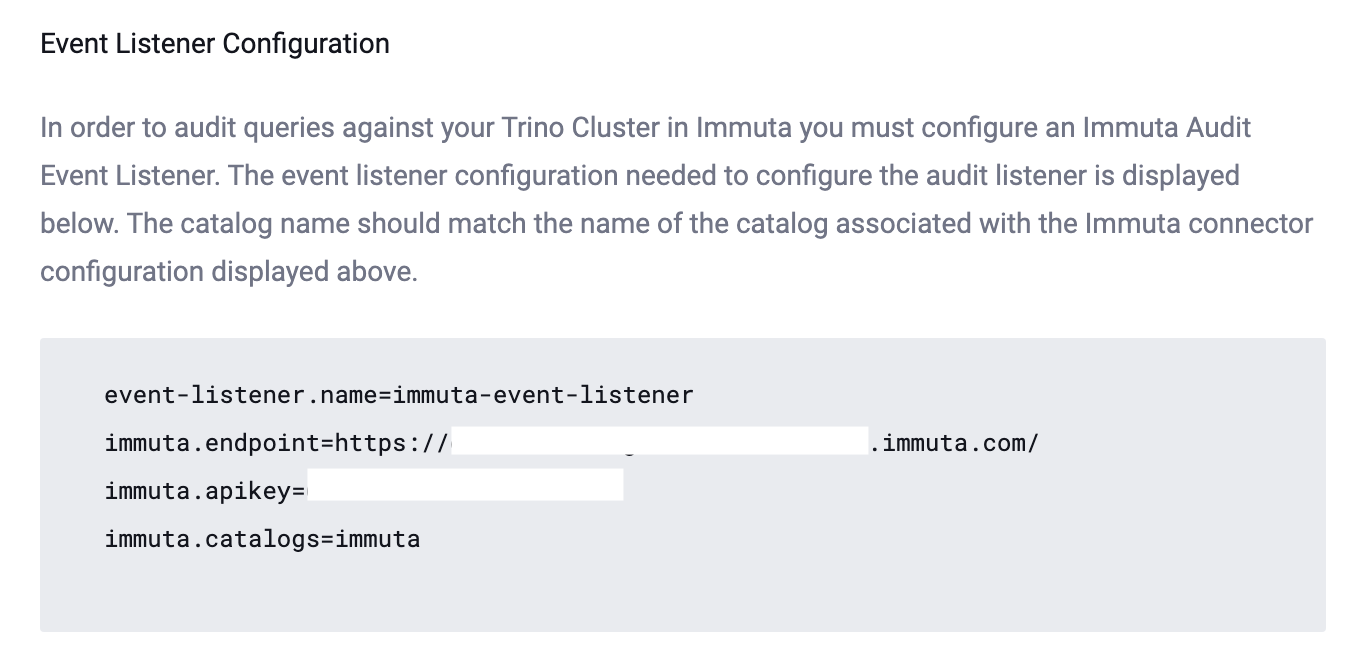
For more details, see Starburst's Event Listener documentation.
4 - Configure Starburst to Block Access
Best Practice: Give Users read-only Access to Immuta Catalog
Give users read-only access to the Immuta catalog. This will prevent users from describing the views, which in
turn prevents them from seeing secrets involved in some masking policies.
Follow Starburst's System Access Control documentation to configure Starburst to block access to any catalog that is not Immuta so that all user access has policies enacted on it.
Trino Cluster Configuration
1 - Enable the Integration
- Click the App Settings icon in the left sidebar.
- Scroll to the Native Integrations section and click Add Native Integration.
- Select Trino from the Native Integration Type dropdown menu.
- Click Save.
The catalog configuration displayed in this section will need to be written out on all nodes (/etc/trino/config/catalog/immuta.properties).
2 - Enable Immuta on Your Cluster
Best Practice: Immuta Archives Access Required
A user with access to Immuta's Archives site is required to conduct the download in this step from https://archives.immuta.com. If you are prompted to log in and need basic authentication credentials, reach out to your Immuta support professional.
-
The Immuta Trino plugin version is updated alongside Trino so that a matching version of the plugin is published for corresponding Trino releases. For example, the Immuta plugin version supporting Trino version 403 is simply version
403. Download the plugin from version from Immuta's Archives site that corresponds with the Trino version you use. -
Enable Immuta on your cluster. Select the tab below that corresponds to your installation method for instructions:
Docker installations for Trino versions 413 and older
- Download the plugin from Immuta's Archives site.
- Follow Trino's documentation to install the plugin archive on all nodes in your cluster.
- Extract the archive to a local directory and mount the local directory to
/usr/lib/trino/plugin/immutain the Docker container. - Install the plugin on all nodes within your cluster.
Docker installations for Trino versions 414 and newer
For Trino versions 414 and newer, you can use the
immuta-trinoDocker image (which includes the Trino plugin jars) from registry.immuta.com instead of thetrinodb/trinoDocker image.-
Pull the image and start the container. The example below specifies the Immuta Trino plugin version 414 with the
414tag, but any supported Trino version newer than 414 can be used:docker run registry.immuta.com/immuta/immuta-trino:414 -
Extract the archive to a local directory and mount the local directory to
/usr/lib/trino/plugin/immutain the Docker container.
Standalone installations
- Download the plugin from Immuta's Archives site.
- Follow Trino's documentation to install the plugin archive on all nodes in your cluster.
- Extract the archive to the
plugin/immutadirectory in the Trino installation directory. - Install the plugin on all nodes within your cluster.
3 - Configure the Immuta Connector
Best Practice: Trino Database Structure
The top level is set based on the name of the catalog properties files in the /etc/trino/catalog directory.
Use the name immuta.properties for this file, which will result in a Trino catalog named “immuta.”
-
Follow Trino's documentation to create this catalog directory:
/etc/trino/config/catalog. -
To configure the Immuta connector, mount the Immuta connector as the Immuta catalog: Create an
immuta.propertiesfile with the following contents, replacing the connection properties with your Trino Cluster Configuration displayed on the App Settings page:connector.name=immuta immuta.endpoint=https://your-immuta-url.com/ immuta.apikey=<your-api-key>
TLS Certificates
TLS Certificate Generation
If you provided your own TLS certificates during Immuta installation, you must ensure that the hostname in your certificate matches the hostname specified in the Starburst (Trino) configuration.
If you did not provide your own TLS certificates, Immuta generated these certificates for you during installation. See notes about your specific deployment method below for details.
-
Kubernetes Deployment: Immuta generates a local certificate authority (CA) that signs certificates for each service by default. Ensure that the
externalHostnameyou specified in the Immuta Helm Chart matches the Immuta hostname name specified in the Starburst (Trino) configuration. -
Single Node Docker Deployment: Ensure that the
hostnameyou specified in theimmuta.tomlfile matches the Immuta hostname name specified in the Starburst (Trino) configuration. If you did not specify this property in theimmuta.tomlfile, the installation script sets it for you based on the hostname of the server where you ran the script.
If the hostnames in your certificate don't match the hostname specified in your Starburst (Trino) integration, you
can set immuta.disable-hostname-verification to true to get the integration working in the interim.
The Starburst (Trino) integration uses the immuta.ca-file property to communicate with
Immuta. Specify a path to your CA file using the immuta.ca-file property.
Optional Parameters
You can include any of these parameters in your immuta.properties file to customize your integration.
immuta.ca-dataThe base64-encoded CA certificate to use when making calls to the Immuta Web Service.immuta.ca-file: The path to a CA file to use when making calls to the Immuta Web Service.immuta.cache.audit.seconds: The amount of time in seconds audit-related query metadata should be cached in the Immuta Metadata Database. If you customize this value, it should be set to a value longer than the longest running query you plan to execute against the Immuta catalog (The default is 24 hours.).immuta.cache.datasources.seconds: The amount of time in seconds a user's available data sources will be cached. Changing this will impact how quickly available data sources will show up when updating projects or subscriptions.immuta.cache.views.seconds: The amount of time in seconds that a user's view of a data source will be cached. Changing this will impact how quickly policy changes are reflected for users actively querying.immuta.disable-hostname-verification: Disable hostname verification when connecting to the Immuta Web Service.immuta.error-on-audit-failure: When set totrue, error out when an Immuta audit record can not be created. Only used when the Event Listener is enabled.
4 - Configure the Event Listener
- Create an
event-listener.propertiesfile in this directory:/etc/trino/. For more details, see Trino's Event Listener documentation. -
Copy the Event Listener Configuration items from the App Settings page and paste it in the
event-listener.propertiesfile:
5 - Configure Trino to Block Access
Best Practice: Give Users read-only Access to Immuta Catalog
Give users read-only access to the Immuta catalog. This will prevent users from describing the views, which in
turn prevents them from seeing secrets involved in some masking policies.
Follow Trino's System Access Control documentation to configure Trino to block access to any catalog that is not Immuta so that all user access has policies enacted on it.